This month, Rebecca Riordan looks at the surprisingly simple process of implementing an Explorer-style form architecture using the TreeView component that’s part of the Windows XP Common Control Library.
While I admit I’ve never done a formal survey, I suspect that the vast majority of forms implemented in Microsoft Access conform to one of two architectures: Either the forms display single records from a recordset, or they display records from multiple recordsets in a one-to-many relationship, typically with the many-side records displayed at the bottom of the form. Microsoft Access makes these basic form layouts easy to implement, and they’re certainly appropriate for the majority of situations.
There’s another common form layout that can be useful when the user is browsing data: the two-pane architecture exemplified by Windows Explorer. Figure 1 shows an example of this architecture, based on the Northwind sample database. As is typical in this type of form, the left pane contains a TreeView and the right pane displays the details of the item selected in that control. The TreeView control comes from the Windows Common Control Library, and it’s surprisingly easy to implement from within Microsoft Access, making an Explorer-style form imminently achievable.
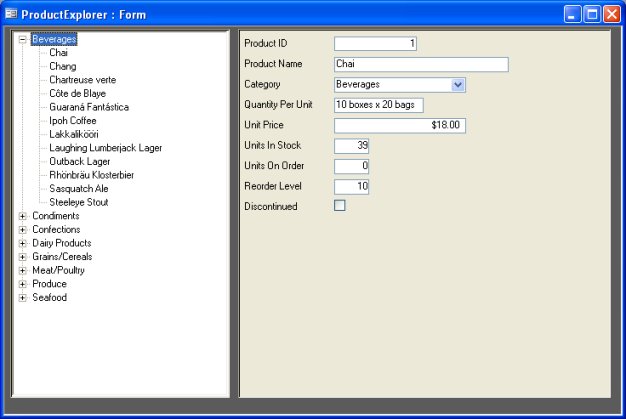
Figure 1
You’ll notice there are a couple of differences between this form and Windows Explorer:
- The details pane displays a simple sub-form rather than the ListView used by Windows Explorer.
- It isn’t possible for the user to adjust the amount of space allocated to the two panes.
It’s possible to use the ListView control in Access because the Windows Common Control Library exposes a ListView control. I’ll look at this solution in a future column. For now, I’ll stick with just using the TreeView control.
In other development environments, allowing the user to adjust the relative space allocated to the two panes would be achieved using a Splitter control. Unfortunately, neither Microsoft Access nor the Common Control Library provides a Splitter control, so this can’t easily be implemented in an Access form. You could, theoretically, duplicate the behavior using VBA, but it wouldn’t be a simple process (and also not the sort of problem that interests me–you’re on your own with this one).
Implementing the view
The first implementation step is, of course, to place the TreeView control on your form. The Windows Common Controls aren’t available in the Toolbox, so you’ll have to choose the More Controls button at the bottom of the Toolbox and select it from the list. The control you’re looking for is named “Microsoft TreeView Control.” You’ll probably have a couple of versions (my brand-spanking-new, nothing-but-Office-and-Visual-Studio-installed laptop has three versions). I’ve used version 6.0 for the sample application, but I’m not doing anything tricky here and earlier versions of the control will almost certainly work just fine.
Once you select the TreeView from the list, you can place it by simply clicking the form’s Detail section, just as you would add an intrinsic Microsoft Access control. Once placed, the control behaves like any other control: You can move and resize the control using the mouse, and set properties in the Property Window. The initial display of the control is shown in Figure 2 (if you place the control with a single mouse click, you’ll need to resize it before the sample data displays).
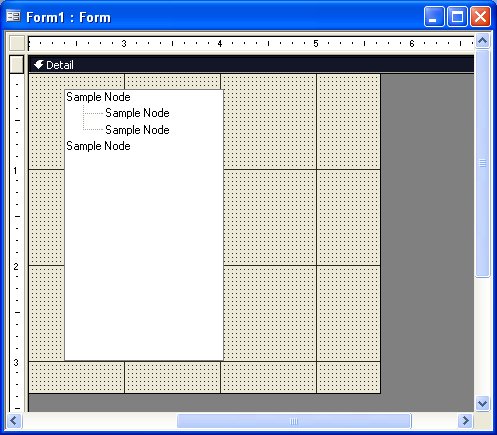
Figure 2
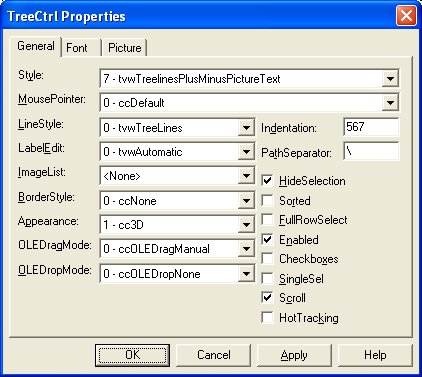
Like most ActiveX controls, the TreeView exposes some properties on the Microsoft Access Property Window, and also exposes a custom Property Sheet (the General tab is shown in Figure 3). In the sample application, I changed the Style property to “6 — tvwTreeLinesPlusMinusText” and the LineStyle property to “1 — tvwRootLines.” The control exposes a bunch of properties for you to play with the next time you’re bored on a rainy Sunday afternoon.
Figure 3
Loading the TreeView data
The TreeView isn’t data-bound, which means that you can’t display data by simply setting a few properties. But loading items into the control at runtime is fairly straightforward, using the following code in the Form Load event handler (you’ll find this code in the downloadable sample application):
Private Sub Form_Load()

Dim rsCat As DAO.Recordset

Dim qryProduct As DAO.QueryDef

Dim rsProduct As DAO.Recordset

Set rsCat = CurrentDb.OpenRecordset("CategoryList",_

          dbOpenForwardOnly)

   Set qryProduct = CurrentDb.QueryDefs("ProductList")

   Do While Not rsCat.EOF

      Dim theCat As Node

      Dim theProduct As Node

      Set theCat = Me.ExplorerPane.Nodes.Add(,,,_

                   rsCat!CategoryName)

      theCat.Tag = "Category"

      With qryProduct

         qryProduct.Parameters(0) = rsCat!CategoryID

         Set rsProduct = _

           qryProduct.OpenRecordset(dbOpenForwardOnly)

         Do While Not rsProduct.EOF

            Set theProduct = _

                 Me.ExplorerPane.Nodes.Add(theCat, _

                 tvwChild, , rsProduct!ProductName)

            theProduct.Tag = "Product"

            rsProduct.MoveNext

         Loop

     End With

     rsCat.MoveNext

   Loop

End Sub
My Form Load event begins by declaring some variables and then opens two queries: the CategoryList query (opened as a forward-only recordset) and the ProductList (opened as a QueryDef). As I mentioned earlier, I’ve used the Category and Product tables from the Northwind database for this sample, but I added the two queries, CategoryList and ProductList. The CategoryList query simply selects the CategoryName and CategoryID fields and sorts them by CategoryName:
SELECT Categories.CategoryName, Categories.CategoryID

FROM Categories

ORDER BY Categories.CategoryName;
The ProductList query is only marginally more complex. It uses a parameter (“theCategory”) to select the Products that match a specific CategoryID. Again, it sorts the results by ProductName. The TreeView control, like a ListBox, will sort data for you, but I always assume that the database will sort data faster than any other tool. The SELECT statement for the ProductList query looks like this:
SELECT Products.ProductName, Products.ProductID

FROM Products

WHERE (((Products.CategoryID)=[theCategory]))

ORDER BY Products.ProductName;
The next block of code loops through the CategoryList recordset, adding each Category and its subsidiary products to the TreeView. Each item displayed in the TreeView is represented as a Node object. You cannot create a Node directly using the New command, but you can get a new Node by calling the Add method of the TreeView’s Nodes collection. The Add method of the Nodes collection has the following syntax:
Add([Relative],[Relationship],[Key],[Text],[Image], _

    [SelectedImage])
All of the parameters are optional, and all of them can be set in code through properties on the Node object if you find that more convenient or easier to understand. I use the Node’s Text property to have the Node display the CategoryName, for instance.
After the code declares the two Node variables, the event handler uses that Add method to assign a reference to the Node variable named theCat. I then set the Text property to control the way the node is displayed in the TreeView list.
I don’t, however, assign a value to the Key parameter. As you’ll see, it would probably be more efficient to assign the CategoryID to this property, but I wasn’t able to make this work in testing–I suspect an incompatibility between String formats between Access and the Common Control Library. The next line of the event handler assigns the string value “Category” to the Tag property of the node. I’ll use this value later to control the details displayed in the other pane of the form.
Loading child data
The next block of code adds the Product records matching the current CategoryID to the TreeView hierarchy. First the CategoryID is passed to the QueryDef as a parameter, and then a forward-only recordset, rsProduct, is opened against the QueryDef. A loop then adds each record as a node to the TreeView.
This time around, however, the nodes are created as children of the Category by passing two additional parameters to the Add function. The first parameter, Relative, receives a reference to another Node and is used together with the second parameter, Relationship, to define where the new node should be placed in the node hierarchy. The values for the Relationship parameter are drawn from the TreeRelationshipConstants enumeration, which has the values tvwChild, tvwFirst, tvwLast, tvwNext, and tvwPrevious. If Relative is omitted, the new node is created relative to the top (or “root”) of the hierarchy.
In the sample, the current Category node is passed as the Relative parameter, and tvwChild is passed as the Relationship, which (not unexpectedly) creates the new nodes as children of the Category node. As with the Category nodes, the CategoryName field is passed as the Text of the new node, and the next line assigns the value “Product” to the Tag property.
The hierarchy in the sample is only two levels deep, but you can easily expand it by nesting additional loops in this basic structure. Simply use the current parent to loop through the child records and add each node in turn.
Displaying the detail
In the sample application, the details pane of the form displays one of two sub-forms depending on what level of hierarchy is selected in the TreeView. This is handled in the event handler for the NodeClick event, which is raised by the TreeView whenever the user selects a new item in its list. The NodeClick event handler from the sample application looks like this:
Private Sub ExplorerPane_NodeClick( _

                ByVal Node As Object)

Dim thePane As Form

    Select Case theNode.Tag

        Case "Product"

            Me.CategoryPane.Visible = False

            Set thePane = Me.ProductPane.Form

            thePane.Filter = "ProductName = """ & _

                             Node.Text & """"

            thePane.FilterOn = True

            Me.ProductPane.Visible = True

        Case "Category"

            Me.ProductPane.Visible = False

            Set thePane = Me.CategoryPane.Form

            thePane.Filter = "CategoryName = """ & _

                             Node.Text & """"

            thePane.FilterOn = True

            Me.CategoryPane.Visible = True

    End Select

End Sub
Again, the code for this procedure is quite straightforward and easily expandable. The event handler receives a reference to the Node that has been selected as a parameter. The code uses this reference to select the sub-form to display, based on the value of the node’s Tag property. In the sample, I could just as easily have used an If statement instead of a Select Case because there are only two options. But Select Case is more easily expanded to support additional hierarchies, and doesn’t (to the best of my knowledge) incur any significant performance penalties.
The code within each Case block is almost identical. First, the Visible property of the pane that is not being displayed is set to False. If you add additional levels to the hierarchy (and thus additional sub-forms), then you’ll need to add lines here. Don’t be tempted to move these lines to the top of the procedure to avoid duplication–your form may flicker.
After the appropriate sub-forms have been hidden, the code assigns the sub-form that’s to be shown to the user to the variable thePane. It sets the Filter property of the form to the value of the Text property of the node passed to the event handler, and sets the filter on. The code then sets the Visible property of the sub-form to True.
Looking ahead
And that’s it. Load the data items into the TreeView when the form itself is loaded, and set the visibility of the detail panes in the NodeClick event. That’s all you need to do to implement an Explorer-style form in Microsoft Access.
The sample application uses simple sub-forms created using the form wizard for display of the product and beverage details, but the detail forms can be arbitrarily complex. You can include tabs, nested subforms, whatever is required for your application.
In fact, you can use this same basic structure as the primary navigation mechanism for your application instead of a Switchboard. Just replace the data hierarchy in the TreeView with the hierarchy of functions in your application. You can even store the functional hierarchy in one or more tables to allow the application to be configured at runtime. Just store the name of the pane as a field, and load it at runtime.
Even though Microsoft Access doesn’t support it directly, the Explorer-style form architecture is straightforward to implement using the TreeView Common Control. This architecture displays much of the same information as a more traditional Access form with the sub-form in datasheet view, but it’s more effective when the user wants or needs to see a list of the items at all levels of the hierarchy. This isn’t common during data entry, but it’s extremely useful when browsing and maintaining information.
Other Pages On This Site You Might Like To Read
