Conditional formats let you flag exceptional values or highlight important results to your users. Rick Dobson shows you several easy (and powerful) ways to implement conditional formats and lower the bar dramatically when implementing conditional formats.
The Access Properties window makes it a snap to format controls. However, the substantial number and multiple settings for form control properties make it challenging to implement conditional formats from code at runtime. But starting with Access 2000, conditional formats became much simpler to do from code–letting you format controls based on their value at runtime.
I’m going to show you both manual and code-based approaches to managing conditional formats. Manually assigning conditional formats is easy at design time because Access provides a Conditional Formatting dialog box. With this dialog box, it can take just a few clicks to assign conditional formats based on data values. At the worst, you’ll just have to type in a control name or a simple expression. Programming conditional formats takes advantage of a special set of objects that exposes just a subset of form control properties in an easy-to-program way. In addition, the programmatic approach to conditional formats overcomes limitations of the Conditional Formatting dialog box–you can do more if you use code. One of these benefits is very obvious: You can let your users change conditional formats at runtime, customizing your application to match their preferences.
The Conditional Formatting dialog
Before you can use conditional formatting, you need an Access form with textboxes (or combo boxes) that display data values. My first example uses a query named qryDatesforOrders (based on the Orders table from the Northwind database). All of my examples can be found sample database file in this month’s download. The query returns the OrderID, OrderDate, RequiredDate, and ShippedDate column values from the Orders table. In addition, the query computes a string value, named Late, as either “True” or “False”. A WHERE clause limits the returned rows to those with an OrderDate column value from 3/1/98 through 3/5/98 whose Late column value isn’t null:
SELECT Orders.OrderID, Orders.OrderDate,

Orders.RequiredDate, Orders.ShippedDate,

IIf([ShippedDate]>[RequiredDate]=-1,

"True","False") AS Late

FROM Orders

WHERE (((Orders.OrderDate)>=DateValue("3/2/98")

And (Orders.OrderDate)<=DateValue("3/5/98"))

AND ((IIf([ShippedDate]>[RequiredDate]=-1,

"True","False")) Is Not Null));
The frmDatesForOrders form in Figure 1 displays the seventh and eighth rows from the query in a Continuous Forms view. These two rows show conditional formats on four textbox controls (the Late textbox has no formats):
- The OrderID textbox is disabled for row 7 but enabled for row 8.
- The OrderDate textbox is bold and green for row 7, but the same textbox in row 8 is bold and blue.
- The third and fourth conditional formats look the same, but are implemented slightly differently. The RequiredDate and ShippedDate textboxes are bold and red for row 8 but normal weight and black for row 7.
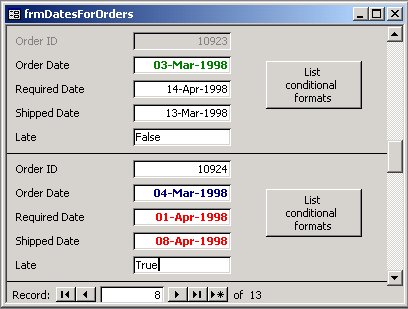
Figure 1
You assign conditional formats to a control by selecting the control in Design view and choosing Format | Conditional Formatting. This command opens a dialog box that lets you assign up to three conditional formats and set a default format for the selected control. Conditional formats apply when a condition, such as an expression, is true. The next section includes examples that show how to create the conditional formats in Figure 1 using the Conditional Formatting dialog box. I’ll describe these examples after briefly reviewing the Conditional Formatting dialog box features.
The Conditional Formatting dialog box allows you to set any of six properties for a control. Three format properties can be either true or false: bold (B), italics (I), and underline (U). A toggle button allows you to control the setting for each property. You can also set the background color and the foreground color from a pop-up box. The last toggle button on the Conditional Formatting dialog box lets you disable or enable a control (a control is enabled unless you explicitly disable it).
Add and Delete buttons at the bottom of the Conditional Formatting dialog box allow you to add and drop conditional formats. By default, the dialog box lets you set one conditional format and one default format. You can add up to two additional conditional formats with the names Condition 1, Condition 2, and Condition 3 (Access assigns names in the order that you create the conditional format). You cannot change the name for a conditional format, but you can delete any of the three conditional formats.
At runtime, Access checks to see if the condition for a format is valid, and applies the format if the condition is valid. The order for checking the conditions is Condition 1, Condition 2, and Condition 3. The first format with a valid condition has its format apply to the control. If no format has a valid condition, Access assigns the default format (which means that the Conditional Formatting dialog box’s default format isn’t actually a conditional format). Setting the default format in the Conditional Formatting dialog box is essentially like using the Properties window for a form control.
There are three possible rules for determining whether a condition for a format is valid:
- You can specify the type of the condition, using a dropdown box. Often the type will involve a comparison. You can also choose any of eight comparison operators (for example, equal to, greater than, or between) from another dropdown box that lets you specify a comparison operator.
- You can designate an expression. This provides more flexibility than comparing the selected control’s value to some other value because you’re not restricted to comparisons with the selected control. Whether you compare based on the selected control’s value or an expression, the format condition is valid if the comparison or expression is true.
- Finally, a condition can be valid if the selected control has focus–that is, the control is selected at runtime.
Testing conditions
With the OrderID textbox selected in Design view for the frmDatesForOrders form, the Conditional Formatting dialog box for the OrderID control shows that the OrderID control has a single conditional format. The format applies whenever the value in the Late textbox on the form equals the string “True”. You have to express the condition with a custom expression because a condition can’t reference the current control. This conditional format has no custom format settings, so it merely restores the normal representation of the contents for a textbox. The Default Formatting section of the dialog shows that the OrderID control will, by default, show its contents as disabled. The difference in the last formatting control between the Condition 1 and Default Formatting sections is critical: When the toggle control isn’t sunken, the conditional format disables the control.
Choosing between a custom expression and a simple condition can be entirely up to you. Figure 2 shows a pair of Conditional Formatting dialog boxes that both apply the same format, but with different settings. Both of these dialog boxes apply their format via settings in the Condition 1 section.
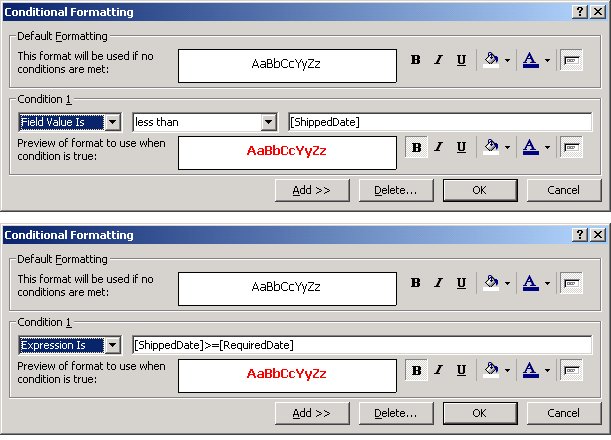
Figure 2
The top dialog box in Figure 2 is for the RequiredDate textbox. The format setting applies a bold red font to the contents of the dialog box whenever the value in the RequiredDate textbox is less than the value in the ShippedDate textbox. Unlike my previous example, this conditional format doesn’t use a custom expression. Instead, the conditional format represents the condition with a selection from a comparison operator dropdown box (less than) and a control name ([ShippedDate]).
Figure 2 shows, in its bottom pane, the Conditional Formatting dialog box for the ShippedDate textbox. The settings in this conditional format also apply a bold red font when its condition is satisfied. This condition, however, uses a custom expression to represent the condition. This custom expression for the ShippedDate textbox is equivalent to the selected condition for the RequiredDate textbox.
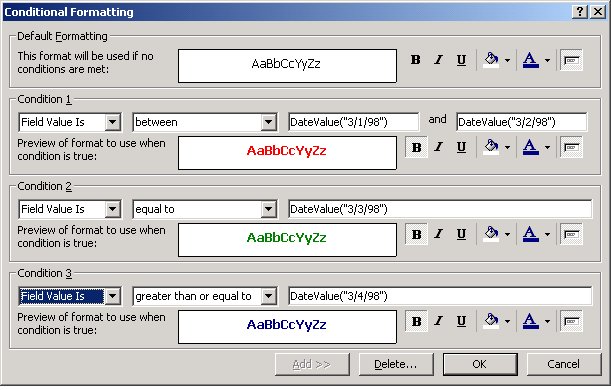
Implementing a test can sometimes require some data conversion. The settings for the OrderDate textbox, which appear in Figure 3, show three conditional formats in a Conditional Formatting dialog box, all based on a test against a date. The conditional fonts are bold and one of the following colors: red, green, or blue. Red is applied when the OrderDate value is between 3/1/98 and 3/2/98, Green when the OrderDate value equals 3/3/98, and Blue when the date in the textbox is greater than or equal to 3/4/98. All three of the conditions use the DateValue function to represent a string as a datetime value for comparison with the OrderDate textbox value.
Figure 3
Conditional format object model
Both textbox and combo box controls have a FormatConditions collection in the Access object model. You can program this collection with VBA to manage the number of FormatCondition objects that apply to any textbox or combo box control. A single FormatCondition object allows you to assign a conditional format to a control. The FormatConditions collection has four members that are especially important for managing FormatCondition objects:
- The Count property returns the number of FormatConditions for a control. Because you can only add up to three FormatCondition objects for any control, it’s important to check the Count property before attempting to add a new FormatCondition object.
- The Item property is the default member of the FormatConditions collection. The Item property will accept the values 0 (the first condition) through 2 (the final condition). These values map to individual FormatCondition objects within the FormatConditions collection.
- The Add and Delete methods for the FormatConditions collection let you add and drop FormatCondition objects for a control.
FormatCondition objects have a set of members that let you specify both the condition and format associated with a specific conditional format. It’s more common to just drop and reset a FormatCondition than it is to modify it because creating a new FormatCondition or dropping an existing FormatCondition from the FormatConditions collection is both simple and fast.
Four FormatCondition properties help to specify the condition for a format. These are Type, Operator, Expression1, and Expression2. The Type property for a FormatCondition indicates whether the object uses a field value, a custom expression, or is tied to a field having the focus on a form using the acFromatCondition type members to denote any of these options: acFieldValue, acExpression, and acFieldHasFocus. The Operator property of a FormatCondition lets you choose between eight comparison operators to specify a FormatCondition’s condition. The acFormatConditionOperator Type lists each of the eight condition operators. With two exceptions, the acFormatConditionOperator requires just one expression to be specified (Expression1). Only acBetween and acNotBetween require the assignment of values to both Expression1 and Expression2.
Other FormatCondition properties allow you to specify the format associated with a FormatCondition. The FontBold, FontItalic, and FontUnderline properties take True/False values to indicate whether to use bold, italics, or underlining for a font. The Enable property similarly takes a True/False value, but this property affects the availability of a control (disabled controls aren’t available for selection at runtime) and only indirectly the control’s appearance. Setting the Enable property to False prevents users from selecting the control. The ForeColor property takes any value output by an RGB function to specify the color for the text in the control. The BackColor property also takes RGB function values and specifies the background color for a control.
Creating FormatConditions
You might reasonably ask, why bother programming FormatCondition objects when it’s so easy to use the Conditional Formatting dialog box? One answer is that you can set conditional formats at runtime by programming FormatConditions to dynamically manage conditional formatting, but there are other benefits. The frmAssignFormat form in the sample database includes six option group controls that let a user control the format for the OrderDate textbox at runtime. This demonstrates one of the benefits of programming conditional formats. When the OrderDate control is disabled, it’s also bold, italicized, and underlined. With FormatCondition objects, you can combine options in a way not possible from the user interface–and it’s easy to do: Just make assignments to four Boolean property values.
The frmAssignFormat form in the sample database lets you make selections from the option group controls to specify a conditional format and then add the FormatCondition object for the OrderDate control. If the OrderDate textbox already has a FormatCondition object, the sample tells you and doesn’t add a new FormatCondition object. You can add the new FormatCondition after first clicking the Drop Format button to remove the previously existing conditional format.
The Click event procedure for the Add Format button (cmdAddFormat) starts by checking if any FormatCondition objects exist already. The Count property of the FormatConditions collection facilitates this check. If there are any existing FormatCondition objects, the code exits the procedure after reminding you of the problem:
If OrderDate.FormatConditions.Count > 0 Then
MsgBox “Conditional format already exists.”
Exit Sub
End If
The next code segment shows the syntax for the Add method in the FormatConditions collection. This method returns a FormatCondition object (fcd1). A Dim statement above the segment declares fcd1 as an instance of the FormatCondition class. The code segment sets the Type property to acExpression and the Operator property as acLessThanOrEqual. The custom expression is a string that indicates the condition applies just to Day function values for the OrderDate column less than or equal to 7:
Set fcd1 = _

OrderDate.FormatConditions.Add( _

acExpression, _

acLessThanOrEqual, _

"Day([OrderDate])<=7")
The preceding expression generates a FormatCondition object instance that you can refer to as OrderDate.FormatConditions(0). The next segment of code within the cmdAddFormat_Click procedure is quite long, but its design is very straightforward. It systematically goes through each of the option group controls and transforms the selection in a control to a format setting. All of the format settings apply to the OrderDate.FormatConditions(0) item. Therefore, you can use a With…End With statement to simplify and shorten the code. The following excerpt shows the beginning of the With…End With statement along with the code for transforming option group selections for the FontBold and FontItalic properties:
With OrderDate.FormatConditions(0)

If optBold = 1 Then

.FontBold = True

Else

.FontBold = False

End If

If optItalics = 1 Then

.FontItalic = True

Else

.FontItalic = False

End If
The code for the ForeColor and BackColor properties follows a different model than for the other formatting properties. This is because the form allows users to pick one of five colors for each color property. Option group values of 1 through 5 refer, respectively, to red, green, blue, white, and black. The following excerpt shows the use of a Select Case statement to translate an option group selection to a ForeColor property value.
Select Case optForeground

Case 1

.ForeColor = RGB(255, 0, 0)

Case 2

.ForeColor = RGB(0, 255, 0)

Case 3

.ForeColor = RGB(0, 0, 255)

Case 4

.ForeColor = RGB(255, 255, 255)

Case 5

.ForeColor = RGB(0, 0, 0)

End Select
This example relies on a single FormatCondition object, although the FormatCondition can assume a wide variety of user-configurable formats. Because the sample allows just one FormatCondition, users must drop any existing format before adding a new one. The application permits the dropping of a format via the Drop Format (cmdDropFormat) button. The following excerpt shows the code for the button’s Click event procedure. You can optionally program the solution to automatically drop an existing FormatCondition. Depending on your application, automatically dropping conditional formats may or may not be acceptable.
If Me.OrderDate.FormatConditions.Count _

> 0 Then

Me.OrderDate.FormatConditions(0).Delete

End If
More than three conditional formats
The first programming sample demonstrates one key benefit of programming conditional formats–enabling users to interact with form formatting at runtime. A second benefit of programming FormatCondition objects is the ability to work with more than three conditional formats concurrently. The following sample demonstrates how to handle five different formats at the same time. The sample uses the same query as a record source in the preceding sample but a different form, frmFiveFormats. This form has just two textboxes. The first one is for OrderID and the second one is for OrderDate.
This sample divides a month into as many as five segments of up to seven days each. These seven-day segments apply to the values showing in the OrderDate textbox. Each segment of days has a different format. The first three segment formats have a bold font of red, green, or blue on a white background. The last two segment formats flip the foreground and background colors–the fourth segment shows values in bold white on a black background, and the fifth segment displays values in bold black on a white background.
A trick for using five formats is to re-program the third conditional format at runtime. Immediately after the form loads, the third conditional format refers to the third block of seven days. Whenever the current row changes, an event procedure examines the Day function of the OrderDate value for the new row. If the Day function’s return value belongs to one of the first two blocks of seven days, no changes are made. However, if the Day function’s return value belongs to any seven-day block beyond the second one, the procedure determines to which seven day block the return value belongs and sets the third conditional format to the format for that block.
The sample implements its logic inside of two event procedures. The form’s Load event procedure initializes the first three conditional formats. The form’s Current event procedure updates the third conditional format whenever the row changes.
The following code segment shows an excerpt from the Load event procedure. The segment begins by clearing any pre-existing conditional formats. Then, the Load event procedure initializes conditional formats for the first three seven-day blocks. The sample declares the FormatCondition objects, fcd1, fcd2, and fcd3, at the module level. This convention makes fcd1, fcd2, and fcd3 available for manipulation by both the Load event and the Current event procedures.
The fcd1, fcd2, and fcd3 conditional formats apply to the OrderDate control value sequentially. If the Day function for the OrderDate value is less than or equal to 7, then fcd1 applies. If the Day function value for OrderDate is greater than 7 but less than or equal to 14, then fcd2 applies. Otherwise, fcd3 initially formats the value in the OrderDate control. As long as the initial OrderDate value falls within the first 21 days of a month, this logic will work properly. If the initial OrderDate value is greater than 21, then you need more sophisticated logic for the Load event procedure. The Current event procedure illustrates the kind of enhancement that you should make:
OrderDate.FormatConditions.Delete

Set fcd1 = _

OrderDate.FormatConditions.Add( _

acExpression, _

acLessThanOrEqual, _

"Day([OrderDate])<=7")

With OrderDate.FormatConditions(0)

.FontBold = True

.ForeColor = RGB(0, 0, 0)

.BackColor = RGB(255, 0, 0)

End With

Set fcd2 = _

OrderDate.FormatConditions.Add( _

acExpression, _

acLessThanOrEqual, _

"Day([OrderDate])<=14")

With OrderDate.FormatConditions(1)

.FontBold = True

.ForeColor = RGB(0, 0, 0)

.BackColor = RGB(0, 255, 0)

End With

Set fcd3 = _

OrderDate.FormatConditions.Add( _

acExpression, _

acLessThanOrEqual, _

"Day([OrderDate])<=21")

With OrderDate.FormatConditions(2)

.FontBold = True

.ForeColor = RGB(0, 0, 0)

.BackColor = RGB(0, 0, 255)

End With
The form’s Current event procedure starts by determining whether to delete the third conditional format. If the Day function value for the OrderDate column of the new row is less than or equal to 14, the code exits the procedure because the third format condition doesn’t apply. Otherwise, the procedure deletes the current third conditional format in preparation for replacing it. The following code segment presents the VBA for implementing this logic:
Dim intDay As Integer

intDay = Day([OrderDate])

If intDay <= 14 Then

Exit Sub

Else

Me.OrderDate.FormatConditions(2).Delete

End If
The remainder of the form’s Current event procedure is a Case Select statement that invokes one of three sets of code that assigns the format for the third, fourth, or fifth seven-day block to fcd3. If intDay is less than or equal to 21, the first Case clause assigns the third seven-day format. If intDay is less than or equal to 28, the second Case clause assigns the fourth seven-day format. Otherwise, the third Case clause assigns the fifth seven-day format.
Select Case intDay

Case Is <= 21

Set fcd3 = _

OrderDate.FormatConditions.Add( _

acExpression, _

acLessThanOrEqual, _

"Day([OrderDate])<=21")

With OrderDate.FormatConditions(2)

.FontBold = True

.ForeColor = RGB(0, 0, 0)

.BackColor = RGB(0, 0, 255)

End With

Case Is <= 28

Set fcd3 = _

OrderDate.FormatConditions.Add( _

acExpression, _

acLessThanOrEqual, _

"Day([OrderDate])<=28")

With OrderDate.FormatConditions(2)

.FontBold = True

.ForeColor = RGB(255, 255, 255)

.BackColor = RGB(0, 0, 0)

End With

Case Is > 28

Set fcd3 = _

OrderDate.FormatConditions.Add( _

acExpression, _

acGreaterThan, _

"Day([OrderDate])>28")

With OrderDate.FormatConditions(2)

.FontBold = True

.ForeColor = RGB(0, 0, 0)

.BackColor = RGB(255, 255, 255)

End With

End Select
As you can see, conditional formats are as easy to assign and manage with VBA as they are with the Conditional Formatting dialog box. The capabilities provided by the dialog box and FormatCondition objects dramatically simplify the task of conditionally formatting textbox and combo controls on forms. Furthermore, these same techniques apply to textboxes in reports as well. So long as you can accommodate an application’s requirements with the six formatting properties available via this approach, you’ll be able to expedite your application development at the same time that you add important functionality.
This Article Continues Here
Listing Conditional Formats
Eventful Formatting for Access Forms
