You’re probably doing too much work–you should be taking advantage of your DBMS’s facilities to get more done in less time. Andrew Wrigley discusses how the principles of declarative design, cascading, and overriding let you have Jet, SQL Server do more work for you.
Access developers often plunge in and, if they ignore the chorus of fearful angels, the inevitable result is a Greek tragedy–a database that requires ever increasing amounts of code in order to work effectively. Every project is different, but the basic guidelines are written in stone: Don’t spend time fighting and/or duplicating what Access is designed to do for you. Instead, invest in learning how to get the most out of Access. The secret of good Access database design is to only add or override what you absolutely have to. Anything else is fudge.
The skill of modeling real-world processes into software and database files takes, well, a lifetime to learn. However, the fundamentals of harnessing what Access is designed to do for you can be covered in 30 minutes or less. And it doesn’t require any VBA code or SQL. On the contrary, everything I’ll cover is achieved just by setting properties. The issue is to understand what properties must be set. When you know that, you get the maximum effect with the minimum time spent.
There are three tools that you need to use to succeed with this approach:
- Declarative database design–Pack as much of your design as possible into up-front “declarations” (property settings).
- The cascade–Access will cascade your declarative design throughout the rest of your project.
- Overriding the cascade–There are, however, some times when you want to override this cascade to make your designs more flexible.
Declarative database design
The Access package includes many things, including a database management system (DBMS)–either Jet or MDSE. You should view your DBMS as a tool that saves you an enormous amount of time and effort on issues that would be difficult and tedious to program yourself. All you need to do to harness your DBMS is set some properties; no code is required.
The bad news is that you need to grasp exactly what each property actually “means” and what impact each setting has on the rest of your application. The properties that give you a handle on Access’ DBMS capabilities involve the Database object itself, your tables and fields, and the relationships between your tables. I need a collective name to refer to the set of these properties. The best that I can come up with is “DBMS Handles.” You won’t find this term used anywhere else, but it serves my purpose here.
You’ve probably noticed that the Query Designer and the Form Designer allow you to set properties that look like these DBMS Handles. You need to distinguish clearly between such Query and Form properties and the functionally richer DBMS Handles. The DBMS Handles affect how Access will treat your data, anywhere in your application. The look-alikes only affect the queries and forms where they’re set and any other query or form that inherits from them.
This property setting process is “declarative” because instead of having to program functionality yourself, you simply set/declare values for your DBMS Handles and let Access do the job for you. The idea is to pack as much of your design into one place as possible, as early as possible in the development process, so that with minimum effort you get maximum impact. This setup stage shouldn’t involve complex programming, just simple declarations. The onus on you is to know what to put where, when, and why. In other words, you need to know what you’re doing.
For instance, imagine that you need a table that can only hold one record. To achieve this, you just set the Primary Key field of the table to be of type Byte. Further down the field’s property sheet, you then set the validation rule of the Primary Key field to be < 1. There can now be no more than one record in the table (or however many records you need). You could have written some code, you could have set properties on multiple forms–but you didn’t. All you did was set two field properties and the DBMS automatically enforces them (see Figure 1).
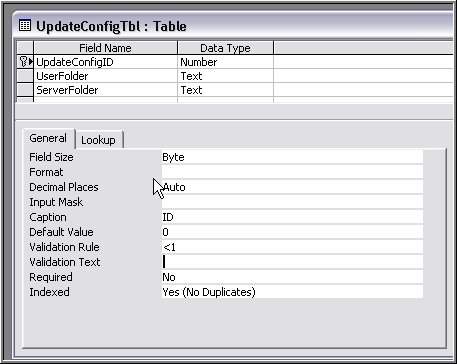
Figure 1
This declarative method is more reliable than any alternative way of handling the problem. If you’d set this property in a Form Designer (or, worse, written some code) to enforce this rule for the form, you would have been exposing yourself to the malicious or unthinking user who bypasses the form and opens the table to add data directly.
Leveraging the DBMS has many advantages. This approach ensures that your DBMS settings will “cascade” throughout your whole project rather than being restricted to a single form. So don’t start designing your forms and reports until you have the DBMS at your beck and call.
Another important benefit of this approach is that it makes your design easy to document. The built-in Access Documenter (Tools | Analyze | Documenter) or equivalent third-party tool (for example, FMS’s Total Access Analyze) will provide you with ready-made printed documentation of the settings you’ve given your DBMS Handles. Consider these benefits:
- You no longer have to document what is done declaratively. The analysis tools will automatically pull it out for you when you need it.
- You don’t have to keep your documentation up-to-date. The analysis tools will always report the current settings in the database.
The cascade
What does it mean when I say that the settings you give your DBMS Handles will “cascade” throughout the rest of your project? It means, for example, that if you set the validation rule for a field in your table design, this validation rule will apply anywhere that you can display and/or edit data in that field, such as queries, forms, or even if a user opens a table directly.
If, at a later stage, you need to modify the validation rule, you only need to make the change in one place. Of course, you may find that Access will alert you to a conflict between existing data and your new validation rule, but then that’s highly desirable also, allowing you to fix the problem!
You can also get your DBMS to handle another tedious job for you: setting the captions and column headings for the fields that you display in datasheets, forms, and reports. Naming conventions are great for developers, but a user will think that a column heading displayed as “EquityType” is a typo. “The idiot can’t even type!” will be the mildest thought that goes through your user’s mind.
Access will take care of this for you if you just set the Caption property for the field, in the table’s properties list. In Figure 2, I’ve set the Caption property of the EquityType field to “Type of Share”. In every query that displays the EquityType field, Access will now automatically set the column heading to “Type of Share”.
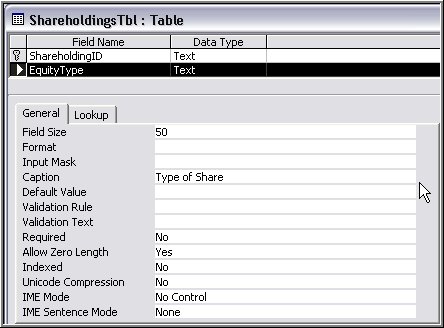
Figure 2
There are a few caveats about using this feature: To set the labels for the controls that display your fields in a form to the field’s Caption, you’ll need to be a little more methodical. Access will cascade your field properties into your form/report designs if and only if you use either the Fields window or the Form/Report design wizards to add data bound controls to your forms/reports (on the other hand, data-specific properties, such as validation rules, will still apply regardless of how you create a data bound control on a form).
But, as long as you’re using the Fields window to add bound controls to your form, consider using the Lookup tab on your Table Designer. If you set the Lookup properties for your field, it will also allow Access to choose what type of control you need on the form based on the properties that you declared in the Table Designer. In addition to saving you time and effort, it also ensures more consistency in your user interface by using the same control for the same data on different forms.
If you set a field’s Caption property at the table level, you’ll no longer be able to determine the underlying field name just by looking at its column heading in queries–or even the table itself. You’ll now see the field’s Caption property rather than its Name property. To see the Name property, you’ll have to open the table in Design view. Therefore, for many purposes, such as for writing SQL statements, you’ll need reliable printed documentation of your database design.
Overriding the cascade
Most of the time, Access allows you to override the cascade by using the “poor relative” properties that you can set for individual queries, forms, and reports. However, if you override a setting in a query, then any “child” query or form that’s based on that query will inherit the overridden settings. In my terms, once you interrupt the cascade, the new settings cascade to any object built on top of the object where you interrupt the cascade. To illustrate this, I’ll look at an example for each type of DBMS Handle: properties for tables, relationships, and the Database object itself.
For instance, you may need to override specific table settings. To make life easier for your users, in the Table Designer you might set the Display Control property on the Lookup properties tab for the EquityType field to display the list of Share Type choices in a combo box’s dropdown list (see Figure 3).
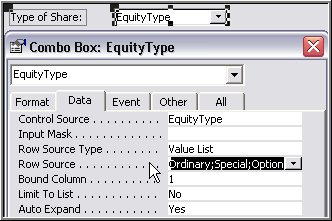
Figure 3
However, let’s say you have a form where users should only be able to choose either Special or Ordinary share types. Access gives you two opportunities to override the RowSource setting that sets your field’s display combo box: in a query or in a form. If you only want to override the RowSource for one form, you’d do it in that form. However, if you need the same override in more than one form, you should design a query for the RecordSource property of those forms and, in this query, override the field’s combo RowSource property setting (see Figure 4). Any form based on this query will have the query settings cascade to it, displaying only a limited list of values. The point is that the form will have the query’s settings cascade to it, rather than table-level settings–but only if the settings have been overridden in the query that’s used as the form’s RecordSource.
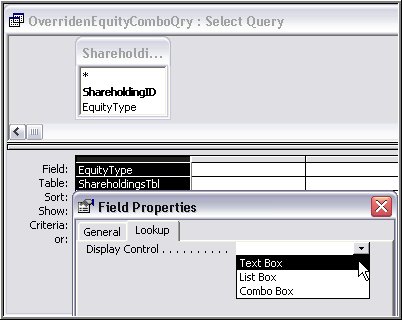
Figure 4
To override relationship settings, you’re limited to one opportunity: the Join Type setting in a query. Figure 5 shows a Join relationship from the Relationships window. However, regardless of the settings in the Relationships window, you can override the settings in any particular query (as shown in Figure 6). Basing a form on the query gives you the Join settings from the query.
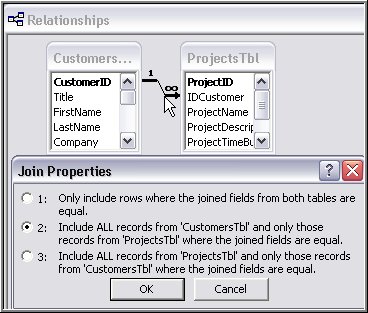
Figure 5
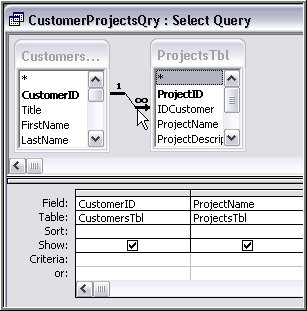
Figure 6
If you viewed the data implied by the query in Figure 6, you’d see that Access displays all of the customers but puts nulls in the ProjectsTbl fields for customers who don’t yet have a project associated with them. However, overriding the Join at the query level simplifies processing where you only need to process customer records that do not have an associated project. This new Join setting will apply to any query or form that you base on this query, completely overriding the Relationships window settings.
The one major restriction in this process is that you cannot override settings made at the database level. As an example, suppose that, in the Tools | StartUp dialog database, you set an icon called iLuvMum as your application icon. If you now check the “Use as Form and Report Icon” option, Access replaces its own form and report icons with the icon of your choice. This choice can’t be overridden at the query, form, or report level of your application. There’s no way to display a different icon for each form and report. Using the terms in this article, this is a setting that will cascade to all of your forms and reports, but you can’t override it.
Access is a multilayered product that offers you many handles to control what it will do for you at each stage of your design. Knowing how to use these handles not only will save you time and effort, it’s also the best way to deliver robust and easily maintained Access databases.
