George Hepworth takes you from design to implementation as he shows you how he creates Dynamic Menus.
Skip the discussions on Switchboards by clicking here
Do you remember how excited you were the first time you discovered the Switchboard Wizard in Access? With your input, the wizard did all the heavy lifting to create a menu system to guide your users through the forms and reports in your brand-new application. The Switchboard Wizard helped put a professional-looking face on your databases with very little experience or expertise on your part. The Switchboard provided a central platform from which all of the functions in the database could be launched. As an organizing principle, the switchboard concept had some real advantages.
However, for me at least, the excitement was short-lived.
First, I discovered the Switchboard Wizard limited the number of buttons that I could use to eight per page. I soon discovered that I also had to use one of the eight buttons to close the database, which meant I could have no more than seven functional buttons on the main page. And, of course, adding a second page meant using another button to navigate to it, leaving only six functional buttons on the main page. Quite quickly, I ended up with multiple layers of menus–and lots of confusion on my users’ part as they drilled down through all those layers and back up to move from function to function in the database.
To make matters worse, with switchboard-style navigation the forms tended to pop open one on top of the other–or on top of the switchboard menus. Not only was it cluttered, many users found it confusing and cumbersome. Users especially disliked having to click on a button to close one form in order to reveal the menu underneath it just so they could click another button (or series of buttons) to navigate to yet another menu where they could open another form or report. And, after a while, I just got tired of looking at the chunky, square switchboards themselves. They all began to look alike to me and they all shouted “Access Newbie.”
To be fair, I have seen some interesting and attractive graphic features in other people’s switchboards, along with some innovative layouts. At the end of the day, though, even they are still subject to the functional limitations I listed. So, like a lot of other developers, I began experimenting with different methods of creating interfaces for my Access applications. This article describes my solution, but I’m going to give you some insight into the complete design and development process–including some dead ends along the way.
False starts and empty promises
Figure 1 illustrates one approach to menu design with which I experimented for a while. I’ll only give you a brief overview of this menu design because this design isn’t the main focus of the article, although it was a step along the way. Not everything works out, but everything you do contributes to making you smart, and this design helped clarify my thinking about what makes for good menus.
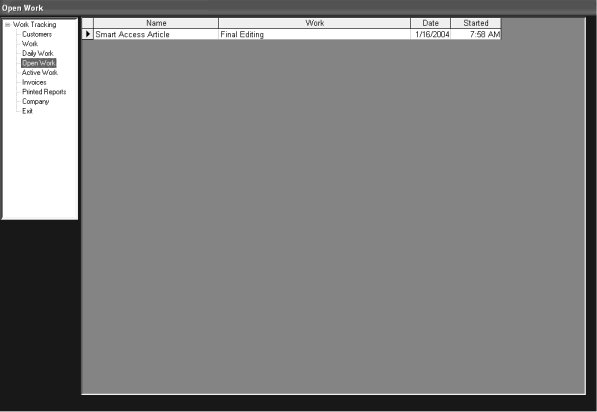
Figure 1
In this design, I used a TreeView control to create and embed a menu directly into a form that would replace the switchboard. The menu appears on the left in Figure 1. The majority of the space on the form was given over to a subform control (it’s on the right). I referred to that subform control as the “Workspace.” I set up a table, similar to the Switchboard table created by the Switchboard Wizard, called “tblTreeMenu” (see Figure 2) to hold subform names and arguments.
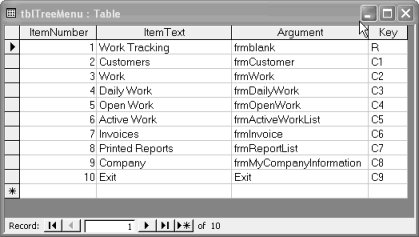
Figure 2
This combined menu and working form works something like the standard switchboards, in that code in the Load event of the main working form creates nodes on the TreeView control from records in the table. The difference is that all of the menu items are loaded into the TreeView control at once and remain permanently available to the user. A simple bit of code on the Node_Click event of the TreeView control loads the proper form into the Workspace subform control by doing a lookup into the menu table.
One of the main advantages of this design is that, because the main form never has to be closed, the screen display remains stable–the user “pulls” subforms to the workspace as they’re needed. Still another advantage is that I can make the main form a modal popup, thereby preventing the user from accessing tool and menu bars or opening other forms or reports except through the subform control in the workspace, which is controlled by the menu.
That design works well, but eventually the TreeView control revealed some problems of its own. Most significantly, it shares the problem of missing references documented by Doug Steele in the December 2003 issue of Smart Access (“Access Answers: But it Worked Yesterday!”). After complaints about that issue from users, I finally dropped the TreeView control in favor of a native Access ListBox bound to the menu table. That’s shown in Figure 3, which is the home page for an application I built for a client

Figure 3
The list box not only solved the major headache of broken references, it simplified the creation of the menu control itself because it was just an ordinary list box with two columns, one with subform names and the other with the associated menu item. However, this design left a lot of unusable, and therefore wasted, space on the form.
Over time, I came to resent the amount of screen real estate wasted on the left side of the form, especially the space below the menu control itself. As you can see in Figure 3, I often used that space to display static information, like the name of the client, but essentially it was just wasted space, even when I crowded it as far to the left as possible. In short, while I think this approach to menu design has some very good points, it still wasn’t quite what I wanted.
Requirements for a dynamic menu system
After some reflection on the strengths and weaknesses of my previous efforts, I came up with several goals when I set out to create this ultimate menu system.
Visibility and accessibility
I’ve come to the conclusion that the most effective user interfaces remain visible and accessible all the time. If possible, the user should never have to manually close one form in order to get to another form or to a menu. The ListBox and TreeView control menus meet that goal well because a single click event handles both tasks simultaneously.
An alternative to menu forms would be to generate custom toolbars or menus for an application. However, because each application has different functions, that would mean creating a new set of toolbars for each application, and that conflicts with my second goal.
Portability
I wanted to create a menu system that’s portable between applications. Once the menu form was created, I wanted to be able to copy it into each new database without having to modify it any more than absolutely necessary. Tool and menu bars can’t do that, except for some very generic functions like Spell Checking, Printing, and Sorting.
Stability and minimal space requirements
I wanted a menu that would take up a minimum of screen space and that would remain in the same location at the top of the window, like a tool or menu bar. The ListBox and TreeView controls met the stability part of this goal but not the space-saving goal. Moreover, by their very nature, they’re vertical rather than horizontal, which means that they have to remain on the left side of the screen.
Dynamically generated
I wanted a menu that can be dynamically generated each time the application is opened, using values stored in a menu table in the database (as is the case with the Switchboard Wizard). Changes to functions within the application are reflected in the menu system by adding, changing, or deleting table entries, not by modifying forms or other database objects. Code that runs when the application opens dynamically generates a new menu with the updated table values. That level of automation seemed like one of the good features of the standard switchboard that I wanted to keep if I could.
The result was the menu system described in the next section.
Dynamic menu
These design criteria are satisfied by the newest menu method I’ve been working on. In some ways, it goes back to the strengths of the original switchboard concept in which all functions are launched from a central form. It also regenerates the menu dynamically from values stored in a table. Plus, it adds some enhancements I’ve worked out from my own experiments.
Advantages
One advantage this menu has over the original switchboard is that it abandons command buttons in favor of hyperlinks. Hyperlinks take up less space on the menu (meeting the third goal), and, with a little bit of additional coding, they can also do things like launch Web sites or send e-mail directly from the menu.
A second advantage this menu has is that it isn’t limited to a fixed number of items on the menu. Each menu item generates its own hyperlink, from one to as many as you need. Unlike the old-style switchboards, which began to pile up in layers as you added functions, this menu simply gets a little taller (approximately 1/5 of an inch in height for every seven menu items that you add at 1024×768, using Arial 10pt type).
A third big advantage is that the menu form generated by this code resizes itself (within limits) according to the user’s screen resolution. The version in this article accommodates only two options, 1024×768 and 800×600, as I’ve rarely, if ever, encountered a different setting in the past few years. However, you can add other resolutions quite easily by adding additional branches to a conditional statement in the function that generates the menu.
Menu components
To make this menu system work in any database, you need four objects: one table and three forms. Some of these will be familiar to you, as they’re derived from earlier switchboard and menu systems you’re accustomed to using.
- tblMenu–Contains the menu items. This is similar to the old Switchboard table, reincarnated with new functions. To generate a new menu for any application, you only need to change the entries in this table. tblMenu accommodates forms, reports, and URLs on the menu, although the sample database in this article uses only forms and URLs.
- frmSplash–Contains the code to generate the menu dynamically and doubles as a splash screen.
- frmMenuDynamic–Serves as a template for the menu. You create frmMenuDynamic once and copy it into every database that uses this menu system. It’s a template; it shouldn’t be changed, except for making the background color match a color scheme.
- frmQuit–Called by the Quit command on the menu. You could use a different method to close the application if you wanted, but this Quit form provides a consistent look and feel to the form and simplifies coding for menu hyperlinks.
The menu table
The menu table has five fields (see Figure 4):
- ItemNumber is only there to provide a sort order for menu items. You can shuffle the order in which menu items are added to the menu form by re-assigning their ItemNumber.
- ItemText provides the captions for the hyperlinks on the menu. You should keep them to a reasonable length, although the dynamic nature of the process allows lengths up to 10 inches.
- Argument is the name of a form, report, URL, or e-mail address launched by the hyperlink.
- ObjectType is Form, Report, mailto:, or http://.
- ScreenTip is the text for the screen tip displayed when the cursor moves over a hyperlink on the menu form.
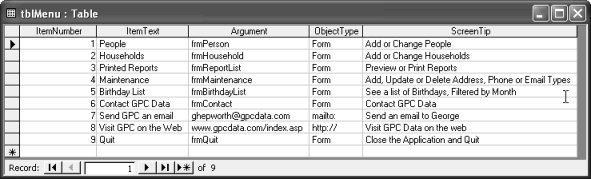
Figure 4
The splash screen/menu builder form
The second component, frmSplash, is a splash screen, opening as the startup form for an application, but it has the more important function of building the dynamic menu form. Figure 5 shows the splash screen for the sample database from my book. What a splash looks like in any given application, of course, is up to you. You can create a customized splash screen for each app, or use a generic version appropriate to your organization. What counts in creating the menus is the code it runs when it opens.
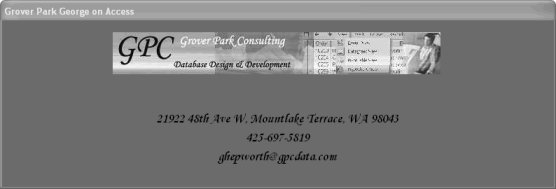
Figure 5
When the splash form opens, it creates a new menu form based on the menu template (frmMenuDynamic) and the values from tblMenu. The Timer event of frmSplash calls the function fCreateMenu, which creates the menu, rather than the Load event. This is because splash screens typically disappear after a few seconds, so you’d normally set the timer for the form to 4000 or 5000 (four or five seconds), and use the form’s Timer event to close the form. However, I need this splash form to run a function–fCreateMenu, which dynamically generates the menu–when it opens. Originally, I put fCreateMenu in the Load event of the splash form. However, that caused the menu creation process to occur before the splash form became visible on the screen, and that wasn’t good.
I put the menu template into design view while the new menu is rebuilt, and I definitely didn’t want users to see that. Even though it only takes a second to rebuild a menu, I found the view disconcerting and I really didn’t want users to be confused by seeing it before the splash screen appeared. The solution was to move fCreateMenu from the Load event to the Timer event and set the value of the timer to a fraction of a second (say, 500 milliseconds). This allows the splash form to open before the menu is rebuilt. Although the menu template still flashes briefly on the screen while the menu is being built, the splash screen helps anchor the user’s attention.
Here’s the code that runs on the Timer event of frmSplash. I’ll explain what it does shortly (I’ve omitted error handling for readability, here and in the code that follows):
Private Sub Form_Timer()

Dim DelayEnd As Date

fCreateMenu

CloseAllForms ("frmSplash")

DelayEnd = DateAdd("s", 4, Now)

While DateDiff("s", Now, DelayEnd) > 0

Wend

DoCmd.OpenForm "frmMenu"

End Sub
The function CloseAllForms is a piece of code I “recycled” from someone else a long time ago. Unfortunately, I don’t know the original source, so I can’t give proper credit. It closes all the forms except the form whose name is passed in the FormName parameter:
Function CloseAllForms(FormName As String)

Dim FormCount As Integer

Dim i As Integer

Dim F As String

FormCount = Forms.Count

    For i = FormCount - 1 To 0 Step -1

        If Forms(i).Name <> FormName Then

            DoCmd.Close acForm, Forms(i).Name

        End If

    Next i

End Function
Forms.Count returns the number of open forms in the database. (AllForms.Count would return the total number of forms, both open and closed.) The For…Next statement steps through any open forms in the database, closing each form in turn, except for the form passed in as an argument to the function. In this case, I want to leave frmSplash open while the menu is rebuilt, but I want to close the new menu after it’s built. So this is the line of code that does both:
CloseAllForms("frmSplash")
Next, because I’ve already used the form’s Timer event to fire this code to create the new menu, I had to come up with a delay mechanism that would display the splash screen for a few more seconds. I found this technique, using the While…Wend loop in Microsoft Knowledge Base Article 141537. You can use any pause or delay technique you like, and you can set the delay to be shorter or longer than the four seconds I used. The last line in the Timer event procedure opens the new menu. (I’ll show you why I don’t need to close the splash screen itself later.)
fCreateMenu–Doing the heavy lifting
The heavy lifting required to create a menu is done by the function fCreateMenu, located in the code module for frmSplash. Here’s how it works. fCreateMenu includes the GetSystemMetrics API call to get the current screen resolution. The API call and relevant constants are declared in frmSplash’s Code Module. The constant, TPI, is also set to 1440, representing the number of twips per inch. I need that number in order to set the maximum menu width:
Option Compare Database

Option Explicit

Private Declare Function apiGetSys Lib "user32"_

    Alias "GetSystemMetrics" (ByVal nIndex As Long) _

      As Long

Private Const SM_CXSCREEN = 0

Private Const SM_CYSCREEN = 1

'TPI, or Twips Per Inch

Private Const TPI As Integer = 1440
Here’s the menu creation function, fCreateMenu. It’s rather long, but I’ve broken it up with explanations to help you navigate through it:
Public Function fCreateMenu()

Dim intMenuItems As Integer

Dim i As Integer

Dim intLabelX As Integer

Dim intLabelY As Integer

Dim intMenuWidth As Integer

Dim intMenuCount As Integer

Dim ctl As Control

Dim ctlLabel As Control

Dim rs As DAO.Recordset
A quick explanation of these variables: fGetCurRes determines current screen resolution–this version of the function provides for two screen resolutions, 1024×768 and 800×600. If your users need other resolutions, add metrics for them in the conditional. inMenuCount is an arbitrary number that assumes approximately 10 inches of usable screen width at 1024×768 and approximately 8 inches of usable screen width at 800×600. Any resolution higher than 1024×768 will default to 10.
In the next code, fCreateMenu sets the value of the variable intMenuItems, which determines the maximum permissible width for the menu. The values I settled on–8 inches at 800×600 and 10 inches at 1024×768–are somewhat conservative, but I’d rather err on the side of caution. I don’t want the menu spilling off the right side of the screen. Establishing a maximum width for the menu, instead of a maximum number of menu items, allows me to put hyperlinks of any width on the menu, subject only to the maximum width of the menu itself. A 10-inch-wide hyperlink label is hard to imagine, but it could be accommodated with this menu system:
If fGetCurRes = "1024x768" Then

    intMenuCount = 10

ElseIf fGetCurRes = "800x600" Then

    intMenuCount = 8

Else

    intMenuCount = 10

End If
Now I convert my menu count to either 8 inches or 10 inches. TPI is a constant, defined as 1440, and converts from inches to twips:
intMenuWidth = intMenuCount * TPI
The next step is to open the template form, frmMenuDynamic, in design view as an icon, so that it’s as unobtrusive as possible. I experimented with a variety of approaches to this step–hiding the template form while it’s being built, for example. However, the form must be made visible at some point in order to save it as the new menu. After experimenting with several options, I decided opening it as an icon was the least intrusive way to do that:
DoCmd.OpenForm "frmMenuDynamic", acDesign,,,, acIcon
I’m ready now to begin adding menu items. The first step is to open the menu table and count the menu items in it. I’ve used DAO but you could use ADO just as easily:
Set rs = CurrentDb.OpenRecordset("tblMenu", _

    dbOpenDynaset)

rs.MoveLast

rs.MoveFirst

intMenuItems = rs.RecordCount
Next, I position the first label to hold a menu item by putting it in the upper left corner of the form:
intLabelX = 0

intLabelY = 0
Then, a For… loop steps through each record in the menu table, creating one label on the menu for each record, using the CreateControl method. The loop starts at 0 because index values for controls on a form are zero-based–that is, the first control has an index of “0”. The labels themselves are named Cmd(i), with the maximum value of i being the number of labels on the form minus one. The label captions themselves are taken from the ItemText field of the menu table:
With rs

    'Index values for controls on a form

    'are 0 based

    For i = 0 To intMenuItems - 1

        Set ctlLabel = CreateControl_

            (Forms!frmMenuDynamic.Name, acLabel, , , _

              "cmd" & i, intLabelX, intLabelY)

            ctlLabel.Visible = True

            ctlLabel.Caption = !ItemText
During testing I found that the SizeToFit method of a label (which is supposed to make the label big enough to hold its text) isn’t reliable if the default width of a control is narrower than its contents. I set the label’s width to 2 inches as a workaround to ensure the label resizes correctly:
  ctlLabel.Width = TPI * 2

            ctlLabel.SizeToFit
The conditional in the next section of the function checks the object type of the current label to see whether it needs to create a hyperlink address (for links to external URLs or e-mail addresses) or a hyperlink subaddress (for internal links to forms, reports, and so on):
            If !ObjectType = "mailto:" Or _

              !ObjectType = "http://" Then

                  ctlLabel.Hyperlink.Address = _

                    !ObjectType & !Argument
However, internal links to forms or reports must be set in the hyperlink SubAddress property:
        Else

                ctlLabel.Hyperlink.SubAddress = _

                  !ObjectType & " " & !Argument

            End If
Just to finish off the process (and to provide the user with some onscreen help), I create a screen tip for the control:
ctlLabel.Hyperlink.ScreenTip = !ScreenTip
With the next control ready, it’s time to determine whether to leave it in place or move it down to a new row. If adding the label would extend the menu past the pre-determined width of the menu form, I have to move the item. Otherwise, it stays where it is. At this point in the process, the value of intLabelX is still equal to the left edge of the previous control (or 0 if I’m still building the first label). If intLabelX plus the width of the current control is greater than the maximum permissible menu width, intMenuWidth, I know the menu could be too wide to fit on the screen, so that control has to move down a row on the menu. Therefore, intLabelX is reset to 0 (the left edge of the form), and intLabelY, which is the top edge of the control, is set to the default height of the control, plus the previous value of intLabelY. That is to say, the new label is at the lower edge of the labels on the previous row:
If intLabelX + ctlLabel.Width >= intMenuWidth _

           Then

             intLabelX = 0

             intLabelY = intLabelY + ctlLabel.Height

             ctlLabel.Top = intLabelY

       End If

         ctlLabel.Left = intLabelX

         intLabelX = intLabelX + ctlLabel.Width
With the hyperlink label created and in its proper place, I move to the next menu item in the recordset and start the loop again:
        .MoveNext

    Next i

End With
When all of the required labels have been created, it’s time to resize the new menu, so that it’s as small as possible. The function does this by resetting the height and width of the form’s detail section to “0”. Since the form can’t be made narrower or shorter than the controls in its detail section, this has the effect of shrinking the new menu form as much as possible:
Forms!frmMenuDynamic.Detail.Height = 0

Forms!frmMenuDynamic.Width = 0

DoCmd.SetWarnings False
Now that the menu form is built, I save the form as “frmMenu”, overwriting any existing instance of the menu form. Issuing DoCmd.Save with a different name has the same effect as selecting File | Save As from the Access menus. I can then close the menu template, abandoning changes made to it (it will be ready for the next time):
DoCmd.Save , "frmMenu"

DoCmd.Close acForm, "frmMenuDynamic", acSaveNo

DoCmd.SetWarnings True

'Clean up

 Set rs = Nothing

End Function
At this point, the new menu is complete and open in design view. One last note: My fGetCurRes function (called at the start of the routine) returns the user’s current screen resolution as X by Y (for example, 1024×768), using the GetSystemMetrics API:
Function fGetCurRes() As String

Dim strRet As String

 fGetCurRes = apiGetSys(SM_CXSCREEN) & "x" & _

   apiGetSys(SM_CYSCREEN)

End Function
After the menu
From here, processing resumes with the code in the Timer event of the splash form following the call to fCreateMenu:
Private Sub Form_Timer()

…

  CloseAllForms ("frmSplash")

  DelayEnd = DateAdd("s", 4, Now)

  While DateDiff("s", Now, DelayEnd) > 0

  Wend

  DoCmd.OpenForm "frmMenu"

End Sub
As I previously discussed, after the menu form creation function runs, the newly created menu form is closed, leaving the splash form open for another four seconds. Then, the new menu form, frmMenu, is reopened, this time in form view, ready to go to work.
And that brings me to the code that runs when the menu form opens and the code that runs when it’s activated by getting the focus from any other form or report.
Opening or activating the menu
This code is in the Open event of the menu template form, frmMenuDynamic. Because frmMenu is a copy of the menu template, it contains this code from the template:
Private Sub Form_Open(Cancel As Integer)

DoCmd.MoveSize 0, 0

'The "Moveable" property is not available

'in Access 2000 or earlier.

Me.Moveable = False

DoCmd.RunCommand acCmdSizeToFitForm

End Sub
This is primarily “housekeeping” code in that it’s there to make sure the menu stays in its proper location at the top of the screen, and at its proper dimensions. Only the first command, which relocates the form to the upper left corner, is really necessary, I suppose. However, I left the rest in as sort of a “belt and suspenders” gesture.
Finally, the last bit of code required to make the menu work is in the Activate event of the menu form.
Private Sub Form_Activate()

  DoCmd.MoveSize 0, 0

  CloseAllForms ("frmMenu")

End Sub
Each time the user moves focus to the menu form by clicking on one of the hyperlink labels on it, the CloseAllForms routine makes sure that every open form except the menu is closed. This eliminates any need for Close or Done buttons on other forms. To make sure that the menu stays in its designated location at the top of the screen, I included the MoveSize command.
frmQuit
The last piece of the system is a Quit form, opened by the Quit command on the menu. It’s a custom dialog form that asks the user to confirm that he or she wants to quit. There are a couple of reasons for using it instead of a message box, or just issuing the Application.Quit command. The most important is that you can make frmQuit match the color scheme of your application by changing its background color, contributing to a consistent look and feel. Second, it doesn’t require special quit handling code because it opens just as any other form does. And, finally, it’s a lot more user-friendly than just closing the application would be.
Figure 6 shows the menu generated by the sample database for Grover Park George on Access (my recently released book). I gave the menu a white background to make it more readable, but the menu can take on a range of colors to match any color scheme.

Figure 6
In Figure 6, you can also see the default Access menu bar. You can create a custom menu bar to replace it and really lock down the application. The sample database that accompanies this article incorporates one such menu bar. It’s a generic version with Spell Checking and Sorting only. In fact, you can make it part of the dynamic menu package along with the other four pieces.
That’s it. With these four (or five) objects–three forms and a menu table, along with the generic toolbar–you can dynamically create a menu in any application. The menu will always move itself to the top of the screen and take up an absolute minimum amount of screen space. In addition, the menu can be given any color background, so that it matches the color scheme of your application. You can even let your menu handle tasks like opening Web pages and sending e-mail messages, which aren’t normally included in switchboard menus.
It isn’t perfect, of course. And it doesn’t completely take the place of built-in or custom menus and toolbars. However, at this point, I consider it a big improvement over what I was using before.
