This month, Doug Steele looks at several techniques to use Automation from within Access to interact with Excel. By the time he’s done, Doug has exported every table in his Access database to separate sheets in an Excel workbook.
Garry’s Note: In the last 14 years, if there is one approach that that has consistently been a winner for my company it is this reply that I give to my Excel-centric customers. “We will take the data that is stored in your spreadsheet and store it in Access. Then we will simply export that information back into an Excel template *.xlt file that looks like your original spreadsheet and that will be your reporting”. To achieve that, we use Excel Automation like that discussed in this article. Read about our consulting services here.
I’m having some difficulties interacting with Excel. I have a spreadsheet that I need to get one or two values from, but I can’t link to the spreadsheet or import it, because the sheet just isn’t set up for that.
While there are reasonable tools within Access for importing and exporting data, I find that sometimes you just have to take things into your own hands. Assuming that you have Excel on your workstation, Access can actually communicate directly with it using a technique known as Automation.
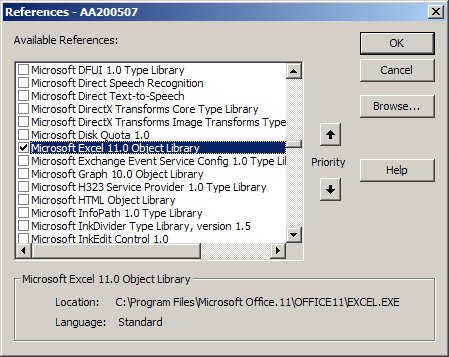
Now, it’s usual when you’re trying to automate an application to set a reference to it (through Tools | References when you’ve got the VB Editor open; see Figure 1). While this does make certain things easier (you can, for instance, refer to intrinsic constants that are part of the other application), because the reference can only be made to a single version of the application, it can lead to problems when working in environments where users can have different versions of Excel installed.
Figure 1
My usual approach is to set the reference while I’m developing the code (known as “early binding”), and then remove the reference once I have the code working to my satisfaction (“late binding”). Typically, the only changes that have to be made moving from early binding to late binding involve how you instantiate the objects you’re using, and ensuring that you provide the actual value for any constants you might have used.
With early binding, you can use code like this:
Dim xlApplication As Excel.Application

Set xlApplication = _

New Excel.Application
With late binding, you use this code:
Dim xlApplication As Object

Set xlApplication = _

CreateObject("Excel.Application")
Actually, you can use CreateObject even with early binding: As far as late/early binding is concerned, it really doesn’t matter how you load Excel into memory and get it running. At design time, the main deficiency with late binding is the absence of IntelliSense and design-time checking of data types. Because the variable that you’re using to work with Excel (xlApplication in my previous code) is declared as Object instead of as Excel.Application, the Visual Basic development environment is unable to access the Excel type library to support the IntelliSense dropdown lists. You’ll see another limitation of working without the Excel type library at the end of this article.
At runtime, however, because you’ve declared your variable as Object, your variable is perfectly willing to work with any version of Excel. By using early binding for most of your development time and then switching to late binding, you get the benefits of early binding at design time and the benefits of late binding at runtime.
There’s a penalty for using late binding at runtime, though. Because your application lacks the reference to Excel, the compiler isn’t able to draw on information about Excel when your code is compiled. The result is more inefficient code–the performance hit is probably measurable but is usually swamped by the costs of communicating with Excel, which, as a compiled EXE, runs in a separate memory space from Access.
In order to use Automation successfully, you need to know something about the Object Model for the application you’re trying to automate. Unfortunately, to give an overview of the Excel Object Model is far more than I can undertake in this column. In order to read a cell in an existing worksheet, all you need to know is that the Excel Application contains a Workbooks collection, which consists of one (or more) Workbook objects (a workbook corresponds to a single XLS file). Each Workbook object contains a Worksheets collection, which consists of one (or more) Worksheet objects. One of the properties of a Worksheet is the Cells property (which is actually a Range object). You can either return a single cell on the worksheet by addressing it by its row and column, or you can return a range representing all the cells on the specific worksheet.
For the purposes of illustration, I’m going to assume that there’s a workbook named “SampleWorkbook.xls” in the same folder as my Access application and that there’s a worksheet named “Sample Data” in that workbook. The following code checks whether cell A1 contains the word “Data.” If it does, it pops up a message box containing the contents of cell B1. If not, it pops up a message to that effect.
I start by declaring the variables and objects that I’m going to need, and determine the full path to the desired workbook:
Sub ReadFromWorkbook()

Dim objActiveWkbk As Object

Dim objActiveWksh As Object

Dim objXL As Object

Dim strWkbkName As String

strWkbkName = CurrentDb().Name

strWkbkName = Left$(strWkbkName, _

Len(strWkbkName) - Len(Dir$(strWkbkName))) & _

"SampleWorkbook.xls"
If the file doesn’t exist, I can’t go on. If it does, I instantiate an instance of Excel, open the workbook, and find the worksheet in question (I’ll get an error at this point if there isn’t a worksheet named “Sample Data” in the workbook):
If Len(Dir(strWkbkName)) = 0 Then

MsgBox strWkbkName & " not found."

Else

Set objXL = CreateObject("Excel.Application")

objXL.Application.Workbooks.Open strWkbkName

Set objActiveWkbk = _

objXL.Application.ActiveWorkbook

Set objActiveWksh = _

objActiveWkbk.Worksheets("Sample Data")

If objActiveWksh.Cells(1, 1) = "Data" Then

MsgBox "Cell A2 contains " & _

objActiveWksh.Cells(1, 2)

Else

MsgBox "Cell A1 does not contain Data"

End If

End If
Now that I’ve read what I wanted, I clean up after myself, and I’m done:
objActiveWkbk.Close SaveChanges:=False

Set objActiveWkbk = Nothing

objXL.Application.Quit

Set objXL = Nothing

End Sub
One important thing to note: Automation is creating objects behind the scene. If you don’t handle those objects correctly, you’ll end up with memory leaks or worse. Note that I’m explicitly closing the workbook after I’ve finished reading it (with SaveChanges:=False to ensure that I haven’t changed anything in the workbook). Once I’ve closed the workbook, I quit the Excel Application and set it to Nothing. Only then can I be sure that I’ve gotten rid of the instance of Excel I created. (If you look at the code included in the downloadable sample database that accompanies this article, you’ll see how I can determine whether Excel is already running, and use that instance of Excel rather than creating a new one.)
The Excel Object Model is quite flexible, and there are often many ways to accomplish the same thing. For instance, I could just as easily have used this:
 If objActiveWksh.Range("A1") = " Data" Then

MsgBox "Cell A2 contains " & _

objActiveWksh.Range("B1")

Else

MsgBox "Cell A1 does not contain Data"

End If
As well, it wasn’t really necessary to declare objActiveWkbk as the ActiveWorkbook and objActiveWksh as the ActiveWorksheet. The following would work just as well:
Sub ReadFromWorkbook()

Dim objXL As Object

Dim strWkbkName As String

strWkbkName = CurrentDb().Name

strWkbkName = Left$(strWkbkName, _

Len(strWkbkName) - Len(Dir$(strWkbkName))) & _

"SampleWorkbook.xls"

If Len(Dir(strWkbkName)) = 0 Then

MsgBox strWkbkName & " not found."

Else

CreateObject("Excel.Application")

objXL.Application.Workbooks.Open strWkbkName

With objXL.Application _

.Workbooks("SampleWorkbook.xls") _

.Worksheets("Sample Data")

If .Range("A1") = "Data" Then

MsgBox "Cell A2 contains " & _

.Range("B1"), vbOKOnly + vbInformation

Else

MsgBox "Cell A1 does not contain " & _

"Sample Data", vbOKOnly + vbCritical

End If

End With

End If

objXL.Application.Workbooks( _

"SampleWorkbook.xls").Close _

SaveChanges:=False

objXL.Application.Quit

Set objXL = Nothing

End Sub
Okay, I see how to read from a spreadsheet. Can I write to one?
Writing is done the same way as reading, except you assign a value to a cell, rather than read it. You can approach this in at least three ways:
- Open an existing workbook and write to an existing sheet in that workbook.
- Create a new worksheet in an existing workbook.
- Create a new workbook and a new worksheet within that workbook.
The following code illustrates how to handle these three separate cases. As before, I declare the various variables and objects I’m going to need, and ensure that I know where the workbook should exist (again, I’m making the simplifying assumption that the workbook should exist in the same folder as the current database):
Sub WriteToWorkbook( _

WorkbookName As String, _

WorksheetName As String)

Dim objActiveWkbk As Object

Dim objActiveWksh As Object

Dim objXL As Object

Dim booXLCreated As Boolean

Dim booWkbkCreated As Boolean

Dim intLast As Integer

Dim strPath As String

Dim strWrkBkName As String

strPath = CurrentDb().name

strPath = Left$(strPath, _

Len(strPath) - Len(Dir(strPath)))

strWrkBkName = strPath & WorkbookName

CreateObject("Excel.Application")
I next determine whether or not the workbook exists. If it does, I open it (and keep track of the fact that it did exist). If it doesn’t, I add a new workbook to the Workbooks collection (I’ll save it as the desired workbook name when I’m done):
If Len(Dir(strWrkBkName)) > 0 Then

objXL.Application.Workbooks.Open _

strWrkBkName

booWkbkCreated = False

Else

objXL.Application.Workbooks.Add

booWkbkCreated = True

End If

Set objActiveWkbk = _

objXL.Application.ActiveWorkbook
There are several different ways of determining whether the desired worksheet name exists in the workbook. One is to loop through all of the Worksheet objects in the Worksheets collection, looking for one that has the desired name. Another (illustrated next) is to try and use the desired worksheet name, and trap any error that might occur because it doesn’t exist. If the worksheet doesn’t exist, I add a new worksheet at the end of the workbook, and give the new worksheet the name for which I was looking (this may not be what you want–you might prefer to exit if you don’t find the worksheet that you’re looking for):
On Error Resume Next

Set objActiveWksh = _

objActiveWkbk.Sheets(WorksheetName)

If Err.Number <> 0 Then

intLast = objActiveWkbk.Worksheets.Count

objActiveWkbk.Worksheets.Add _

After:=objActiveWkbk.Worksheets(intLast)

Set objActiveWksh = _

objActiveWkbk.Sheets(intLast + 1)

objActiveWksh.name = WorksheetName

End If
At this point, I know that I’ve got the worksheet I want and the workbook I want, so I can write what I want:
objActiveWksh.Cells(1, 1) = "Today's Date"

objActiveWksh.Cells(1, 2) = Date
As mentioned earlier, if I had to create the workbook, I save it to the desired file name. Otherwise, I simply save the workbook.
If booWkbkCreated = True Then

objActiveWkbk.SaveAs _

FileName:=strWrkBkName

Else

objActiveWkbk.Save

End If

Once I've done that, I clean up after myself, and I'm done:

objActiveWkbk.Close

Set objActiveWkbk = Nothing

objXL.Application.Quit

Set objXL = Nothing

End Sub
I need to export my data to multiple spreadsheets in a single workbook, with different data on each spreadsheet, and I just don’t seem to be able to do this.
So far, all I’ve done is read and write to a specific cell (or cells). You’ll notice, though, that I can address individual cells on the spreadsheet by referring to their row and column. What you can do is open a recordset for each table, loop field by field for each row in that recordset, and write the values out to the spreadsheet.
Fortunately, though, there’s an easier way. Excel has a method called “CopyFromRecordset” that copies the contents of a recordset (either DAO or ADO) into a worksheet, beginning at the upper left corner of the specified range. Optional parameters of the method allow you to specify how many rows to copy from the recordset, and how many fields.
This means that all I really need to do is specify an “anchor point” in the spreadsheet, and the CopyFromRecordset method will do everything else for me.
As usual, I start by declaring the various objects and variables needed:
Sub ExportAllTables()

Dim objActiveWkb As Object

Dim objXL As Object

Dim objWorksheet As Object

Dim dbCurr As DAO.Database

Dim rsCurr As DAO.Recordset

Dim tdfCurr As DAO.TableDef

Dim fldCurr As DAO.Field

Dim booXLCreated As Boolean

Dim intCurrColumn As Integer

Dim intCurrSheet As Integer

Dim strMessage As String

Dim strSQL As String

Dim strWrkbkName As String
I’m going to write to a workbook named the same as the current database (except it will have an .xls extension, instead of an .mdb extension). The Name property of the current database tells me exactly where the current database is located; all I need to do is change the extension:
strWrkbkName = CurrentDb().Name

strWrkbkName = Left$(strWrkbkName, _

InStr(strWrkbkName, ".mdb") - 1) & ".xls"
Now, it’s possible that a workbook with that name already exists. If so, I prompt the user to ensure that it’s okay to delete the existing workbook:
If Len(Dir(strWrkbkName)) > 0 Then

strMessage = strWrkbkName & _

" already exists." & vbCrLf & "Delete it?"

Select Case MsgBox(strMessage, _

vbYesNoCancel + vbQuestion, _

"Smart Access Answer Column")

Case vbYes

Kill strWrkbkName

Case vbCancel

Exit Sub

Case Else

End Select

End If
Now I want to check to see if there’s already an instance of Excel running. If so, I’d prefer to use it and then (potentially) load a second copy of Excel into memory. If there’s no existing instance of Excel, then I’ll have to create a new instance. One way to do this is by assuming that there’s an instance running, and trying to refer to that instance by calling the GetObject method. If an instance doesn’t exist, an error will be raised. I can then trap that error and create an instance of Excel. Either way, at the end of the following code, objXL will be pointing to a properly instantiated copy of Excel. (I have another alternative: I could use the FindWindow API to loop through all open windows, checking the Class name of each window until I find an Excel window–the class name will be XLMain–or until I run out of windows.)
On Error Resume Next

Set objXL = GetObject(, "Excel.Application")

If Err.Number = 0 Then

booXLCreated = False

Else

Set objXL = CreateObject("Excel.Application")

booXLCreated = True

End If

On Error GoTo Err_ExportAllTables

objXL.Application.Workbooks.Add

Set objActiveWkb = _

objXL.Application.ActiveWorkbook
At this point, Excel is ready to start accepting data from Access. To export all of your data tables, you need to loop through all of the tables in the database (ignoring the system tables). You can check that there’s data in the table and add a worksheet for the table if you have something to export or just to add a worksheet for every table.
There’s a wrinkle here, though. If Excel has been started through the user interface, there will normally be three worksheets automatically added as part of creating the workbook. However, that number is configurable within Excel so that the number of initial worksheets may be different in different versions of Excel. In addition, on some versions of Excel, when a workbook is added through Automation, it will have no worksheets. To deal with this, you should always count how many worksheets have already been used in the workbook before you start to add new worksheets. Only if the current worksheet number is more than the number of worksheets already in the workbook’s Worksheets collection should you add a new worksheet. Otherwise, the smart thing to do is to use one of the worksheets already present in the workbook. This is what I do in this code:
intCurrSheet = 0

Set dbCurr = CurrentDb()

For Each tdfCurr In dbCurr.TableDefs

If (tdfCurr.Attributes And dbSystemObject) _

= 0 Then

strSQL = "SELECT * FROM " & _

[" & tdfCurr.name & "]"

Set rsCurr = dbCurr.OpenRecordset(strSQL)

If rsCurr.BOF = False And _

rsCurr.EOF = False Then

intCurrSheet = intCurrSheet + 1

If objActiveWkb.Worksheets.Count < _

intCurrSheet Then

objActiveWkb.Worksheets.Add _

After:=objActiveWkb.Worksheets( _

intCurrSheet - 1)

End If

With objActiveWkb.Worksheets( _

intCurrSheet)

.Name = tdfCurr.name
Now that you’ve found your worksheet, you should set the first row of the worksheet to the names of the fields in the table. After that, you’re ready to use the CopyFromRecordset method to populate the worksheet with the data from your table. For this example, I’m ignoring the possibility that the number of rows in the recordset may exceed the capacity of Excel (65,536 rows in newer versions of Excel, but lower in previous versions). If you’re going to do this in a production setting, I’d advise checking the size. Here’s my version of the code:
       intCurrColumn = 1

For Each fldCurr In rsCurr.Fields

.Cells(1, intCurrColumn) = _

fldCurr.Name

intCurrColumn = intCurrColumn + 1

Next fldCurr

.Cells(2, 1).CopyFromRecordset rsCurr

End With

End If

rsCurr.Close

End If

Next tdfCurr
Once you’ve written all of the tables to the spreadsheet, you can save the workbook to the desired file name and clean up. If, at the start of this procedure, you found Excel already running, the polite thing to do is to leave it running and not arbitrarily shut it down. This code checks the boolXLCreated variable that I set at the start of the routine before quitting Excel:
objActiveWkb.Close SaveChanges:=True, _

FileName:=strWrkBkName

Set rsCurr = Nothing

Set dbCurr = Nothing

Set objActiveWkb = Nothing

If booXLCreated Then

objXL.Application.Quit

End If

Set objXL = Nothing

End Sub
The resulting worksheets are kind of ugly. Is there any way to format them from Access?
To format that mess, you can go into Excel and record a macro while you’re formatting it as you want (or, better yet, get the person who will be using this workbook to format the spreadsheets in the way that he or she likes). For example, I wanted the first row (the field titles) to be bold, and each of the columns to be expanded to be large enough to show all of the data. Recording what I did in Excel to accomplish this, I got the following macro:
Rows("1:1").Select

Selection.Font.Bold = True

Columns("A:A").Select

Range(Selection, Selection.End(xlToRight)).Select

Selection.Columns.AutoFit
Unfortunately, it’s not quite as simple as copying that code in Excel and pasting it into Access. Because Excel assumes that the VBA code is working with Excel objects, it can take a few shortcuts with referring to the objects. When you’re running from inside of Access, you have to be explicit. It’s not sufficient, for example, to refer to Rows; you need to indicate Rows on which spreadsheet. As well, I find it confusing to create a selection and then refer to that selection, the way Excel does.
Note, too, that this line of code refers to an intrinsic Excel constant, xlToRight:

Range(Selection, Selection.End(xlToRight)).Select
If you’re not that familiar with Excel VBA, Selection.End(xlToRight) lets you extend the current selection to the right until the last populated cell. In this case, since the selection is a column, this means that the resultant range will be all contiguous columns that have some data in them. Since I’m using late binding here, Access has no idea what the value of that constant is, so it’s necessary to provide the actual value.
In the end, after tweaking the code to work in Access, the following code will perform the desired formatting:
With objActiveWkb.Worksheets(intCurrSheet)

.Rows("1:1").Font.Bold = True

.Range(.Columns(1), .Columns(1).End(-4161)) _

.Columns.Autofit

End With
In terms of the previous code that wrote the data out to the worksheets, the two formatting lines would be inserted into the code after using CopyFromRecordset, before closing the With statement referring to the current worksheet:
.Cells(2, 1).CopyFromRecordset rsCurr

.Rows("1:1").Font.Bold = True

.Range(.Columns(1), .Columns(1).End(-4161)) _

.Columns.Autofit

End With
I’ve just barely scratched the surface of what can be done using Automation. Hopefully it’s enough to give you a flavor of how powerful a technique it can be.
