You can link your Outlook tasks to your Access database, thanks to XML. Garry Robinson and Scott McManus show how you can integrate project information in Access with Outlook tasks.
One of the most important parts of managing a software business is keeping track of all the different jobs, possible jobs, and any kind of job that passes your way. When you’re not busy, your system for managing these requests can be kept on paper, in a database, in a Word file, and, more than likely, in your e-mail inbox or task box. When you’re busy, trying to pull all of these things together at one time can be a hit-or-miss process. We now integrate our Outlook tasks into an Access database so that we can prepare reports and hook into other related project data. This exercise also included a voyage into using XML to export from Outlook and view that information inside Microsoft Access.
Most of the previous discussions in Smart Access about Outlook have concentrated on using linked tables to retrieve the data from Outlook. Unfortunately, when it comes to Outlook tasks, most of the important task fields (for example, Body and Subject) are invisible to the Outlook linker. So, to capture task information, we took a more classical Automation approach to retrieve the information. And you know what? We enjoyed the investigation as much as the solution. That’s not to diminish what we accomplished. We can now:
- Set up the task lists for any project in Outlook.
- Update the task information in Outlook.
- Import the task information when we need it.
- Report and review the project information using Access forms and reports.
Microsoft Outlook 2000
When it came to programming Microsoft Outlook, Scott worked out all the tricky bits. Microsoft Outlook programming isn’t easy, and the samples that are around to demonstrate programming techniques are quite scarce. This particularly applies to Outlook’s document model for folders/subfolders and the different types of data that are stored in the folders. Without going into all the finer technical details of Outlook, here are some simple suggestions to making Outlook easier to manage as a programmer.
First, if you stick to the standard top-level folders, programming is far easier. By top folders, we mean Contacts, Inbox, Calendar, Notes, and Tasks. Fortunately for us, these folders all have special constants to define where they’re located. In this article, we’re only interested in the Tasks folder, and our initial piece of code starts off as follows:
 Dim appOutlook As Outlook.Application
 Dim appNS, appTasks
 Dim AppItems As Outlook.Items

 Set appOutlook = New Outlook.Application
 Set appNS = appOutlook.GetNamespace("MAPI")
 Set appTasks = appNS.GetDefaultFolder(olFolderTasks)
 Set AppItems = appTasks.Items
If you search out this code in the sample database, you’ll find that we’ve now jumped to the middle of the subroutine called AddOutlookTasks. This is because we first want to demonstrate the mechanics of getting the information from the Tasks folder. The sample code is what you need to hook into the items inside the Outlook folders. The Outlook constant olFolderTasks specifies that we’ll look at the Tasks folder. If, while writing your code, you select the olFolderTasks constant and hit F2, you’ll open the object browser to show all the special constants for the important (and unmovable) Outlook folders.
Now we’d like to work our way through all the tasks item by item and store the values for each task into variables. This is handled by first finding out the total number of tasks and then moving through the collection as shown in the following code. As you can see here, this actually is quite easy. The code is complicated a little by a number of tests that are performed to limit the tasks that are transferred. This includes testing whether the task is fully completed (indicated by the PercentComplete property being equal to 100) and also checking to see whether the task has been deferred. Those two types of tasks aren’t transferred:
ItemCount = AppItems.Count
 On Error GoTo 0
 For i = 1 To ItemCount
   itPerComp = AppItems(i).PercentComplete
   If itPerComp < 100 And _
    AppItems(i).Status <> olTaskDeferred Then
    On Error Resume Next
    If (Not IsMissing(CatRequired) And _
       AppItems(i).Categories = CatRequired) Or _
       IsMissing(CatRequired) Then
       On Error GoTo 0
       DoCmd.Echo True, AppItems(i).Subject
       itDateCreated = AppItems(i).CreationTime
       itSubject = AppItems(i).Subject
       itBody = AppItems(i).Body
       itCategory = AppItems(i).Categories
       itImportance = AppItems(i).Importance
     End If
   End If
 Next
 Set appOutlook = Nothing
If you’re a little low in Outlook programming experience level, the best resource for determining what the members of the various objects in Outlook can do for you is to use the Object Explorer:
- Open the Object Explorer by pressing F2, and choose Outlook as the library to search.
- Enter TaskItem to search for TaskItems. The object browser will show you all the fields that are available in Task Items as well as all the other properties, methods, and events that relate to the TaskItems (see Figure 1).
Without the Object Explorer, finding the actual names in the collection is next to impossible. If you wish to program other types of Outlook folders, search for MailItems, ContactItems, NoteItems, and AppointmentItems. Then you can then substitute the task field names and collection field names.
That’s all there is to looping through your Outlook tasks: Set up the collection, loop through it, and store the results in variables or directly into your target table or recordset.
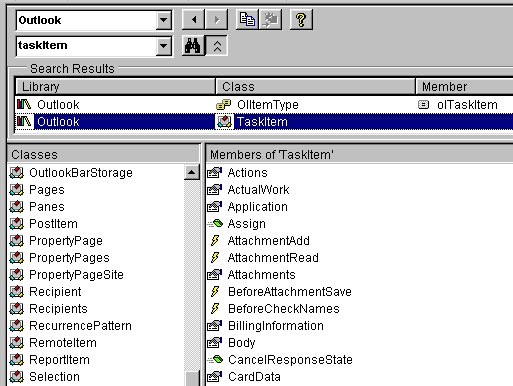
Figure 1
Storing the results
Now, as the Smart Access reader is more than likely going to be storing the Outlook information in an Access database, we’ll step back a bit in the sample code to demonstrate the VBA code that’s required to append the Outlook Tasks to an Access table.
To manage importing the Outlook Tasks into the database, we’ve set up a subroutine called AddOutlookTasks that has two important arguments that need further description, userNameRequired and CatRequired:
Sub AddOutlookTasks(userNameRequired As String, _
Optional CatRequired As Variant)
Only the first parameter is required, which lets you call the routine like this:
Call AddOutlookTasks(User_FX)
The first and very important argument is the system username. If you switch machines or log in with different usernames, you or your colleagues are going to be accessing a different Outlook task list. Importing those tasks into the database will mean that it will be necessary to identify which task list is actually going to be processed. To identify the list, we use the Environ function that extracts the user’s name from an environment variable that’s stored on any Windows NT, Windows XP, or Windows 2000 operating system. Other operating systems (for example, Windows 95 and 98) don’t carry this environment variable:
Public Function User_FX() As String
User_FX = Environ("USERNAME")
If User_FX = "" Then
User_FX = "Unknown"
End If
End Function
If the Windows NT login identifier were FreddyM, then all our tasks in the Access database would be flagged with a FreddyM username. This allows us to process tasks for more than one person in the same system. This can be very useful to managers who need to review user tasks when the employee is sick or if the tasks need to be reallocated.
The other argument to the subroutine is the Category Required. Outlook categories allow you to organize tasks into groups. In some parts of our software, we find it more convenient (faster) to only update all tasks for a given category. You’ll see references to the categoryReq variable in the code that follows.
The next step in the process will more than likely be clearing out any existing task information already stored in your database. We handled this by using a SQL Delete statement. If the CatRequired field is prepared, a Where clause in the SQL statement that we generate allows the subroutine to only delete and load Outlook tasks for one category:
Const outlookTbl = "tblOutlookTasks"
Dim qryStr As String

qryStr = "delete from " & outlookTbl & _
" OutlookTasks where systemUserName = '" _
& userNameRequired & "'"
If Not IsMissing(CatRequired) Then
qryStr = qryStr & " and category = '" _
& CatRequired & "'"
End If

DoCmd.SetWarnings False
DoCmd.RunSQL qryStr
DoCmd.SetWarnings True
Now we open an ADO recordset so that we can write records to the Access table that holds all the tasks. The Access table is named using the outlookTbl constant, and we designed its structure to match that of the Outlook task fields:
Set rstTasks = New ADODB.Recordset
With rstTasks
.ActiveConnection = CurrentProject.Connection
.CursorType = adOpenKeyset
.LockType = adLockOptimistic
.Open outlookTbl, , , , adCmdTable
End With
Now we can return to Outlook items that were being processed and stored in the variables. These variables are added to a new record and appended to the tasks table in the Access database:
itSubject = AppItems(i).Subject
itBody = AppItems(i).Body

With rstTasks
.AddNew
!DateCreated = itDateCreated
!Subject = itSubject
!Category = itCategory
!Body = itBody
!PercentComplete = itPerComp
!Importance = itImportance
!SystemUsername = userNameRequired

.Update
End With
A quiet word of warning: Constant loading and reloading of Access tasks into an Access table will cause your database to bloat. You’ll need to be vigilant about compacting your database.
Integrating Outlook tasks
Because Microsoft Outlook stores its data in a very flat structure, merging this information into a corporate world will require integration with a database. To do this, we use the projectID primary key from the project table as the common key for the Access database and the Outlook tasks table. In Outlook, the project code is stored in the Category table. Figure 2 shows how the Outlook items are viewed in our system in a subform with the project table so that users can review all the tasks for a project. We chose the Category field because all the different Outlook collections (for instance, Calendar, Inbox, and Notes) also have a Category field. Using the Outlook Category field to hold the project number lets us tie a variety of Outlook resources to a single project.
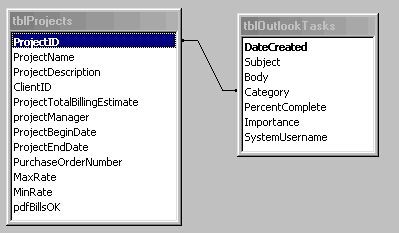
Figure 2
The best way to describe how the Access and Outlook programs relate to each other is to look at the Access project table and the Outlook table that we’ve just imported using a simple Access relationship. This is shown in Figure 3.
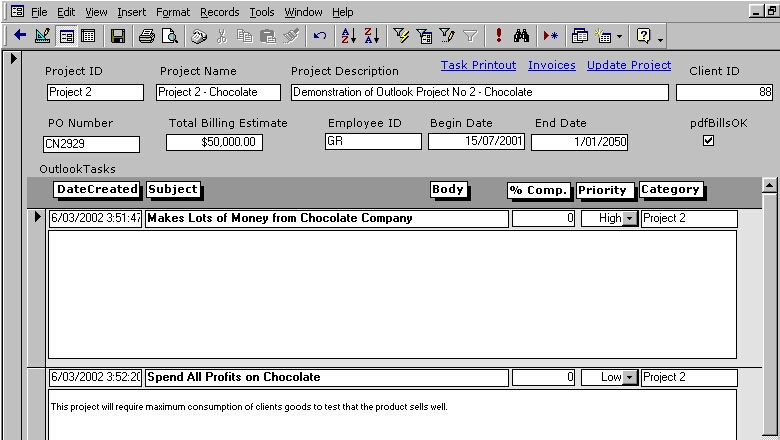
Figure 3
Naturally, all tasks that don’t have a project will end up as orphans in this model. These can be easily picked up by adding an Orphan project or, during the import stage, simply deleting all tasks without projects.
But the main reason that we do all this integration is to produce a really neat report that shows details on an individual project along with the tasks for that project. The report all sorts the tasks from highest priority to lowest priority. On the top of the form in Figure 2, you’ll see a hyperlink titled Task Printout. The click event for this hyperlink fires the following code to open the report filtered by the currently displayed project. The report that shows one task per page is shown in Figure 4.
DoCmd.OpenReport "rptProjectsOutlook_A5", _
acPreview, , "ProjectID = '" & Me!ProjectID & "'"
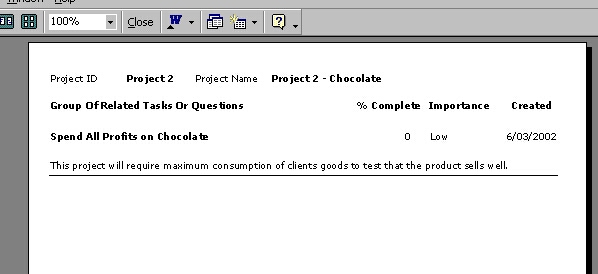
Figure 4
Using XML
As mentioned earlier, we’re always a little reluctant about storing temporary data in an Access database because constantly deleting and reloading data causes the MDB file to bloat. So we decided to look into other ways to hold the data transferred from Outlook while still allowing us to view the data within Access. We initially thought to use either a comma-delimited file or a fixed-width text file. This method was quite appealing, as Access supports linking to both of these file formats. While we believe that these are quite legitimate ways to transfer the data, we decided that it was time to refine our skills with XML and see whether Access 2002 delivered the improvements in XML promised by the promotional material.
Now we return to our earlier exploits with the Outlook task items to help describe what we came up with for XML creation. We like the simplicity of the ADO recordset’s Save method as a way of making an XML document, so we wrote the following to begin creating an XML document from an ADO recordset:
Dim rstXML As New ADODB.Recordset
Dim xmlFile As String
xmlFile = GetDBPath_FX & "tasks.xml"
Now we encountered our first real problem, which took hours of poring through Help and online Help to resolve. Because we weren’t using any existing data, we had no query or recordset to initialize our XML file. Then we came across the Append method of the Fields collection in ADO. This allows you to establish the names, types, and attributes of fields in a recordset without actually accessing a table. The arguments to the Append method are the field’s name, type, and length. As you can see in the following code snippet, this isn’t unlike a Create Table SQL statement. One argument that was confusing was field length, as the ADO Help indicated this wasn’t required for some field types (for example, Date) but wouldn’t compile unless we provided it. In the code, where we’ve entered a field length of 0 is where the length isn’t relevant but the entry is required:
With rstXML.Fields
.Append "DateCreated", adDate, 0
.Append "Subject", adChar, 150
.Append "Body", adLongVarChar, 5000
.Append "Category", adChar, 20
.Append "PercentComplete", adSingle, 0
.Append "Importance", adTinyInt, 0
.Append "SystemUsername", adChar, 50
End With
rstXML.Open
So now we return to the individual Outlook items as seen in our original code. We add a new record to the recordset and load the fields from the Outlook variables:
With rstXML
.AddNew
!DateCreated = itDateCreated
!Subject = itSubject

!Importance = itImportance
!SystemUsername = userNameRequired
.Update
End With
The Update method to our recordset clause doesn’t actually store the information in any table, as the recordset has no underlying table.
When all the data is loaded, it’s time to close and save the recordset. Before saving our recordset, we use a Kill statement to remove any existing XML file with the same name. Then the Save method of the recordset (passed the adPersistXML constant) generates an XML file from the contents of the ADO recordset (for this to work, you need ADO version 2.5):
On Error Resume Next
Kill xmlFile
On Error GoTo 0
rstXML.Save xmlFile, adPersistXML
rstXML.Close
Set rstXML = Nothing
The header section (schema) of the XML that’s generated looks like the following. You can see that the field types and sizes are stored in the header section.
<xml
xmlns:s='uuid:BDC6E3F0-6DA3-11d1-A2A3-00AA00C14882'
xmlns:dt='uuid:C2F41010-65B3-11d1-A29F-00AA00C14882'
xmlns:rs='urn:schemas-microsoft-com:rowset'
xmlns:z='#RowsetSchema'>
<s:Schema id='RowsetSchema'>
<s:ElementType name='row' content='eltOnly'
rs:updatable='true'>
<s:AttributeType name='DateCreated'
rs:number='1' rs:write='true'>
<s:datatype dt:type='dateTime'
rs:dbtype='variantdate' dt:maxLength='16'
rs:precision='0' rs:fixedlength='true'
rs:maybenull='false'/>
</s:AttributeType>
<s:AttributeType name='Subject' rs:number='2'
rs:write='true'>
<s:datatype dt:type='string' rs:dbtype='str'
dt:maxLength='150' rs:precision='0'
rs:fixedlength='true' rs:maybenull='false'/>
</s:AttributeType>
It’s the data section of the XML document that holds the information from the Outlook tasks. The following sample also shows the <rs:insert> tag, which provides some insight on how ADO keeps track of changes to the recordset:
<rs:data>
<rs:insert>
<z:row DateCreated='2002-03-06T15:51:47'
Subject='Makes Lots of Money '
Body='' Category='Project 2
' PercentComplete='0' Importance='2'
SystemUsername='Garry '/>
<z:row DateCreated='2002-03-06T15:52:20'
Subject='Spend All Profits on Chocolate '
Body='This project will require maximum consumption
of clients goods to test that the product sells.'
Category='Project 2           '
PercentComplete='0' Importance='0'
SystemUsername='Unknown    '/>
</rs:insert>
</rs:data>
</xml>
XML dead ends
One of the more hyped features of Access 2002 in the Microsoft documentation is its ability to import and export XML. We tried to import the XML file generated by ADO and discovered that Access wasn’t interested in reading the file (and offered no clues as to what was wrong). That really wasn’t a problem for us, as the XML exercise was all about viewing the data in Access without having to create an internal table.
We next investigated Access’s ability to use a recordset behind a form (instead of a SQL statement or query name) with code like this:
Set Me.Recordset = xmlRst
Unfortunately, this only works if your recordset has its CursorLocation property set to adUseClient. This precludes the use of external XML documents loaded back into the recordset to populate a form. A more significant issue is that Access 2000 reports can’t use recordsets.
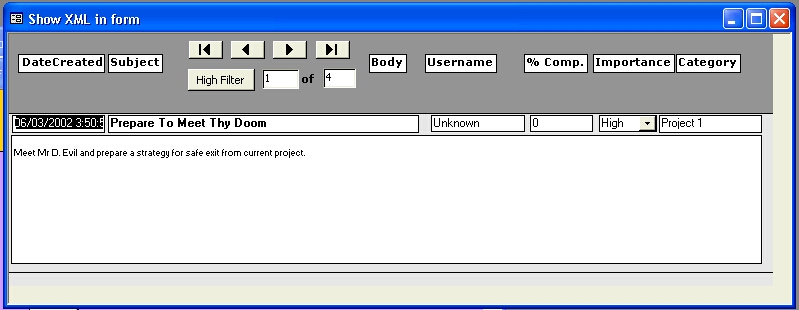
Figure 5
As far as we could see, we were left with only one choice in our quest to import the XML into a table. That solution was to use ADO again and cycle through the XML file using an unbound form, filling the fields as each record was displayed. This process starts with the Form Open event in the form shown in Figure 5. The Form Load code that creates the recordset and loads it from the XML file looks like this:
set rstXMLForm = New ADODB.Recordset

With rstXMLForm
.Open "c\my documents\tasks.xml"
Call cmdFirst_Click
Me!NumRecords = .RecordCount
Most of the navigation and display code is handled under the navigation buttons that we’ve added to the top of the form. The “Goto Next Record” and “Goto Last Record” buttons have the following code in the on-click events:
Private Sub cmdLast_Click()
On Error Resume Next
rstXMLForm.MoveLast
Call recordLocation
Call displayXML
End Sub

Private Sub cmdMoveNext_Click()
On Error Resume Next
rstXMLForm.MoveNext
Call recordLocation
Call displayXML
End Sub
All the display of the fields from the recordset loaded from the XML document is handled by assuming that the field names in the recordset are exactly the same as the names of the unbound fields on the form. That way, the same code can be easily transferred to another form and another XML recordset:
Private Sub displayXML()
Dim i As Integer
With rstXMLForm
For i = 0 To .Fields.Count - 1
Me(.Fields(i).NAME) = Trim(.Fields(i).Value)
Next i
End With

End Sub
There are two other notable features of this form that are highlighted by the Filter toggle button (see Figure 5). The click event applies a filter to the XML recordset that’s being used. The filter is applied to the Importance field of the Outlook tasks, which might be better described as the “task priority” field. Values for the importance field include High (2), Normal (1), and Low (0)—the same priorities that you attach to your e-mails. This is the code that allows the user to filter the tasks to show only the High priority tasks:
Private Sub tglFilterImp_Click()
With rstXMLForm

If Me!tglFilterImp Then
.Filter = "importance = 2"
Else
.Filter = adFilterNone
End If
recordLocation
Me!NumRecords = rstXMLForm.RecordCount

End With
Call displayXML

End Sub
The recordLocation routine that’s called in the routine captures the absolute location of the current record so that the users won’t have to scroll to find their record when the filter is applied and removed:
Private Sub recordLocation()
Dim recPosInt As Integer

recPosInt = rstXMLForm.AbsolutePosition
If recPosInt = adPosBOF Then
recPosInt = 1
ElseIf recPosInt = adPosEOF Then
recPosInt = Me!NumRecords
ElseIf recPosInt = adPosUnknown Then
recPosInt = -99
End If
Me!recPos = recPosInt

End Sub
The Download database
If you wish to try this Outlook demonstration, you’ll need a copy of either Outlook 2000 or Outlook 2002 on your computer. You’ll also need to set up some sample tasks in Outlook (if you haven’t already got some). For each task, you need to assign a Category. To make the Download database easier to understand, assign them a category of “Project 1” or “Project 2” for some of the tasks that you create. You’ll find the Category field on the bottom right-hand side of the New Task form in Outlook.
The Download database is in Access 2000 format. The database will look through your Outlook tasks, bring across the tasks, and store them in a table in the demonstration database. The software will also generate an XML file of the same tasks and store that in the same directory as the software.
Since Access occasionally loses references to external components, here are the external references that the Download database requires:
- Microsoft Outlook 9.0 Object Library
- Microsoft ActiveX Data Objects 2.5
- Microsoft DAO 3.51 Object Library
You’ll need ADOXDB if you’re interested in the XML exports and imports. You can download the installation kit for ADOXDB from www.microsoft.com/data.
Initially, we wrote all the non-XML software using DAO, as we’re running the software in an Access 97 database. We then converted the project to ADO. If you’re going to stay with the ADO code, you won’t need the DAO reference. If you’d like to revert to the DAO code, search for lines with a comment beginning with DAO and uncomment them. You’ll also need to comment all the lines with ADO so that you’re using the correct recordset handler for the code. Finally, for DAO you’ll want to comment all lines with “XML File >>” so that XML exporting is turned off.
If you have Microsoft Outlook 97, you must program in VBScript rather than VBA. This isn’t covered in this article.
Conclusion
This article has shown you how easy it is to import Outlook tasks into your database and use them in a meaningful way. In addition, we’ve demonstrated that integrating XML is going to be a tougher nut to crack than may be first indicated by Microsoft Press. It seems that the best way to guarantee success with XML is to use the same technique for writing the file that you use for reading the file. In this case, we resorted to ADO to generate the XML. That said, the XML file that was generated is now in a format that can be easily sent anywhere in the world. This can’t always be said about Outlook, Access, and other proprietary file formats.
