Treeviews are a common (and powerful) tool for creating Windows User Interfaces. Unfortunately, developing with the Treeview control is neither intuitive, nor easy. Doug Den Hoed provides a module that you can reuse to quickly add rich Treeview functionality to your own applications, including a form that your users can play with to create their own Treeviews on the fly!
A few years ago, one of my clients convinced me that a Treeview was the best way to display their data. I resisted using the control, mostly because of my ignorance about how Treeviews worked. I only knew that they were very different from the other types of controls I’d used within Access, and that the learning curve was steep. But learning the control turned out to be the worth the effort: my client loved the results.
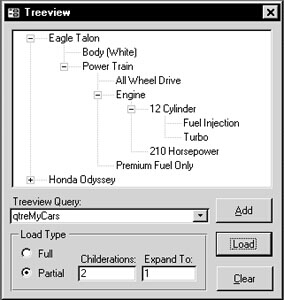
Over time, I generalized my solution into a library database (TreeLib.MDB), which I now use to quickly add Treeview functionality to other projects, without having to relearn everything. In fact, I even built a form (frmTreeviewBuilder) that lets users create their own Treeviews on the fly (you can see that form in Figure 1 and the data behind it in Figure 2).
Figure 1

Figure 2
TreeViews on the fly
When a user opens my frmTreeviewBuilder form, the top portion of the form displays an empty Treeview control. Users then select the query that they want to view from the combo box on the form, choose either Full or Partial Load Type, set the Childerations and Expand To values (if applicable), and click the Load button, which loads the Treeview and displays the root level of data. On the form, the Load Type determines how deeply the code populates the Treeview. For large sets of dynamic data, the Partial option causes the Treeview to display its initial screen sooner (I’ll assume Full when describing how my code works).
The combo box pulls its data from Access’s system object table, displaying all queries (MSysObjects.Type = 5) whose names are prefixed with “qtre.” I use “qtre” to flag queries suitable for displaying in a Treeview. The RowSource for the combo box looks like this:
SELECT MSysObjects.Name

FROM MSysObjects

WHERE MSysObjects.Name Like "qtre*"

AND MSysObjects.Type=5

ORDER BY MSysObjects.Name;
Clicking on the nodes in the Treeview expands and collapses the details underneath the node. When the user is done with their first set of data, they can click the Clear button to empty the display or choose another query to load its data. If none of the queries listed in the combo box are the one that the user wants, clicking the Add button on the form will open Access’s query builder and let the user create the query they need.
The queries that I created to work with frmTreeviewBuilder have three columns called Node, NodeID, and ParentID. For each record in the query’s Recordset, the Node field contains the text that displays in the Treeview (for example, Eagle Talon), the NodeID field contains a key value for that Node (for instance, the Power Train row has a NodeID of 8), and the ParentID field contains a reference to the parent record. At least one row must contain either a null or vbNullString value in the ParentID column: This designates the record as “root level” data. All other rows must have in their ParentID field the NodeID of the node they belong under (for example, Power Train is a child of Eagle Talon, so its ParentID is set to 8). The query that I used for the display in Figure 1, looks like this:
SELECT tblBillOfMaterial.InventoryAssemblyID

AS ParentID,

tblPartDefinition.PartID AS NodeID,

tblPartDefinition.PartDescription AS Node

FROM tblPartDefinition LEFT JOIN

tblBillOfMaterial

ON tblPartDefinition.PartID =

tblBillOfMaterial.InventoryPartID

WHERE (((tblPartDefinition.PartID)<19))

ORDER BY tblPartDefinition.PartDescription;
Processing the tree
The work of converting the query data into Treeview nodes is done by the treTreeviewFill routine. For each row in the qtreQuery, the code creates a node. The routine then calls itself (a “recursive” call), looking for other rows in the qtreQuery that belong to the current row (that is, rows with whose ParentID contains the same value as the current row’s NodeID). For each child it finds, the routine finds and creates that child’s children. When the routine finally gets to a child with no children, it moves back up a level to do the next child at the previous level, until there are no children there either, and then moves up again, and so on. Eventually, the routine will return to the row it started with and move to the following row. As you might have guessed, as the code moves through the Recordset, it will eventually hit a row that is a child of an earlier row and so has already been created as a node. In that case, the routine skips to the next row.
On top of all of this brute force effort, you’ll normally want the Treeview to keep the Nodes sorted alphabetically so it’s easier to find any particular node. That takes even more overhead, especially because the results from qtreQuery might not be sorted in a useful way. In my example, the load of the Treelib would have processed the records in this order: 8, 6, 1, 2, 3, 4, 9, 10, 5, 7, 11, skip 1^10 (already loaded, 12 With all of that skipping around in the Recordset, the order that the records were retrieved isn’t much help to the order of the records in the Treeview. It’s easy to imagine that increasing the data volume quickly degrades a Treeview’s load performance.
Consequently, I coined the term “Childeration” when I built frmTreeviewBuilder. The Childerations setting determines the maximum “depth” of children the Treeview should look for when it populates the Treeview. The code keeps track of how many Childerations deep it is relative to the root node (initially), or the expanding node (on click), and stops looking for children when it exceeds the Childerations setting. This saves processing time by loading only a few levels at any particular time. The “Expand To” setting is closely related to the Childerations setting: Expand To determines how many levels of children to show (initially), and to expand (on click).
Although they’re variable, I believe that my default values of Childerations = 2 and Expand To = 1 are optimal. Take another look at Figure 1 to see why. Expand To = 1 means that the Treeview will display only the root level when it first loads, and then expand one level of children per node click. By looking one Childeration deep, the code discovers whether the current node has children, and can decide whether to display a plus sign (+) beside the node as a visual indicator to the user that the node has children. By going two Childerations deep, the code has already loaded every node that the user might click, speeding up the user’s next expansion.
So it’s a trade off. The more data you load initially, the quicker the Treeview responds as you click it, but the longer it takes to load. I encourage you to experiment to decide what works best for your data. I should also mention that collapsing and then reexpanding a Partial Load Type Treeview will actually refresh the data as it’s redisplayed. That’s helpful when the data keeps changing.
Grow your own Treeview


Figures 3 & 4
I use the code from TreeLib.MDB (in the accompanying Download file) behind the custom Treeview controls that I put on my forms. I also dress my Treeviews up with icons using the ImageList control, which is in comctl32.ocx. Here are the steps that I followed when I built the sample form frmCustomerOrderProduct in TreeLib.MDB, excluding some theft of NWind.mdb data:
- Set references: Set or confirm a reference to comctl32.ocx; set a reference to TREELIB.MDBTreeLib.MDB or import its module).
- Create the form: I created a new form called frmCustomerOrderProduct to display my Treeview control, and set some basic formatting properties.
- Add the Treeview control to your form: From the menubar, I clicked Insert | ActiveX Control | Microsoft Treeview Control, version 5.0 (SP2). Don’t confuse this with Microsoft Treeview Control, version 6.0—it only works with VB6. Although it’s tempting, never copy and paste a Treeview; always paint a fresh one. Copied Treeviews might work in your development environment, but they lose their license in the copy, and will fail in your runtime version on a machine without a full installation of Access.
- Set Treeview options: I renamed my Treeview “objTreeview,” then right-clicked it and picked TreeCtrl Object, Properties, which brought up the property sheet shown in Figure 3. I set Style to “3 tvwPlusPictureText,” LabelEdit to “1 – tvwManual.” and Indentation to “200.” If you wish, you can change the font, and even the mouse pointer icon to be used when the mouse hovers over the Treeview.
- Add the ImageList control to your form: From the menubar, I clicked Insert | ActiveX Control | Microsoft ImageList Control, version 5.0 (SP2). Again, version 6.0 is for VB. Although this control is invisible at runtime, you use it to hold the icons you want to display in the Treeview.
- Load the ImageList: I renamed my ImageList “objImageList,” then right-clicked it and chose ImageListCtrl Object | Properties. I skipped to the Color tab, and set the Background to “Windows Background” and Mask color to “Button Face” under the “Windows System Colors” pallet. These settings will make your icons look their best in the Treeview. Then, as shown in Figure 4, I jumped back to the Images tab. I inserted three icons by browsing my harddrive for .ICO files, and gave each a Key that matched the data element that they represent. My routine uses those Keys to locate the right icon with a node.
- Associate the ImageList to the Treeview: I popped back into the objTreeview’s property sheet, went to the ImageList property, and selected objImageList from the drop down list. The Treeview control uses this property to locate the ImageList control that contains the icons it will use.
- Build qtreQuery: I’ll discuss the queries behind the Treeview after this step by step process.
- Call treLibrary functions: I populate objTreeview from the Form_Load event by calling the treTreeviewFill routine, passing a reference to the Treeview control and the name of the query to use:
Me.Visible = True

treTreeviewFill Me.objTreeview, _

"qselCustomerOrderProduct"
I set Me.Visible = True so users can watch and expand objTreeview while it populates, thanks to a DoEvents command in the treLibrary code that lets the Form repaint itself. I deleted some data from the Northwind tables that I borrowed in order to speed things up. In your application, you might want to filter the query with input from a form. With your Treeview loaded, you can add code to the Treeview’s Node_Click event to perform some action when the node is displayed: open frmCustomer, frmOrder, and frmProduct, for instance, depending on the node type. Get creative!
I built four queries to support objTreeview: qselCustomer, qselOrder, qselProduct, and qselCustomerOrderProduct. I forced ParentID to be a zero length string in qselCustomer, which causes my code to treat each Customer as a root node. The ParentIDs in qselOrder contain NodeIDs from qselCustomer, making each qselOrder row a child node of a qselCustomer record. Similarly, qselProduct ParentIDs relate to qselOrder NodeIDs. Each qselQuery includes a column called Image, where I store the appropriate ImageList Key for that entity.
The qselCustomerOrderProduct query that’s the basis for the Treeview is a Union of the three queries. Remember that the relationships between the records is established by the NodeIDs and ParentIDs. As a result, using a Join to tie the records together is unnecessary. To avoid the possibility of confusing which entity a NodeID or ParentID refers to, I prefixed each NodeID and ParentID with a tag to represent the proper entity (for example, “cust,” “ordr,” and “prod”). I didn’t bother with an Order By, either—the Treeview handles that.
Climb higher, branch out
There’s still more functionality in TreeLib.MDB. In the previous section, I used only the first two of 16 parameters that you can pass to treTreeviewFill. To really exploit my treLibrary, consider trying some of these options. Table 1 lists the all of the parameters and what they do.
Table 1. All of the treTreeviewLoad options.
| Parameter | Description |
| objTree | Treeview Control to manipulate |
| strTreeviewSQL | SQL, Table, or Query to open as Treeview’s recordset |
| strTreeviewPointerField | (Optional, default “ParentID”) Name of field pointing to parent’s primary key |
| strTreeviewKeyField | (Optional, default “NodeID”) Name of parent’s primary key field |
| strTreeviewVisibleTextField | (Optional, default “Node”) Name of field containing text to be displayed |
| strTreeviewImageField | (Optional, default “Image”) Name of the field containing the number of the Image |
| strTreeviewSelectedImageField | (Optional, default “SelectedImage”) Name of the field containing the number of the SelectedImage |
| intRecordsetType | (Optional, default dbOpenDynaset) for speed, updatability |
| intRecordsetOption | (Optional, default dbReadOnly) for speed, updatability |
| fSorted | (Optional, default True) formats objTree root as sorted |
| fFullPopulate | (Optional, default False) True = Populate all levels – passed in to treTreeviewAddBranch |
| intMaxChilderations | (Optional, default 2) # of CHILDren genERATIONS to populate in Treeview; Smaller Number, Faster Performance. Passed in to treTreeviewAddBranch; NOTE: ignored if fFullPopulate = True |
| intExpandToChilderation | (Optional, default 1) used in recursive calls to treTreeviewAddBranch to determine whether to expand the current childeration |
| nodCurrent | (Optional) the node that was just clicked, from which further childerations will be branched; NOTE: ignored if fFullPopulate = True |
| fCreateDuplicateNodes | True = if a duplicate node is found in a recordset (that is, reused parts across different bill of materials), add a separate “duplicate” node; False = if a duplicate node is found in a recordset (for example, third pass at a complex treeview load, like in the KB frmUserEntityShow), do NOT create a separate, duplicate node, but instead, use the existing node |
| fTreeviewLoadContinuation | True = allow multi-pass loads, where different queries build upon the existing nodes in the treeview (with the logic to support it in “branch order”) to permit the gathering of branch information from distributed, eclectic sources; NOTE: did NOT test it where fFullPopulate = False, since that’s an unlikely case |
The comctl32.ocx Treeview control is a powerful interface that users love to use, but developers hesitate to confront. My treLibrary, frmTreeviewBuilder, and examples let you easily tap into its features. I invite you to use TreeLib.MDB to offer users Treeviews on-the-fly, custom Treeviews with icons, and duplicate branching. And, once you know how it works—Improve it! Share it!
Sidebar: Using TreeLib.MDB
To use TreeLib.MDB in your own applications, set a reference to comctl32.ocx, which is where the Treeview control itself lives. Check the reference to comctl32.ocx in TreeLib.MDB too, in case your path to comctl32.ocx is different than mine, and fix it if it’s missing.
Next, either set a reference to TreeLib.MDB or import the treLibrary module into your MDB. I expose a way to open frmTreeviewBuilder in TreeLib.MDB from your database by calling the routine treOpenForm and passing the parameter tregOPEN_FORM_TREEVIEW_BUILDER, but it isn’t particularly helpful. I haven’t found a way to have the combo box on the form list the queries from your database—the list is always the queries from TreeLib.MDB. Your users can’t save their queries to the TreeLib.MDB and, even if they did, the queries wouldn’t run anyway, since the tables the queries depend upon are back in your database. The simplest solution is to just import frmTreeviewBuilder into your application.
Finally, build a couple of example qtreQueries using the conventions I described and test them with frmTreeviewBuilder. Usually, I draw my hierarchical data from four different kinds of tables: tables with self-joins, like “tblCompanyPeckingOrder”; utility tables like “tblMyAppNavigation”; system tables like “MSysObjects” (which I’ve provided as another example); or from a set of related tables like “tblCustomer, tblOrder, tblOrderDetail.” In the latter case, I make my qtreQuery Union the tables together, and prefix the NodeID’s of each with a tag to make them unique (for example, cst1, odr1, dtl1). Also, I use the Nz() function to make sure my root queries return a vbNullString rather than Null to match the “string” datatype of my concatenated NodeID’s (that is, “cst1,” rather than 1).
As long as you follow the qtre conventions and choose the Load Type prudently, frmTreeviewBuilder will be enough to satisfy your Treeview needs.
Other Pages On This Site You Might Like To Read
Access Interfaces: Building Explorer-style Forms
Displaying Hierarchical Data in a TreeView
