This month, Rebecca Riordan discusses the importance of giving your users control over fundamental UI elements such as fonts and colors. It’s simple to do, and your users will love you for it.
One of the fundamental principles of user interface design, and perhaps the most important, is “Put the user in control.” Get it right, and users will be amazingly tolerant of the occasional infelicities in your design. Get it wrong, and it doesn’t matter how beautiful your color schemes or elegant your graphic elements are–your system will be regarded as fundamentally broken.
Most of us work pretty hard to keep at least the illusion of having our users in control. We provide multiple paths through the application and multiple levels of undo. We’re careful to prevent our applications from doing anything that might seem arbitrary or high-handed (you do do these things, right?). But developers hardly ever allow the user to control the most fundamental characteristics of the user interface: the fonts, colors, and graphic styles. And yet, as you’ll see this month, doing so is (at least technically) a simple process.
The canonical method for providing user customization in Windows applications is, of course, the Windows Control Panel. Access provides partial support for Control Panel settings, but that support is problematic.
If you use the constants shown in the list that’s included in the Download file, Access will update its UI colors when the user changes them in the Control Panel. This is great, as far as it goes. Unfortunately, that’s not very far.
The first problem is that it’s difficult to determine how to map the Control Panel components to the elements of a database application user interface. The vbWindowBackground is straightforward enough, but what color should the background of a textbox be? You can’t simply pick something–vbInfoBackground, the background color of a ToolTip, for example–without running the risk of surprising your application’s users. (Remember that bit about not appearing arbitrary?)
The other problem, of course, is that Access only supports the colors specified in the Control Panel, not the fonts and (most importantly) the font size chosen by the user. There are Windows APIs that allow you to retrieve this information, but you must do so manually and, I’ll warn you up front, it gets ugly.
In most situations, custom configuration is simple to implement and matches the needs of your users reasonably well. At any rate, while I’ve had clients complain about not having any way to change the color of a form, I’ve yet to have a customer complain that the application didn’t automatically reflect the Control Panel settings.
Designing the infrastructure
Figure 1 shows a simple little form from this article’s sample database. As you can see, it provides a way for the user to change the font used to display the controls’ labels, the background color of textboxes, and the control style.
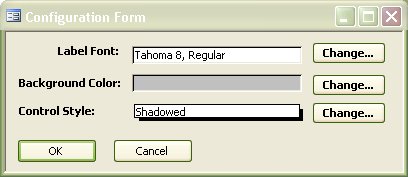
Figure 1
The first thing that may strike you about the sample is that it’s a slightly odd collection of properties. Actually, I picked this set of properties intentionally to make the point that you need to consider what properties you should expose for user configuration. (Really, it was intentional; I wouldn’t lie to you about something like that.) With this form, you’re working with essentially three different types of settings–fonts, colors, and possibly graphics–but each type appears in a lot of different places.
So, for example, you might allow users to choose one font and size for labels and a different one for control text. Or separate fonts for labels, textboxes, and listboxes. Or separate fonts for active and inactive versions of each of these, or… You get the picture.
This is one of those situations where more is not necessarily better. If you were to allow users to individually set the visual characteristics of each and every form and control in your application, your good intentions would almost certainly backfire: Your users would be overwhelmed. It’s better to select categories of settings and set those categories at a level of granularity that suits the users. Then you need to implement those categories consistently. The only practical exception to this principle is to allow users to set the background color of individual forms. Some users find having each form set to a different color creates a useful sort of “roadmap”: They know the pink form is for Customers and the yellow one is for Products, for example.
Once you’ve determined what characteristics you’ll allow users to change, the next step is to determine a persistence strategy. You can persist a set of user selections in a table, in custom properties, or even in an XML file or the Registry (if you’re brave). I tend to use tables, simply because I think in a table-oriented way, but you should choose the method that makes best sense in your environment.
You must also determine where the customizations will be persisted. In the canonical multi-user application that splits the front-end interface elements and back-end data, you generally want to store the customization in the front-end database. This works well if there’s a more or less one-to-one relationship between users and workstations. This is typically the case–each user has a desk, and each desk has a computer. But if you need to support roaming users who might be working remotely from different workstations, or if a single workstation is shared among multiple users, then it’s best to persist the customizations in the back-end database.
Assuming that you’re storing the data in a table, you must decide what the structure of the table is to be. Figure 2 shows a classic normalized version. If there’s any possibility that the set of characteristics will change (and it happens more often than you might expect), this is the structure to use.
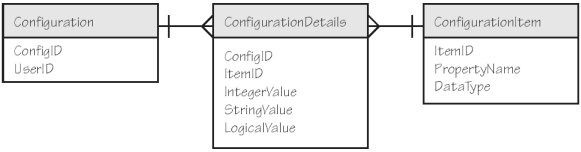
Figure 2
In this table, each record contains a field for a String value (such as a font name), an Integer value (such as a color value), and a Logical value (as is used by the Bold and Italic settings). For any given row, two of these three fields will be empty, resulting in a very sparse table and some waste of disk space. However, since values of all three types must be stored, the only alternative would be to use a generic field type such as String and cast the values to the appropriate type at runtime, which would have much higher overhead.
Alternatively, you can flatten the table schema as shown in Figure 3. This makes the database analyst in me shudder, but in reality it’s a very good solution for the majority of applications. Like any flat structure, it does require that you know in advance what properties you’ll allow to be customized, but as you’ve seen, this will be determined during your initial analysis. Furthermore, if the set of customizable characteristics changes, you’ll need to change both the structure of the table and the code that uses it.
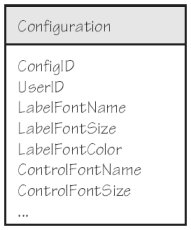
Figure 3
Despite these problems, this flat structure has much to recommend it. It requires no joins, and only a single record need be returned from the database in client/server environments. Also, because the field names are known in advance, runtime processing is somewhat simpler. This is the structure I use most often in my own work, and the one demonstrated in the article’s sample database.
Coding the common dialogs
Once you’ve designed your infrastructure, the next step is to build the configuration form for your application. The form in the sample database, shown in Figure 1, demonstrates the three most common techniques that you’ll require for this purpose. Each of the buttons labeled “Change…” opens a subsidiary dialog that allows the user to choose the appropriate settings. The first two buttons use standard Windows dialogs, and the third opens a custom form.
The form uses the Microsoft Common Dialog ActiveX control to open the standard Windows Font and Color pickers. You should be aware that the Common Dialog control has some problems when used from Access, and many developers prefer to go directly to the Windows API. My requirements are straightforward, however, and the Common Dialog ActiveX is more than sufficient for my purposes.
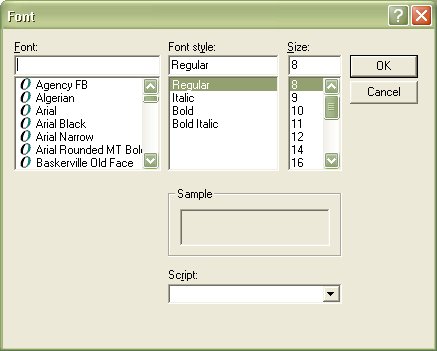
The following code shows the Click event code for the single font property on the sample form. Using commonDialogs (the name of the Common Dialog control that I dragged onto the form), the code first sets the control’s Flag property to cdlCFScreenFonts so that only fonts that can be displayed on the screen are shown (that is, no printer fonts will be displayed). The code then calls the ShowFont method to display the dialog modally. The result (with the font list on my system) is shown in Figure 4.
Private Sub showFonts_Click()

    With commonDialogs

        .Flags = cdlCFScreenFonts

        .ShowFont

        fntName = .FontName

        fntSize = .FontSize

        fntBold = .FontBold

        fntItalic = .FontItalic

    End With

    Me.labelFont = makeFontName

End Sub
Figure 4
The Common Dialog control exposes the user’s selections as a set of properties that remain available after the font picker itself is closed. My code uses the properties–FontName, FontSize, and so on–to set local variables to the values that the user selected in the dialog. The last line in the procedure calls a utility function of mine, makeFontName, that concatenates the values stored in the local variables. The text of the font textbox is set to the value returned from the makeFontName function.
The next set of code shows the click event handler for the Change button associated with the control background option. It’s a simpler version of the previous code. The ShowColor method of the commonDialogs control is called to display the standard color picker shown in Figure 5. Once the user closes the dialog and execution continues, the procedure sets the local variable ctrlColor to the selected color (returned by the Color property of the common dialog) and sets the background of the relevant control on the configuration form:
Private Sub showColors_Click()

    commonDialogs.ShowColor

    ctrlColor = commonDialogs.Color

    Me.bkgdColor.BackColor = commonDialogs.Color

End Sub
Figure 5
Coding custom dialogs
As you can see, these are very simple procedures to implement. This approach also has the advantage of using dialogs that your users are likely to be familiar with. The problem is that these dialogs may provide more functionality than your application might need. The Font picker, for example, allows the user to select the font name, font size, and font style. But you might want to constrain the font size, for example, to avoid having the user select a font that’s too big to be displayed in the textboxes on your forms.
In this case, of course, you’ll need to create custom dialogs. The third option on the configuration form, Control Style, shows the general procedure. The custom form in the sample database is shown in Figure 6. The following code block shows the click event handler that opens it:
Private Sub showStyles_Click()

    DoCmd.OpenForm "ControlDisplay", acNormal, _

        , , , acDialog

    If Application.CurrentProject.AllForms_

       ("ControlDisplay").IsLoaded Then

        controlStyle = Forms!ControlDisplay.Tag

        DoCmd.Close acForm, "ControlDisplay"

    End If

    Me.ctrlStyle.SpecialEffect = controlStyle

    Me.ctrlStyle = makeStyleName

End Sub
Figure 6
The basic procedure here is identical to the other two procedures you’ve seen. The difference is in how the dialog itself behaves. The first line of the procedure opens the dialog modally. If the user selects Cancel, the form is closed. If, however, the user selects OK, the form is hidden so that its values remain available to the click procedure that called it.
As you can see, the click procedure uses the IsLoaded property to determine what action the user took–the form will only be loaded if the user clicked the OK button. The code then sets the local variable, controlStyle, and the style of the control.
All that remains is the mechanics of persisting and restoring the values the user has chosen. The following code from the sample database stores the values to the database. Remember that each of the click procedures stored the user’s choices in local values. All this procedure needs to do, then, is update the appropriate record using standard data handling techniques:
Private Sub btnOK_Click()

    Dim rs As Recordset

    Set rs = CurrentDb.OpenRecordset("Settings")

    With rs

        .Edit

        !FontName = fntName

        !FontSize = fntSize

        !FontItalic = fntItalic

        !FontBold = fntBold

        !Color = controlColor

        !Style = controlStyle

        .Update

    End With

    rs.Close

End Sub
For efficiency’s sake, the procedure updates all values, whether or not they’ve been updated by the user. This works perfectly well in the sample since, as you’ll see, the local variables are initialized in the form’s Load event. If you vary this technique, you’ll need to check for Null values here.
A production application would require DAO code to find the appropriate record to update. Because the configuration table in the sample database contains only a single row, I’ve omitted it from the sample.
The following code loads the stored customizations. The first section of the procedure consists of standard data handling code to load the values into local variables. Again, I’ve omitted the code to find the appropriate record:
Private Sub Form_Load()

    Dim rs As Recordset

    Set rs = CurrentDb.OpenRecordset("Settings")

    rs.MoveFirst

    With rs

        fntName = !FontName

        fntSize = !FontSize

        fntItalic = !FontItalic

        fntBold = !FontBold

        controlColor = !Color

        controlStyle = !Style

    End With

    rs.Close

    Me.labelFont = makeFontName

    Me.bkgdColor.BackColor = controlColor

    Me.ctrlStyle.SpecialEffect = controlStyle

    If controlStyle = 0 Then

        Me.ctrlStyle.BorderStyle = 0

    End If

    Me.ctrlStyle = makeStyleName

End Sub
After the code that closes the recordset it simply sets the control properties as required. The only tricky bit here is the SpecialEffect property. A bug in Access sets the BorderStyle property to Heavy when you set this property to 0 (Flat). The If statement in my code handles this bug by resetting the property to 0 for a fine border.
Because the sample form is only using each property in the table to set a single property of a single control, the sample procedure does this explicitly:
Me.bkgdColor.BackColor = controlColor
Alternatively, you could loop through the Controls collection of the Form to set the appropriate property for all controls of the correct type, but the basic procedure would remain the same. You can use a control’s ControlType property to determine what kind of control you’ve retrieved from the Controls collection.
None of the procedures that I’ve shown you this month are particularly difficult technically–opening dialog boxes, loading and restoring values from a table, and setting control properties at runtime are all standard stuff. The real cost of providing this functionality is first in the analysis: deciding what characteristics ought to be configurable by the user and how they can best be stored. That cost is fairly minimal, so consider providing this functionality in your next system. It doesn’t always make sense, but it’s always worth considering.
