Your users like to have some flexibility in how they get their printed data–but they give up the ability to modify printer settings when you compile or secure your applications. Or do they have to? Russell Sinclair takes a look at how you can handle form and report print layouts in secured or compiled projects while still giving your users a little freedom.
If you create applications that you sell to the general public, or if you create applications that you can distribute to other users, one of your concerns is that other people can view or modify the design of your application. Access provides two solutions to this problem. The first solution is to implement Access security in your application. This option is good if you’re distributing your application within your organization. However, if you’re selling your product and are concerned about someone else stealing your intellectual property, it may not be enough. There are, for instance, more than a few products on the market that help people recover lost passwords for Access databases, Access security, and VBA security. An unscrupulous user can easily use these tools to break open your database and steal your code. So, the next step after applying Access security is to compile your Access projects to hide your code from your less scrupulous users.
One major problem with both of these options is that they secure users completely–including preventing them from making any changes to your objects. This includes changing the default layout of your forms and reports when they’re printed. If a user just changes the printer a report uses, or modifies any of the print settings, those changes won’t be retained the next time the report is run. This can be extremely frustrating for users and for the support personnel who have to take the inevitable technical support calls when the product ships. Fortunately, if you’re working with Access 2002 or later, there’s a solution: the Printer object.
The Printer object
In previous versions of Access, Microsoft provided us with a few printer properties that were extremely difficult to use: PrtMip, PrtDevMode, and PrtDevNames. These properties were actually stripped-down versions of the Windows API structures used by C++ developers when working with printers. They were incredibly difficult to work with and were often the cause of crashes in Access applications that tried to make use of them (check out my “Access Answers” column in the May 1998 issue for an illustration of just how crazy these properties are to work with). These properties also suffered from one serious setback–they had to be applied when a report was open in design view. If you secured users and prevented them from viewing reports in design view, or if you compiled your project, you could no longer use these properties. The Printer object and Printers collection, on the other hand, are easy to use and can be applied in any view in which you open a report.
The Printers property of the Application object is a collection of all of the installed printers on the computer that Access is running on. Each Printer object in this collection provides you with information that you can use to manipulate the settings for that printer. Table 1 contains a list of the properties of the Printer object and a short description of the purpose of each property (see the Access VBA documentation for full details).
Table 1. The Printer object.
| Property | Purpose |
| DeviceName | The name of the printer as it appears in the Windows Printer list. |
| DriverName | The name of the driver used for the printer if used from a Form.Printer or Report.Printer property, or the Windows spooler driver if read from a printer in the Printers collection. |
| Port | The printer port used. |
| TopMargin, BottomMargin, LeftMargin, RightMargin | The size of each respective margin, in twips (multiply centimeters by 567 or inches by 1440). |
| ColumnSpacing, RowSpacing | The vertical and horizontal spacing between detail sections, in twips. |
| DataOnly | Specifies whether to print data only or include labels, borders, and other graphics. |
| DefaultSize | Specifies whether to use the detail section size for printing. |
| ItemSizeHeight, ItemSizeWidth | Used to explicitly set the size of the detailsection when DefaultSize is False. |
| ItemLayout | Determines whether detail sections are printed across and then down or down and then across. |
| ItemsAcross | The number of columns to use. |
| Copies, ColorMode, Duplex, PaperBin, PaperSize, PrintQuality, Orientation | Standard printer settings on print (the most important probably being Orientation). |
There are a few ways to access Printer objects:
- You can loop through all printers on the system by using the Application.Printers collection. This will provide you with access to each printer and give you the ability to change their settings.
- You can also access and/or modify the default printer assigned to Access (the system-default printer) by using the Application.Printer property.
- Each report and form has a Printer property that can be used to work with the printer settings currently assigned to the object.
Forms and reports also have the Boolean property UseDefaultPrinter that specifies whether the object is currently configured to use the Application.Printer object when they’re printed.
Putting the Printer object to work
So, you may be thinking–now that you know you can directly manipulate the printer settings for a form or report through its Printer property–that you’re good to go. There are a few small problems.
Any change you make to the Printer property when a report is open in preview mode will result in the entire report being laid out again. If you have a large or complex report, this can be a very slow process. Each time you modify a single property, you have to wait for the layout to complete before the next property is set. When I first tried this on a simple tabular report based on the Customers table in the Northwind database, it added about 30 seconds to the report preview time. I can’t see any user being happy with this option.
As a workaround, I tried setting the UseDefaultPrinter property of my reports to True and then working with the Application.Printer object to force the report to layout using the properties I specified. Basically, I selected a Printer object from the Printers collection, set the properties I wanted, and then assigned that object to the Application.Printer object to force the default printer, as in the following code:
Dim prt As Printer

Set prt = Application.Printers("LaserJet")

With prt

    .PaperSize = acPRPSLetter

    .TopMargin = 567

    .BottomMargin = 567

    .LeftMargin = 567

    .RightMargin = 567

    .Orientation = acPRORLandscape

End With

Set Application.Printer = prt
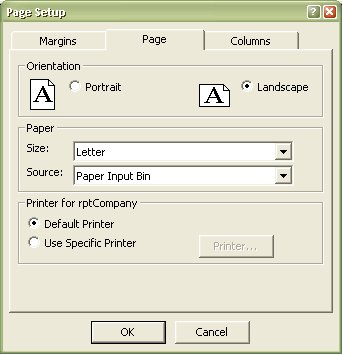
This code almost worked. The problem is that some of the settings applied to the default printer don’t get applied to reports when you print them. The property that was the biggest problem in this case was Orientation. No matter what I did to the system printer, the orientation of the report would remain as originally set. Another problem was that if a user opened the Page Setup dialog, it would appear that the default system printer was being used for the report (see Figure 1). This may or may not have been true–the user may have just been seeing the temporary setting that I’d made.
Figure 1
After much playing, I finally found a better method to use when specifying printer settings: I directly set the Printer property of the form or report to a Printer object after configuring that Printer object. The same code shown before translates to this code when I use an arbitrary Printer object rather than the system printer:
Dim prt As Printer

Dim rpt As Report

Set prt = Application.Printers("LaserJet")

With prt

    .PaperSize = acPRPSLetter

    .TopMargin = 567

    .BottomMargin = 567

    .LeftMargin = 567

    .RightMargin = 567

    .Orientation = acPRORLandscape

End With

DoCmd.OpenReport "rptCompanies", acViewPreview

Set rpt = Reports("rptCompanies")

Set rpt.Printer = prt
This code still incurs the overhead of a refresh when the Printer object is set. However, because I only access the form or report’s Printer property once, the overhead is minimal. One caveat with this code is that you can’t modify any of the Printer properties of a report during any of the events in that report. This means that you can’t set the Printer object for a report in the Report_Open event to try to avoid the doubling-up of the report layout.
Reading and saving layout information
Now that I had a strategy for applying the report layout at runtime, I needed one more feature: the ability to save the report layout so that I could apply it again at a later time. In the case of MDB and MDE applications, this is relatively simple. All I would need is a local table with the properties of the Printer object that I could use to store the settings. However, I wanted a solution that would also work with ADP and ADE applications. Since you can’t create local tables in Access projects, I needed to store my information in some other way.
There are all kinds of ways that you can work with data in Access. You can save data in text files, open external databases in code using DAO or ADO, or use XML along with some of the features in Access 2003 to work with the data. None of these appealed to me, because they wouldn’t solve my problem in all situations as efficiently as possible. Fortunately, ADO, which you can use in any version of Access, provides its own method for storing data that isn’t based on a pre-existing data store. This means that you can create an ADO recordset on the fly, put some data in it, and then save it to your hard drive. You can persist this data in either a proprietary ADO format called ADTG or in an XML format.
The nice thing about data stored in ADTG format is that you have access to all of the functionality that ADO provides for normal recordsets, but you determine where, when, and how the data is saved to disk. Unlike an XML file, ADTG is a binary format, so the file can’t be opened and modified in Notepad (remember, if you’re securing or compiling your application, it’s because you don’t want your users to change it). This means that you don’t need to create an Access database and tote along the DAO code to work with it.
To create an ADO recordset, simply create a new recordset, add fields to it, and then open it. This clip from the ReportDataset function in the sample database illustrates the technique:
Dim rst As ADODB.Recordset

Set rst = New ADODB.Recordset

rst.Fields.Append "ReportName", adVarWChar, 64

rst.Fields.Append "UseDefaultPrinter", adBoolean

.

.

.

rst.Open
To save the recordset, simply call the Save method and pass in a file name. If the file already exists, it will be overwritten. If the recordset has already been saved to disk, omit the file name or a runtime error will be raised if you use the same file name again. If you’d prefer to save your data in the XML text format, pass the adPersistXML constant as the second parameter to the Save method.
The structure of the recordset I created is very simple. I simply took all of the properties of the Printer object and stored them in fields with corresponding names and the appropriate data types. All of the properties of the Printer object are stored just in case I might use them at a later time (the DriverName and Port properties have yet to be of any use to me, other than for debugging). You can see the code for this in the SaveReportSettings function in the sample database.
There are two methods you can use to save the report settings at the appropriate time. The first is to add code to every report in the Report_Close event that calls the SaveReportSettings function. This option leaves a bit to be desired. It results in your report settings being saved every time a report is closed. Since the function that applies saved settings to a report only runs if saved settings are found, you’ll be applying report settings every time the report is opened–not the most efficient solution. The other option is to override the Page Layout functions in the menus with your own code that saves the report settings when the user makes changes to the layout. The reports in the sample database all illustrate this functionality by attaching a custom shortcut menu bar to each report. This menu item calls code to launch the Page Setup dialog and save the report settings for the active report, as in the following code:
Dim rpt As Report

Set rpt = Screen.ActiveReport

DoCmd.RunCommand acCmdPageSetup

SaveReportSettings rpt
When you replace the menu items, don’t forget to save the menus, toolbars, and shortcut menus. If you miss one of these items, your layouts won’t be saved.
Report layouts must also be handled in such a way that they’re applied at the appropriate time. The way that I handle this in my databases is to call my own OpenReport function (a simple one is illustrated in the sample database) that takes care of opening reports and applying report layouts. An advantage to this kind of overriding of the DoCmd.OpenReport call is that you can also handle other common functions in this procedure. I’ve used it in the past to provide graceful handling of security violations, and I’ve also used it to provide a simple way to ignore the annoying error 2501 (the error raised when you cancel opening a report in the NoData event). I’m sure you can think of your own uses for this function as well. All it takes is a simple find/replace operation and some discipline to ensure that you always use your customized OpenReport function instead of DoCmd.OpenReport.
You may also notice in the ApplyReportSettings function that there a couple of places where I turn against my deepest instincts and use On Error Resume Next. To be perfectly honest, this is out of sheer laziness. The first place I do it is when I’m getting a Printer from the Printers collection by name. If the call fails, it means that printer information is out of date or incorrect. I could have handled this gracefully, but I’m sure if you want to correct it you’ll be able to easily figure out the code. The other place I turn this feature on is when I’m applying the printer settings. The reason I use Resume Next in this case is because setting certain properties will fail on some printers with an error that the property isn’t supported. You can use an API call to a function called DeviceCapabilities (see MSDN for full details) to determine the supported features on a printer. However, I didn’t think that this warranted the effort involved. If you’re interested in doing this, I’d love to see the end results.
Limitations
As with all good things, this functionality does have its limitations. The most important limitation is that you need to be using Access 2002 or Access 2003 in order for the code to work. If you’re developing on 2000 or earlier, you’re out of luck as far as this code goes.
