A well-designed application provides help on several levels. Control captions, status bar text, and ToolTips provide passive support. Progress meters, system messages, and traditional online Help provide reactive support. Both of these types of user assistance add to the application’s ease of use. But there’s a third type of user assistance that’s frequently overlooked–Rebecca Riordan explains.
Proactive user assistance monitors the way the user interacts with the system and offers suggestions to the user about more efficient work practices. The best known commercial example of proactive user assistance is the Microsoft Office Assistant, which suggests shortcuts or more efficient work methods to the user. The Office Assistant monitors the user’s actions, and provides tips and suggestions based on the types of tasks the user performs. The idea is that the Assistant is supposed to act as a kind of application mentor, providing the types of hints that an experienced co-worker might provide.
This is great in theory. Unfortunately, the Office Assistant is also one of the best examples of the major drawback of this kind of assistance: Rather than being seen as a collaborator, it’s often seen as some kind of virtual Big Brother. Who wants a computer telling you how to do your job?
It’s been my experience that this has at least as much to do with the Assistant itself as with the type of help it provides. Either you find the idea of an anthropomorphic paperclip endearing, or you don’t. I don’t, and my response has nothing whatsoever to do with what the irritating little creature is doing. I just don’t like it. Neither do a lot of my clients.
But it’s important to separate the assistance being provided from the delivery mechanism. The Assistant is an example of what Microsoft calls a “conversational interface,” and like any other user interface technique, it’s only one choice among many. The Office object model makes the Assistant available to your programs (provided the user has Office installed locally), or you can use the Microsoft Agent ActiveX control. Microsoft Agent is freely distributable with runtime applications and provides a more sophisticated programming environment. You can, for example, create your own Agent figure, which isn’t something you can do with the Office Assistant.
Proactive Help that works
Just because Microsoft uses the Office Assistant to deliver proactive Help, it doesn’t necessarily follow that you can’t use a more traditional mechanism to achieve the same end. You could use the status bar to display your tips or, as I do in my sample, use a simple textbox control on the form. The cue banners discussed in Doug Steele’s “Access Answers” column last month might be regarded as a kind of proactive Help interface that uses the actual control that the user is interacting with.
Whether you use the “conversational interface” provided by Microsoft Agent or a more traditional interface mechanism, the most difficult part of providing this style of assistance is determining what your application should suggest, and under what circumstances. I’ve been told that Microsoft bases its suggestion set on tests in its usability labs, a luxury that isn’t available to most of us. In the absence of a usability lab, you’re left with your imagination. One approach is to walk through the various methods for performing a task, choose the most efficient, and suggest it when the user chooses one of the others.
Menu shortcuts are an obvious option. You might decide, for example, that if a user chooses Delete from the Edit menu three times, you’ll suggest to him that he could use Ctrl+D instead, or that when a user uses the Find operation five times, she might want to use Filter instead. Obviously, these situations and suggestions (I’ll call them “suggestion rules”) are going to be specific to your application and your user base.
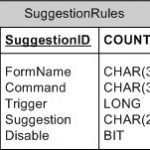
Figure 1 shows a simple table schema for storing suggestion rules. The FormName and Command fields identify the Form and Command to which the rule applies, respectively. The Trigger field, a long integer, contains the number of times the operation should be performed during the session before the suggestion is made. The Suggestion field contains the text of the prompt, and the Disable field allows the user to turn off the suggestion.
Figure 1
This is a simple schema, and it will handle simple rules. So, for example, the rule that you suggest Ctrl+D to users after they’ve chosen Delete from the Edit menu three times would be represented as shown in Figure 2. If you wanted the rule to apply to all of the forms in the application, you could either leave the FormName field empty, or perhaps use the text “All”, which is somewhat clearer.

Figure 2
Of course, your rules may vary. In fact, they’ll probably be more complicated and you’ll have to adjust your table schema accordingly. For example, you might want to specify the Trigger more discretely, allowing rules to be triggered three times in a session, or three times in an hour. You could accommodate that functionality by adding a Period field to the table.
In a multi-user system, you’d need to split the Disabled field out into a separate table that included the UserName so that the system could track which rules to show to which users. The schema and the rule processing for your application may be more complex, but the general approach is the same as that shown for this simple example.
Implementing the rules
Having arrived at a set of suggestion rules and a schema to represent them, the next step is to implement some form of event-logging mechanism. Figure 3 shows a schema for tracking each occurrence of a trigger event.
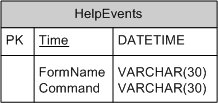
Figure 3
Again, the schema is very simple. You need to record the Time that the event occurred and the type of event. In a multi-user environment, you’d also need the UserName. If you’re triggering events based on the number of times they occur in a single session, you must clear all records from this table when the application starts.
With this infrastructure in place, you can implement your proactive Help system. Logically, there are two steps that need to occur each time a trigger event occurs. First, you must add a record to the HelpEvents table (or whatever you’re calling it), and then you must check whether the event has occurred often enough to meet the suggestion rule.
The following code shows a simple function for adding a record to the HelpEvents table. There’s nothing tricky here; it’s straightforward DAO code. The function is passed the FormName and Command name as arguments. The function should be called at the beginning of each command event handler:
Public Sub AddEvent(theFormName As String, _

theCommand As String)

Dim rs As DAO.Recordset

Set rs = CurrentDb.OpenRecordset("HelpEvents")

With rs

.AddNew

!Time = Time

!FormName = theFormName

!Command = theCommand

.Update

End With

rs.Close

Set rs = Nothing

End Sub
The code to determine whether the suggestion has been triggered relies on two queries. The SQL command for the first is shown in the following code, while Figure 4 shows the corresponding design grid. The query, called CountEvents in the sample database in the accompanying Download, is straightforward. It accepts two parameters, theFormName and theCommand, and returns the number of times the specified event occurred:
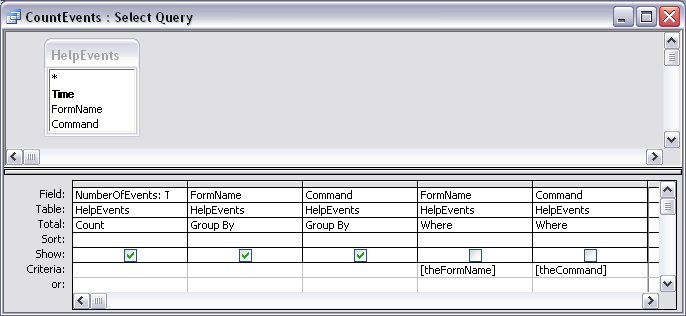
Figure 4
SELECT Count(HelpEvents.Time) AS NumberOfEvents,

HelpEvents.FormName, HelpEvents.Command

FROM HelpEvents

WHERE (((HelpEvents.FormName)=[theFormName])

AND ((HelpEvents.Command)=[theCommand]))

GROUP BY HelpEvents.FormName, HelpEvents.Command;
The CountEvents query is used in a second query, called TriggerEvent in the sample database. The SQL for this query is shown in the next code block, and it’s shown in Design view in Figure 5. Again, the query is fairly straightforward. It returns a record only if the CountOfEvents field calculated in the CountEvents query is greater than or equal to the Trigger value specified by the rule:
SELECT SuggestionRules.Suggestion, CountEvents.FormName,

CountEvents.Command

FROM CountEvents INNER JOIN SuggestionRules

ON (CountEvents.FormName = SuggestionRules.FormName)

AND (CountEvents.Command = SuggestionRules.Command)

WHERE (((SuggestionRules.Disable)=False)

AND ((CountEvents.NumberOfEvents)>=

[SuggestionRules].[Trigger]));
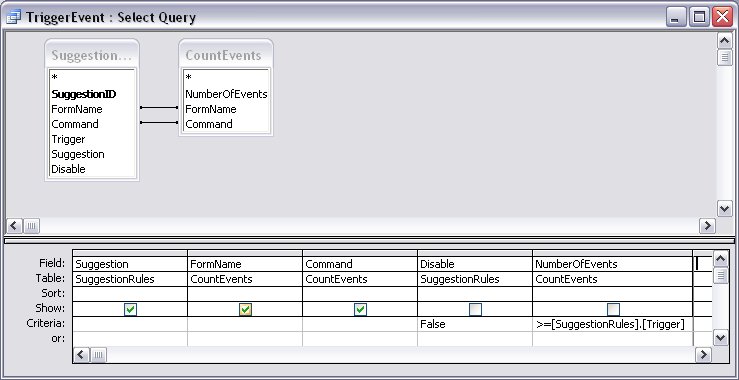
Figure 5
Displaying the Help
The following code shows the procedure that displays the suggestion. It sets a variable, qdef, to the TriggerEvent query, sets the [theFormName] and [theCommand] parameters, and then opens a Recordset against the result. TriggerEvent only returns a record if the criteria for triggering the rule have been met, so a simple test of the RecordCount property of the Recordset determines whether the suggestion should be displayed:
Public Sub DisplaySuggestion(theFormName As String, _

theCommand As String)

Dim qdef As DAO.QueryDef

Dim rs As DAO.Recordset

Set qdef = CurrentDb.QueryDefs("TriggerEvent")

With qdef

!theFormName = theFormName

!theCommand = theCommand

Set rs = .OpenRecordset

If rs.RecordCount > 0 Then

Screen.ActiveForm!HelpPane = rs!Suggestion

Screen.ActiveForm!chkDisable.Checked = False

Screen.ActiveForm!chkDisable.Visible = True

Else

Screen.ActiveForm!HelpPane = ""

Screen.ActiveForm!chkDisable.Visible = False

End If

.Close

rs.Close

End With

Set rs = Nothing

Set qdef = Nothing

End Sub
The procedure assumes that the form doing the testing contains two controls, a TextBox named HelpPane and a CheckBox named chkDisable. Figure 6 shows these controls on the sample form. Obviously, you could pass the controls to the procedure rather than assuming their names, or, as we’ve seen, you could use a completely different type of user interface, displaying the suggestion in the StatusBar (or even use the Office Assistant). The code within the If block would become more elaborate, but the basic approach would remain the same.

Figure 6
The chkDisable control’s purpose in life is to provide a way for the user to disable the rule. This functionality is enabled by setting the Disable field of the SuggestionRule table in the Click event of the control, as shown here:
Private Sub chkDisable_Click()

Dim rs As DAO.Recordset

Set rs = CurrentDb.OpenRecordset("SuggestionRules")

With rs

.Index = "Suggestion"

.Seek "=", Me!HelpPane

If Not .EOF Then

.Edit

!Disable = True

.Update

End If

End With

End Sub
The AddEvent and DisableSuggestion procedures should be called at the beginning of each event handler (assuming the event could trigger a suggestion). The following code shows the basic pattern. Since the two procedures are always called together, you’d probably want to combine them in a production application and save yourself some typing. I’ve kept them separate simply to make them easier to understand within the context of this article.
Private Sub chkDisable_Click()

Dim rs As DAO.Recordset

Set rs = CurrentDb.OpenRecordset("SuggestionRules")

With rs

.Index = "Suggestion"

.Seek "=", Me!HelpPane

If Not .EOF Then

.Edit

!Disable = True

.Update

End If

End With

End Sub
There are a number of other ways to enhance the basic technique that I’ve outlined here. I’ve already talked about using more complex rules and a different user interface for making suggestions. You might also want to add code to avoid making the same suggestion repetitively. If your rule is “three times in a session,” you probably don’t want to make the suggestion on the fourth, fifth, and subsequent occurrences of the event. That’s not being helpful, it’s nagging.
There are several ways to avoid turning your application into a fishwife. The simplest is to delete the records in the HelpEvents table whenever you display the suggestion. In essence, your rule becomes “every third time in a session.” A more sophisticated approach would be to maintain a record of when you last made the suggestion, and then repeat it only after a specified time period had passed. Figure 7 shows the changes to the SuggestionRule table that would be required to implement this strategy.
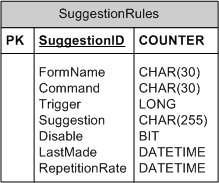
Figure 7
Proactive user assistance isn’t prohibitively difficult to implement (as you’ve seen) and, even though the precise benefits are difficult to quantify, it’s been my experience that it does add to the users’ general impression of the quality of an application, and their long-term productivity. So consider it for your next project. You and your client may both be pleasantly surprised.
