In this article, John Williams shows how to use the Tag property of a calculated control to help validate its contents.
I’ve always been a fan of the Tag property of Access forms and controls. The Tag property can be a useful place to store information, and I often use Tag entries to create “families” of controls that are to be treated in the same way (for example, to create a group of tags that are to be visible only to certain users). Taking things a step further, Tag entries can be used to define what are in effect custom properties, a technique that’s a valuable addition to the developer’s toolbox. In this article, I’m going to show you how I use the Tag property to create a generalized, reusable validation routine by turning the Tag property into a Validation property.
I first developed this routine for a client who manages a network of Call Centers and wanted an application to help forecast call volumes. The basic requirement was to enable the users in each Call Center to specify how they expect a given annual call volume to be profiled across the months, days, and hours of the year, and then have the application calculate a call volume and staffing requirement for any given time period. The client would need to be able to create and maintain several different sets of possible profiles, and compare the forecasts produced by these profiles with the actual volume of calls received.
The standard method for profiling calls across the months of the year involves declaring a set of factors (one for each month) that sum to 12. To calculate a call volume for any particular month, you divide the annual call volume by 12 and then multiply by the factor for that month. Any month with a factor greater than 1 is busier than average; a factor of less than 1 is a quieter month. The table of monthly factors looks something like Figure 1. The numbers shown in the figure reflect the typical profile seen by my client, where April and May are the busiest months. This set of factors is calculated (to three decimal places!) from past years’ call volumes and is the default expectation for future years.
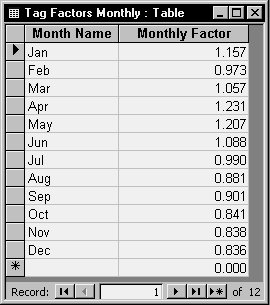
Figure 1
But the point of my application is to allow the client to make changes to the factors in order to explore different possible scenarios. Whatever changes he makes, he should probably keep the sum of the factors equal to 12, or the sum of the monthly calls won’t be equal to the annual volume he started with. Since most people would have difficulty adding up 12 numbers each expressed to three decimal places, I needed to display the sum of the factors to the user and also provide a warning where that sum wasn’t equal to 12.
On the form where the user gets to edit the factors, I included a calculated control to show the sum. And of course it would have been easy enough to write a few lines of code to check that the value of that control was equal to 12, and provide a warning message if not. But I knew I was going to have to do much the same thing again with daily factors (Monday, Tuesday, and so on), which should sum to 7, and hourly factors, which should sum to 24.
The most elegant solution would be to write a generic routine that could be called from any form, and that would perform validation on any of the form’s controls. The problem was figuring out how this routine would know what the required value for each control was supposed to be. I could build a table listing all the controls and their required values, but that would add maintenance overhead and would complicate a simple idea. The required value was logically a property of the control, so why not use the Tag property as the Validation property for the control?
Using Tag
I realized that all the information needed to validate the control value could be embedded in the control itself using the Tag property. I’ve defined three pieces of information to be stored in the Tag property with semicolons used to delimit the elements:
- An indicator that this control needs to be validated.
- The operator for the validation (equal to, greater than, less than, or not equal).
- The text value to compare the control’s value to.
The entry in the Tag property of my control that sums the monthly factors would look like this:
CHECKVALUE;=;12;
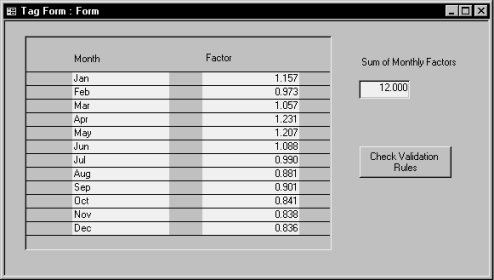
The word CHECKVALUE indicates to the validation routine that this control requires validation; the equals sign indicates that the control’s value should be equal to the text value, and the control should be tested against the number 12. I’ve included a sample application in the accompanying download. The original form is rather cluttered with charts and extra bits of functionality. So, for the purpose of this article I’ve produced a cut-down version that just concentrates on the validation technique (see Figure 2).
Figure 2
As you can see, I have a button (labeled Check Validation Rules) on the form that must be clicked to trigger validation. I didn’t want the validation routine to run every time the value in the Sum control changes. The user needs to be able to change the factors one by one until he’s happy with them. Only when he’s finished will he check the validation condition by clicking the button. This button calls the validation routine, passing a reference to the calling form.
The validation routine
The first step taken by the validation routine is to examine every control on the form and any subforms, looking for controls that might have validation requirements.
The main code loop works its way through each control on the form, first checking the ControlType property to see if the control is a subform. If it is, the routine calls itself recursively, this time passing a reference to the subform. This allows the routine to check validation conditions for controls on subforms and nested subforms of the main calling form.
When the loop finds a textbox control, it checks to see if the entry begins with the word CHECKVALUE, which is my indicator that this control has a validation condition. If validation is required, it takes the Tag entry and parses it into the three data elements, storing these in the array strParsedTag. In the case of my Tag entry, strParsedTag will have the values shown in Table 1.
Table 1. Values for strParsedTag.
| Position | Value |
| 0 | CHECKVALUE |
| 1 | = |
| 2 | 12 |
The parsing loop is quite generic, and will happily parse any number of data elements so long as they’re separated by semicolons. The Check_Tag_Value routine only expects to find three elements, though, so if any more are found, I raise an error (number 9: Subscript out of range). My error handler checks for this error specifically and provides a message to tell me that I’ve made a mistake and which control has the problem.
Here’s the start of the routine that declares some variables that I need:
Public Function Check_Tag_Value(frm As Form)

Dim ctl As Control

Dim strParsedTag() As Variant

Dim fPassTest As Boolean

Dim strMessageText As string

Const RED As Long = 255

Const BLACK As Long = 0

Const WHITE As Long = 16777215

Const FLOATERROR As Double = 10 ^ -6

On Error GoTo ErrorHandler

frm.Requery
The next step is to identify those controls that actually require validation. Currently, I restrict my testing to textboxes with the CHECKVALUE keyword. Having identified a control that requires validation, I parse the different elements of the Tag property using the Split function (the sample database includes code that accomplishes the same task but doesn’t use the Split function in case your version of VBA precedes the implementation of the function). The next step is to carry out the actual validation. The Select Case statement identifies the particular test required and performs the appropriate calculation:
For Each ctl In frm.Controls

If ctl.ControlType = acSubform Then

Check_Tag_Value frm(ctl.Name).Form

ElseIf ctl.ControlType = acTextBox And _

Mid(ctl.Tag, 1, 10) = "CHECKVALUE" Then

strParsedTag() = Split(ctl.Tag, ";")

If  UBound(strParsedTag) > 2 Then

Err.Raise 9

End If

frm.Recalc

fPassTest = False

Select Case strParsedTag(1)

Case "="

If Abs(ctl - strParsedTag(2)) _

<= FLOATERROR Then

fPassTest = True

End If

Case "<>"

If Abs(ctl - strParsedTag(2)) _

> FLOATERROR Then

fPassTest = True

End If

Case ">"

If ctl - strParsedTag(2) _

> FLOATERROR Then

fPassTest = True

End If

Case "<"

If strParsedTag(2) - ctl _

> FLOATERROR Then

fPassTest = True

End If

Case Else

MsgBox "Error in CHECKVALUE " & _

"condition on control:  " & ctl.Name

Exit Sub

End Select
Once the validation condition has been checked, the variable fPassTest will have been set to either True or False to indicate the result of the test. Where a control has failed the test, I’ve changed its color to white text on a red background and also display a warning message. If the test is passed, I set the control’s value back to my design standard of black text on a white background (I could have used values that would cause the textbox to revert to the default settings for the current Windows theme).
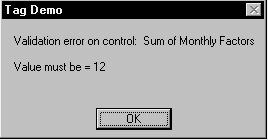
Figure 3
I did consider using a fourth data element in the Tag property to specify a custom error message for each control, but eventually decided that generating a message from the validation inputs was more elegant and convenient. The message tells the user which control has failed validation and also shows the validation condition (see Figure 3).
If fPassTest Then

ctl.BackColor = WHITE

ctl.ForeColor = BLACK

Else

ctl.BackColor = RED

ctl.ForeColor = WHITE

strMessageText = _

"Validation error on control:  " & _

ctl.Name & vbCrLf & vbCrLf & _

"Value must be " & strParsedTag(1) & _

" " & strParsedTag(2)

MsgBox strMessageText

End If

End If

Next ctl

Exit Function
Finally, my error handler catches any problems and checks for the out-of-bounds error that I raise:
ErrorHandler:

If Err.Number = 9 Then

MsgBox "Error - Too many CHECKVALUE " & _

"parameters on control:  " & ctl.Name

Else

MsgBox "Error number " & Err.Number & ": " & _

Err.Description

End If

Resume Next

End Function
In my Call Center forecasting application, it’s quite possible that the user has deliberately set the sum of monthly factors to some number other than 12 to best express a particular scenario. So the validation routine simply warns the user when the validation fails, and doesn’t insist that he correct the data to satisfy the validation condition. You could be more prescriptive about this, depending on the requirements of your application.
Computers can’t add up
You may be wondering about the FLOATERROR constant that appears in my tests. The calculations to check the validation conditions are complicated by the fact that the value in the control Sum of Monthly Factors is a floating point number. In many cases the result of a floating point calculation can’t be represented in binary, and rounding errors mean that the value held by the control won’t be precisely equal to the real sum of the factors. So a straightforward comparison like this isn’t going to work:
If ctl = strParsedTag(2) Then…
To get around this problem, I’ve instead determined the difference between ctl and strParsedTag(2), and compared this to the constant FLOATERROR, which is a very small number. If the difference is less than FLOATERROR, then I’ll accept that it’s just an artifact of the floating point calculation, and that the two numbers are in fact equal. The other validation conditions are contrived to work in a similar way. This problem with floating point numbers can also be addressed by the use of fairly complicated rounding techniques. For the straightforward comparisons required here I haven’t bothered with that.
My original code to check the sum of monthly/daily/hourly factors only needed to check that the sum was equal to some number, and so didn’t include the Select Case statement with its different validation types. I added this when writing this article to make the routine more flexible by serving as a clear placeholder for you to add other conditions if you need them. You could of course also change the pass/fail actions to provide different indications of the validation result. In fact, you can extend this routine to handle as much (or as little) of your validation as you want.
