
This month, Doug Steele passes on feedback he’s received from readers about past columns. Along the way, he shows how different priorities cause different programmers to come up with different solutions for the same problem.
1) See the Embedded quotes in SQL statements question
The “Handling groups of controls“ May column dealt with ways to treat controls as a group, usually for the purposes of making them visible or not…
Stephen Charles wrote with an interesting twist on using the Tag property of each control to allow multiple grouping. He assigns each group a binary value (1, 2, 4, 8, 16, 32, and so on), sets the tags equal to the sum of the binary value(s) of the group(s) to which it belongs, and then uses AND to do a bitwise comparison to determine whether or not each control is in the specific group of interest. For example, he might have three groups that he’s going to use on a particular form, so he’d think of the groups as 1, 2, and 4. It’s fairly straightforward to see that controls that should only be visible as part of the first group would have a Tag value of 1, those that should only be visible as part of the second group would have a Tag value of 2, and those that should only be visible as part of the third group would have a Tag value of 4. However, if a particular control should be visible as part of both the first and second groups, its Tag value would be 3; if it should be visible as part of both the first and third groups, its Tag value would be 5. This works for all of the possible combinations.
In a specific example he sent, he used the same form to capture input for a number of different reports. He had a combo box that listed the various reports of interest, plus the combo box had a number associated with each report (in a hidden column in the combo box) that he could use to indicate which controls he wanted visible for each report. The code associated with the combo box’s AfterUpdate event was something like this:
For intLoop = 0 To (Me.Controls.Count — 1)

  If Me.Controls(intLoop).Tag <> "" Then

    Me.Controls(intLoop).Visible = False

    If (Val(Me.Controls(intLoop).Tag) And _

      Me.cboReportName.Column(2)) _

      = Val(Me.Controls(intLoop).Tag) Then

      Me.Controls(intLoop).Visible = True

    End If

  End If

Next intLoop
Stephen even sent an example of how this works, which I’ve included in the downloadable database associated with this month’s column.
This strikes me as a fairly straightforward approach. In fact, I think it’s a lot simpler than the approach I used of having the relationships between the controls and the groups to which they belonged stored in a table. Thanks for the suggestion, and for the sample, Stephen.
Jay Selman wrote to describe how he makes groups of controls disappear. He places all of the controls that he may want to disappear on a tab page control. When he sets the tab page control’s visibility to False, all of the controls on the tab page disappear with the tab. This works for his situation because the controls are normally grouped together on the form anyway. In addition, if he doesn’t want a tab control to appear when the controls appear, he just sets the Tab Style to None and the Back Style to Transparent so that the tab control itself is hidden.
The “More Dragging Around and Cuing Banners” February column addressed how to simulate cue prompting…
Chris Weber, whose articles you’ve doubtlessly read in past issues of Smart Access, was disappointed that it was “only applicable to unbound text boxes, rich text boxes, and combo boxes in Access,” and also thought that the code-heavy implementation didn’t really explore the object properties available to Access developers. So he took it upon himself to try a simpler approach.
He felt there had to be an easier way and, to be truly useful, a way to have cues within bound controls. His first thought was that the cues could be implemented as labels placed beneath transparent controls. When the control got focus, it would, by default, appear non-transparent. When the user left the control, if the control was Null, its Back Style should remain Transparent allowing the cue to show through. If not, its Back Style should be set to Normal, obscuring the label. To try this out, he decided to work with the Customers form in the Northwind database.
The first step was to change the form to Standard style using the Format | Autoformat menu selection. He then highlighted all of the labels and set the Back Color property in the property sheet to white (16777215), the Border Style to Transparent, and the Fore Color to a dark grey (10263706). Next, he held down the Shift key, lassoed the bound controls, and set their Back Style to Transparent. Finally, to set the cues in each label, he did the same as I had in my example: He changed each to “Enter the fieldname” and dropped the colon from each. After these changes, the form looked like the one in Figure 1.

Figure 1
The next step was to align the labels behind their corresponding controls. To get a perfect fit, Chris first used the Format | Size | To Widest menu selection on each pair (cursing all the while that Access doesn’t have a Ctrl+Y, Repeat Formatting, like Excel or Word!). Then, he used Ctrl+A to select all of the controls and chose Format | Size | To Tallest so that they’d all be the same height. To align each of the labels with its respective control, he used a little-known feature of Access: If a label is nudged behind a control, you can get the label to align perfectly behind the control through the Format | Align menu selection. If the label isn’t already overlapping, the Align menu choice will just slam as closely as possible to the other control. Therefore, pushing each label a bit behind its parent control, selecting each pair, and then selecting Format | Align | Right lines them all up perfectly.
You can see the results in Figure 2. While the right-hand version (which shows what the form will look like for a new record) looks good, some work is still required when the form is opened to an existing record (the left-hand version).
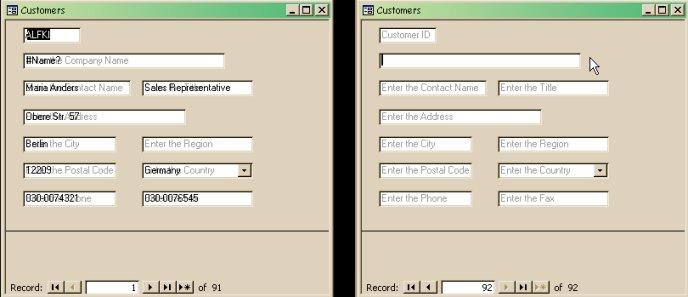
Figure 2
It was at this point that a fundamental difference in philosophy between Chris and me became evident. As you’ve probably gathered from reading my columns, I’m a code jockey. I prefer using code to accomplish virtually everything. I feel it lets me know exactly what’s going on. I also feel it makes the application easier to understand for others who have to support it: They can see that there’s code causing whatever is happening on the form, rather than having to look for specific properties that have been set. It also provides me with a space to write comments. Chris, on the other hand, feels that writing code should be a last resort. Consequently, his first approach to solving this problem was to try and use Conditional Formatting.
He began by resetting the Control Source of the Company Name field and then choosing Conditional Formatting under the Format menu. He wanted the Back Color of the Company Name control to be white and non-transparent if the control has data. Figure 3 shows what he attempted.
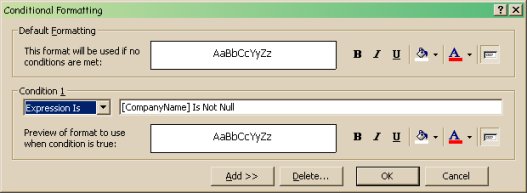
Figure 3
He then used the Format Painter on the toolbar to transfer this condition to all of the other controls and updated the name of the field in brackets for each control. However, no matter how he tried, he couldn’t get the expression to evaluate properly: The controls always appeared blank (non-transparent with a white background). In fact, even after deleting the conditions, the controls still appeared blank. It turns out that setting the condition for a change of Back Color automagically changes each control’s Back Style from Transparent to Normal.
Fortunately, the code required to make the Back Style of a control Normal when it has data and Transparent when it doesn’t is pretty straightforward–essentially a single line of code! If you look in the Help file for details about the Back Style property, you’ll see that its values are either Transparent (0) or Normal (1). All that’s required is to set the Back Style property to the appropriate value, depending on whether the control is Null or not. The code that does this checking must be in the form’s Current event in order to set the properties properly as each new row in the recordset is read, as well as in the AfterUpdate event of each control.
By setting the Tag property of each of the controls for which you want this effect to be used to the same value (Chris used “CueControl”), you can write a generic function to be used for the form’s Current event. Just set the form’s Current event to call Chris’
CueControl_Reset function:

=CueControl_Reset([Form])

The function looks like this:

Function CueControl_Reset(frm As Form)

On Error Resume Next

Dim ctl As Control

  For Each ctl In frm

    If ctl.Tag = "CueControl" Then

      ctl.BackStyle = IsNull(ctl) + 1

    End If

  Next ctl

End Function
While that works, my preference is to not depend on True being -1. So I’d rewrite the function like this:
Function CueControl_Reset(frm As Form)

On Error Resume Next

Dim ctl As Control

  For Each ctl In frm

    With ctl

      If .Tag = "CueControl" Then

        .BackStyle = IIf(IsNull(ctl), 0, 1)

      End If

    End With

  Next ctl

End Function
Similarly, you can write a generic function to use on each control’s AfterUpdate event (in other words, select all of the data-aware controls and assign =CueControl_AfterUpdate() to their AfterUpdate events). Chris’ code function is:
Function CueControl_AfterUpdate()

  Screen.ActiveControl.BackStyle = _

    IsNull(Screen.ActiveControl) + 1

End Function

I'd rewrite that as:

Function CueControl_AfterUpdate()

  With Screen

    .ActiveControl.BackStyle = _

      IIf(IsNull(.ActiveControl), 0 , 1)

  End With

End Function

Figure 4 shows how the form looks after making these changes.
Figure 4
Notice how much smaller the form is compared to the original. For some forms, you can omit the labels and save a lot of space. With screen space at a premium, fewer interfaces can contain more data, which can simplify navigation in your application.
Good work, Chris! It’s a big improvement.
