Adding an e-mail facility to your Access application is a convenient way to communicate critical data to multiple users, while at the same time producing a trail linked to key records in your database. Keith Bombard shows you how.
As a systems developer, gaining a client’s trust depends on weeks, sometimes months of clever coding, successful implementations, and good old-fashioned relationship building. Once that trust is established, you might be in a position to suggest enhancements beyond the initial specifications of the project—enhancements that can help glue the users to your system.
One of those enhancements worth doing is an e-mail system, built within the walls of your Access application. An application that incorporates e-mail can be the vehicle used to communicate critical and time-sensitive information to the system’s stakeholders. You also get a free audit trail: Messages are automatically stored in chronological order for later review, linked to key records in the database.
I coaxed a client into integrating an Access e-mail system into a large database I’d developed for them. “Coax” might be the wrong word—I implemented and installed the e-mail enhancement before they requested it. To my surprise, the e-mail feature became that system’s most celebrated enhancement. Since then, some form of e-mail finds its way into every one of my development projects.
To illustrate, I present the “CARS” database in this article and its accompanying Download file. CARS is a simple database that stores basic information about new cars for sale at a fictional car dealership. The CARS database employs a reasonably complete e-mail system that the sales staff can use to communicate to each other about cars on the lot. The sample application isn’t very much about cars; it’s a lot about e-mail. You can import these objects into your database, passing your own “ApplicationKey” field to link the e-mail system to key records.
A brief overview
The main table in the e-mail portion of CARS is tbl920_MailMessage, which holds all e-mail data. Each record represents one e-mail, sent to a single user and uniquely identified with its own AutoNumber MessageID field. Figure 1 shows the fields in the table.
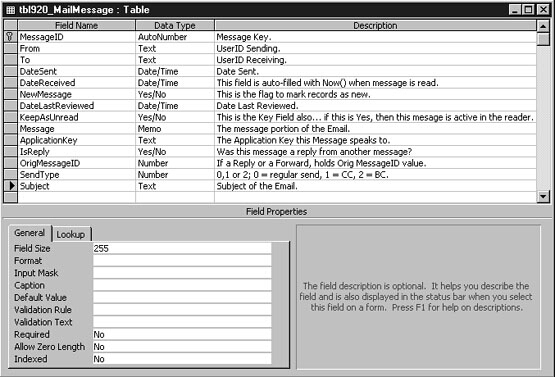
Figure 1
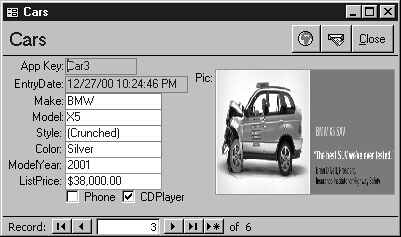
In the CARS system, users can access the mail system from the car lookup form (see Figure 2), which passes an ApplicationKey field into the mail creation form, frmMailSend. This key is added to the table tbl920_MailMessage when the e-mail is sent. This field can be used later as a cross-reference field for displaying all e-mails associated with the car being displayed at the time that the message was sent. You can have as many e-mail launch sites in your application as you want, not all of which may update the ApplicationKey field. For example, your application’s main menu might include a “Send Mail” option where the ApplicationKey field would be blank.
Figure 2
To send mail, the user works with the frmMailSend form (see Figure 3). On the form, the FROM user mails the TO user(s) either a new message, a reply to an already received message, or a forwarded message. The FROM user can send regular mail, CC mail, or BC (blind copy) mail to any e-mail-enabled user in the database’s user table, tbl900_UserMaster (see Figure 4). A Sent To listing is attached to the e-mail text, indicating which users were originally sent the e-mail (skipping any BC recipients). FROM users can also send external e-mails into the standard e-mail system, provided Outlook is installed.
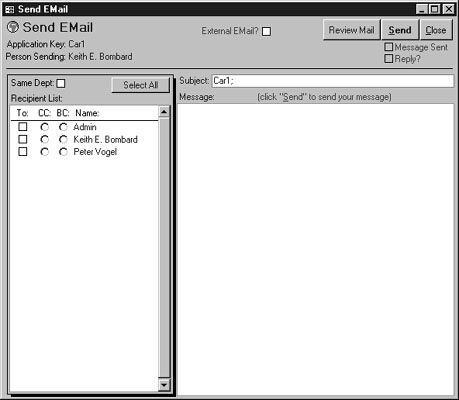
Figure 3
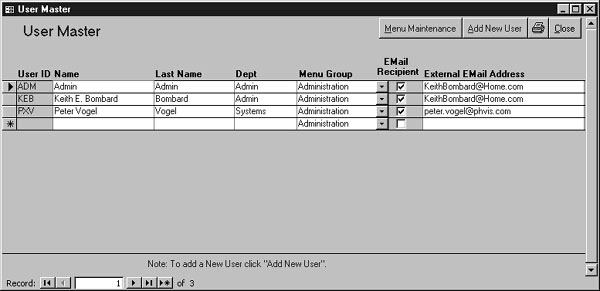
Figure 4
Replies and forwarded e-mails are marked with the OriginalMessageID stored in the reply or forwarded message. E-mails are automatically linked together this way to enable e-mail Trail viewing, which shows the originating e-mail and any linked e-mails in the e-mail trail. In addition, whenever reply messages are sent, the original message is tacked onto the bottom of the new message surrounded by angle brackets (< .. >), making it easy to follow the message trail.
When the TO user reads the mail using the frmMailLookup form, the DateReceived field receives the current date and time, marking the record as a Received mail record and dropping it from the new mail category.
You’ve got mail
All e-mail messages reside in one network table, tbl920_MailMessage. Any newly received messages are signaled to the TO user from a polling function inside the frmCars timer event procedure. When the timer routine finds new messages, it toggles a button image ON and OFF to indicate mail has arrived. The code inside the frmCars timer event procedure is a single call to the subroutine HasMail, passing a reference to the current form:
HasMail Me
HasMail() checks the global variable glbHasMail and then toggles the command button cmdMail’s transparency. If mail is found, the transparency is turned on and off a half second apart. If glbHasMail is false, the command button transparency is turned off (just once to avoid screen flicker).
If glbHasMail Then

frm.cmdMail.Transparent = True

Wait 0.5

frm.cmdMail.Transparent = False

Else

If frm.cmdMail.Transparent = True Then

frm.cmdMail.Transparent = False

End if

If Second(Now()) Mod 10 = 0 Then CheckForMail
The glbHasMail variable is updated by the CheckForMail function, which is called only every 10 seconds, thanks to the Mod function, to reduce the network traffic incurred in checking the mail table. For systems with lots of users, you might want to check less frequently.
When the button is transparent, it lets an image control resting squarely behind the command button show through. This image control holds an exact image of the command button, but with a yellow mailbox superimposed. The effect is a command button with a blinking yellow mailbox indicating that new mail has arrived. With the Car form timer set at 1.5 seconds, new mail recipients experience a repeating yellow mailbox for half a second, followed by a full green globe for 1.5 seconds. New mail is reported within five to 10 seconds of being received.
The CheckForMail function looks for mail in the table tbl920_MailMessage. The routine begins by getting a count of the number of records in the qryMailThere query. If there’s more than one record, the global variable is updated:
If DCount("*", "qryMailThere") > 0 Then

glbHasMail = True

Else

glbHasMail = False

End If
The query, qryMailThere, examines tbl920_MailMessage looking for any new (not yet read) mail sent to the current user (see Figure 5). The CuserID() function that the query uses returns a shortened string version of the current user ID from the system’s user table.
When the user clicks on the blinking button, one of two things happens. If the button is blinking, the Mail Lookup form, frmMailLookup, is launched. If the button isn’t blinking, clicking the button will launch the new mail form, frmMailSend.
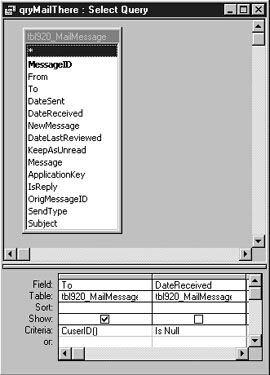
Figure 5
Sending new mail
The Open event of the send mail form first checks to see whether Outlook is loaded. If it is, the external e-mail check box on the form is enabled:
Dim frm As Form

If OutlookLoaded Then Me.chkExternal.Enabled = True
The routine then sets up a temporary table to hold the current mail. Later queries append the newly composed mails to the main production mail tables:
DoCmd.OpenQuery "QueryAppendBlankMessage"

DoCmd.RunSQL "Delete * from tblTempe-mailPeople"

DoCmd.OpenQuery "QueryAppende-mailPeople"

Me.frmMailPeopleSubform.Requery

Me.Requery
If the mail type is a blind copy, the message is unlocked for editing with a warning that you’re sending out mail that you received as a blind copy:
If isloaded("frmMailLookup") Then

Set frm = Forms![frmMailLookup]

If frm![MailListing].Form![SendType] = _

"BCopy" Then

Me.OrigMessage.Locked = False

MsgBox "Caution!@You are preparing to " & _

"send out a Blind copy " & _

"e-mail.@Click 'OK' to continue.", _

vbOKOnly + vbInformation, MsgHeader

End If

End If
The send mail process begins by deleting any records in its temporary table. As part of setting up to create mail, I run action queries to load a template of user and message info into the mail system’s client-side temporary tables. If the user is sending a replay, a query copies the necessary information into the table. This is necessary because replies send the original e-mail message surrounded by angle brackets (< .. >), and mail and forwards don’t:
DoCmd.RunSQL "delete * from tblTempMailToSend"

If Me.IsReply Then

DoCmd.OpenQuery "QueryAppendTempMail_Reply"

Else

DoCmd.OpenQuery "QueryAppendTempMail"

End If
I use temporary tables extensively in e-mail processing. I’ve found that using temporary tables speeds up form processing in general and reduces network traffic. The network table (for instance, tbl920_MailMessage) is updated only if the e-mail is actually sent, not during the editing processs.
The OutlookLoaded function is called to determine whether the current database has Outlook installed as a reference. If the reference exists, the external e-mail check box chkExternal is selected, enabling the user to send e-mails externally through normal e-mail channels. To check for Outlook, I iterate through the References collection, checking to see whether any reference has the name Outlook:
Dim i As Integer

OutlookLoaded = False

For i = 1 To References.Count

If References(i).Name = "Outlook" Then

OutlookLoaded = True

Exit For

End If

Next I
Notice that the references collection, unlike most other collections, isn’t a zero-based collection. I’ll discuss the code to send mail through Outlook later in this article.
The send e-mail form presents a subject and message section on the right-hand side. On the left-hand side, a subform of “e-mail-enabled users” is displayed—this is the Recipient List. The system’s user table has a Boolean field called e-mailRecipient. If this field is set to True, the user is assumed to be e-mail-enabled, and the user name will appear as a choice in the left side recipient listing.
The process for sending mail is simple:
- To select a user to receive regular mail, click the To: check box in the Recipient List section. To select a recipient to receive a CC or a BC, click the CC or BC radio button. If you select either a CC or BC, the To: check box is automatically selected. You can select multiple users for regular mail, or for a CC or BC. You can also click the Select All command button to select all of the recipients to receive regular mail. Checking the Same Dept check box displays only those users who have the same department that you have in tbl900_UserMaster.
- Add a subject (optional).
- Add a message (required).
- Click the Send command button to send the e-mail.
When the message is complete, this code calls the append query that copies the e-mail from the temporary table into the production table:
DoCmd.OpenQuery "QueryAppendMailMessage"

Me.MessageSent = True

If MsgBox("** Message was sent **@Your message "& _

"was sent to the selected people. Are you "& _

"finished sending mail?@Click Yes " & _

"to Exit, or No to Send again.", vbQuestion _

+ vbYesNo, MsgHeader) = vbYes Then

DoCmd.Close acForm, "frmMailSend"

End If
The data for the e-mail is collected from a combination of form fields and underlying temporary tables and appended to another temporary table (tblTempMailToSend) before being appended to the network table (tbl920_MailMessage).
Originally, I appended the message field from an unbound form field. Doing it that way worked unless the message size was approximately 1,000 or more characters. Under these circumstances, the message was truncated due to Access’s size limitation for passing form fields in a query. Moving data to a bound field in a temporary table resolved the problem.
Reply messages and regular mail messages use different send mechanisms. If the message is a reply message, as indicated by the Reply check box, a different append query is used to append the message to tblTempMailToSend. In a reply, the original message becomes attached to the bottom of the message, surrounded by angle brackets (< .. >). Replies are initiated from the frmMailLookup form, discussed later.
Naming names
My e-mail messages always include a system-generated send-to string listing that’s generated by my SendToList function. This function concatenates together all of the people to whom the message was sent, with one important exception. The routine begins by opening a snapshot recordset on my temporary table. I chose a snapshot recordset, as I only need read-only access and, for small number of records, it will run faster than the default dynaset:
Dim Tstr As String

Dim PrefixStr As String

Set DB = CurrentDb

Set RS = _

DB.OpenRecordset("qrye-mailPeopleSorted",4)
I first check that records were retrieved, and, if they were, I attach the last name of each recipient to the string that this function returns, separating each name with a comma. Because this puts a comma after the last name in the list also, at the end of the loop I remove that final comma:
If Not RS.EOF And Not RS.BOF Then

Do While Not RS.EOF

If RS!Sende-mail = True Then

Tstr = Tstr & RS!LastName & ", "

ctr = ctr + 1

End If

RS.MoveNext

Loop

If ctr > 0 Then _

Tstr = Left$(Tstr, Len(Tstr) - 2)

End If
I repeat the process for any people listed as getting copies of the mail. As you can see, the only thing that really changes from my previous routine is the name of the query:
Set RS = _

DB.OpenRecordset("qrye-mailPeopleSortedCC",4)

If Not RS.EOF And Not RS.BOF Then

If ctr > 0 Then Tstr = Tstr & ";  CC'd to:  "

Do While Not RS.EOF

If RS!Sende-mail = True Then

Tstr = Tstr & RS!LastName & ", "

CCtr = CCtr + 1

End If

RS.MoveNext

Loop

If CCtr > 0 Then _

Tstr = Left$(Tstr, Len(Tstr) - 2)
The key thing about the routine to handle blind copy recipients is that it doesn’t exist: Blind copy recipients aren’t included in the Send To list. In Figure 6, you can see a typical Send To listing.
![]()
Figure 6
With the list built, I create a string that identifies the person who sent the mail and whether the mail was originally received as a copy of a letter. I then concatenate all of the parts of the description together:
If ctr > 0 Then

PrefixStr = "{Sent from " & _

GetLastName(CUserID()) & " to:"

ElseIf CCtr > 0 Then PrefixStr = "{CC'd from" & _

GetLastName(CUserID()) & " to:"

End If


If ctr + CCtr > 0 Then

FollowStr = "}"

Else

PrefixStr = ""

FollowStr = ""

End If

SendToList = vbCrLf & vbCrLf & PrefixStr & _

Tstr & FollowStr

RS.Close
The GetLastName function that these routines use in turn uses the glbUserNames array. The GetLastName function only loads the array once, the first time the routine is called, using the LoadUserNameInfo routine. This reduces database hits on the user table as the array is used to provide the user’s last name in a variety of subroutines. The CuserId function returns a three-letter identifier for the current user:
If IsNull(glbUserNames(0, 0)) Or _

IsNull(glbUserNames(0, 0)) Or IsNull(UID) _

Or Len(glbUserNames(0, 0) & "") = 0 Then

LoadUserNameInfo

End If

UID = CuserID()

For I = 0 To UBound(glbUserNames, 2)

If Trim(UID) = Trim(glbUserNames(0, I)) Then

GetLastName = Trim(glbUserNames(2, I))

Exit For

End If

Next I
Mailing through Outlook
The send e-mail form includes a code hook to send an e-mail externally, using OLE calls to Outlook. The user indicates that the mail should be sent both externally and internally by checking the External e-mail check box. The check box is disabled if the Outlook reference isn’t installed on the sender’s computer.
After checking the External e-mail setting, the send mail routine gets the recipient’s external e-mail address from the user table:
If Me.chkExternal = True Then

Dim DB As DataBase

Dim RS As Recordset

Dim ctr As Long

Dim I As Long

Dim People As Variant

Dim SList As String

Dim Subj As String

Set DB = CurrentDb

Set RS = _

DB.OpenRecordset("qrye-mailExternal", 4)
External e-mail addresses are retrieved using the query qrye-mailExternal, which pulls data from the user table tbl900_UserMaster. The addresses are loaded into a variant People array using the little known (but very powerful) Access GetRows method. If you’re not familiar with GetRows, I recommend that you look for it in Access Help. It’s a really great way to pull data out of tables.
People and other e-mail goodies are passed into the Send_Mail function. Depending on whether or not this message is completely new or a reply to an existing message, different information is passed to my Send_Mail function:
If Not RS.EOF And Not RS.BOF Then

Subj = ""

SList = SendToList()


RS.MoveLast

ctr = RS.RecordCount

RS.MoveFirst

People = RS.GetRows(ctr)


RS.MoveFirst

If Not IsNull(Me.ApplicationKey) Then _

Subj = "; Application Key = "

If Me.IsReply Then

Send_mail "Application e-mail" & _

Subj, RS!Message &  _

SList & vbCrLf & vbCrLf & _

"---Orig Message---" & _

vbCrLf &  "<" & RS!OrigMessage & ">", _

People

Else

Send_mail "Application e-mail" & Subj, _

RS!Message & SList, People

End If
The Send_Mail function accepts a subject, body, and list of recipients. The Folks array, which holds the list of recipients, also contains the SendType for each recipient (Mail, CC, or BC):
Function Send_mail(Subjct As String, _

BodyTxt As String, Folks As Variant) As Boolean


Dim I As Integer

Dim Recs As Integer

Dim ToList As Variant

Dim CCList As Variant

Dim BCList As Variant
The next lines of code reference the Outlook.Application object and will fail even to compile if Outlook isn’t installed or isn’t checked on the References list. I use conditional compile tests, based on the constant OutlookEnabled, to skip these lines so that if Outlook isn’t available, there’s no problem (see readme.txt in the Download file for more information on this):
#If OutlookEnabled Then

Dim olApp As Outlook.Application

Dim olNewMailItem As MailItem


Set olApp = CreateObject("OutLook.Application")

I = 0

Recs = 0

DoEvents

This error handler avoids null and subscript errors in the Folks array:

On Error GoTo Jump_Past

Do While Len(Folks(0, Recs) & "") > 0

Recs = Recs + 1

Loop

Jump_Past:

On Error GoTo Send_mail_ERR
This loop iterates through the Folks array, checking the second position, which contains the mail type 0 for the To-list, 1 for the CC-list, and 2 for the BC-list. Distinct send-lists are built according to the mail type:
For I = 0 To Recs – 1

Select Case Folks(4, I)

Case 0

ToList = ToList & Trim$(Folks(0, I)) & "; "

Case 1

CCList = CCList & Trim$(Folks(0, I)) & "; "

Case 2

BCList = BCList & Trim$(Folks(0, I)) & "; "

End Select
With the preliminaries taken care of, the following code creates an Outlook mail item, sets the necessary properties, and sends the mail item:
Set olNewMailItem = olApp.CreateItem(olMailItem)

With olNewMailItem

.Subject = Trim$(Subjct)

If Len(ToList & "") > 0 Then .To = ToList

If Len(CCList & "") > 0 Then .CC = CCList

If Len(BCList & "") > 0 Then .BCC = BCList

.Body = Trim$(BodyTxt)

.Save

.Send

End With
If everything works, the Send_Mail function returns True. If the code was skipped in the conditional file, the only line that goes into the routine is one that has the function return False:
Send_mail = True

Set olApp = Nothing

Set olNewMailItem = Nothing


#Else


Send_mail = False

#End If
Reading mail
If the Mail button on a form is blinking, it means that the user has new mail. Clicking on the blinking mail button takes the user to the form frmMailLookup to read the new mail. This form contains two subforms: The top subform holds a list of e-mail records, and the bottom subform holds the e-mail message text associated with the selected message. E-mails can be read, replied to, and forwarded from this form. The form opens in one of two modes:
- Opening the Mail Lookup form from the slotted mail command button (cmdSeee-mail) on the Cars form frmCars displays any and all e-mails associated with the currently selected car irrespective of the FROM or TO person setting (blind copy e-mails are excluded). This is accomplished by filtering records using the ApplicationKey field (see the Figure 7).
- Opening the form from the blinking globe button on the Cars form or the Review Mail command button on the frmMailSend form initially displays only your own New or Kept e-mail records. Your New records are defined as records having a To field as your UserID and a NewMessage field as True. Kept records have a To field as your UserID and a True in the KeepAsUnread field. In this mode, the form also displays the optMailType radio-button group control you can use to redisplay different mail types. You can display sent, received, or both kinds of mail (see Figure 8).

Figure 7

Figure 8
This is the code that filters the records in the mail table for display in the form for reading mail. The code applies the appropriate filter based on the option box on the main form. At the end of this code, I set the option box’s ToolTip to the filter text:
Dim frm As Form

Set frm = Me![MailListing].Form


Me![MailListing].Form.AllowDeletions = True


Select Case optMailType

Case 1

'Show New or Kept Mail.

frm.Filter = "(To=CuserID() AND " & _

"(NewMessage=True OR KeepAsUnread=True))"

Case 2

'Show Received Mail.

frm.Filter = "(To=CuserID())"

Case 3

'Show New Mail.

frm.Filter = _

"(To=CuserID() AND NewMessage=True)"

Case 4

'Show Kept Mail.

frm.Filter = _

"(To=CuserID() AND KeepAsUnread=True)"

Case 5

'Show Unread Sent Mail.

frm.Filter = "(From=CuserID() AND "& _

"DateReceived Is Null)"

Case 6

'Show all Sent Mail.

frm.Filter = "(From=CuserID())"

Case 7

'Show All Mail, Sent or Received.

frm.Filter = "(To=CuserID() OR From=CuserID())"

Case 8

'Show mail associated with the selected car.

frm.Filter = "(ApplicationKey = " & _

"forms!frmCars!AppKeyField and SendType < 2)"

Me![MailListing].Form.AllowDeletions = False

End Select


frm.FilterOn = True

Me.optMailType.ControlTipText = frm.Filter
Notice that the option group control has only seven choices, yet there are eight case choices in the code. The eighth case statement supports the filter for the Cars form entry mode. In that mode, this After_Update routine is called directly from the frmCars cmdSeee-mail button Click event after setting optMailType to 8, like this:
DoCmd.openForm _

"frmMailLookup", , , , , , "From Cars"

Forms!frmMailLookup!optMailType = 8

Forms!frmMailLookup.optMailType_AfterUpdate
In the form’s Unload event, the code retrieves the form’s recordset and works through the records on the form. If a message’s received data has anything in it, then it can’t be a new message, so this code sets the message’s New flag to False:
Dim RS As Recordset

Dim RC As Long

Dim I As Long

Set RS = Me![MailListing].Form.RecordsetClone

If Not RS.EOF And Not RS.BOF Then

RS.MoveLast

RC = RS.RecordCount

RS.MoveFirst


For I = 1 To RC

RS.Edit

If Not IsNull(RS!DateReceived) Then

RS!NewMessage = False

End if

RS.Update

RS.MoveNext

Next I
You might ask why I included what appears to be a redundant field, NewMessage, when I could have just checked to see whether DateReceived is equal to Null. The answer is that I wanted to hold that record in the new status for as long as the form is open. DateReceived has something in it as soon as the current event fires to indicate the e-mail was in fact looked at. If you change the filter to review another mail type, then return back to new mail, any mail you’d just viewed would be gone. This way, all mail remains as new mail until you close the form.
Working with mail
E-mails can be replied to or forwarded from the Mail Lookup form. The user only needs to click on the Forward command button to launch the Send e-mail form, forwarding the current message. Clicking the Reply command button sends a reply. In a reply, the original e-mail message is tacked onto the bottom of the message being sent using QueryAppendTempMail_Reply (see Figure 9). As I noted previously, if you attempt to reply or forward a blind copy message, you’ll be reminded of that before the Send Mail form loads. I did this to warn the user that they’re about to be exposed as a blind recipient.
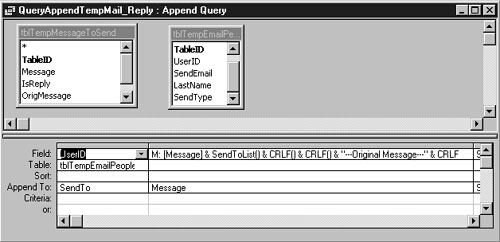
Figure 9
In both reply and forwarded messages, the original e-mail MessageID key is passed to the new e-mail as OrigMessageID, effectively linking the e-mails together in a trail of e-mails. If a forwarded or reply e-mail is sent again, the linked trail of e-mail grows one level deeper. This can continue on and on, with some e-mail trails growing to be very large.
The system has a facility to view e-mails that are linked together this way. If an e-mail has an OrigMessageID field that isn’t Null, you can see the trail if you click the cmdTrail button on the frmMailLookup form. CmdTrail is enabled only if that e-mail has an OrigMessageID that isn’t Null. CmdTrail’s Click event loads the form frmMailMessageViewer (see Figure 10). Before loading the form, the cmdTrail Click event calls the BuildMessageTrail function. This function builds the data for trail-viewing using two parameter queries. The queries adds e-mails to the temporary table tblTempMailMessageViewer and sorts them in ReceivedDate order for chronological viewing. The right half of the form displays the message for the e-mail selected on the left half of the form.
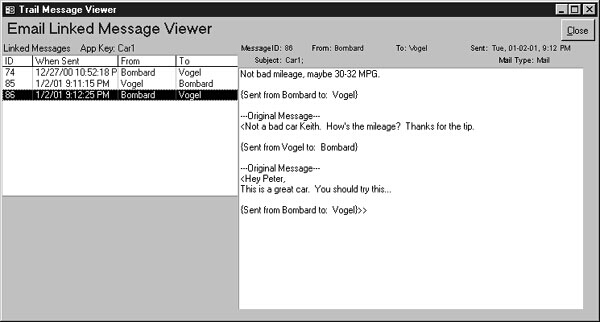
Figure 10
Using the code
Feel free to implement your own e-mail by importing the objects from the sample database into your database. Remember to steal and insert the Car form’s globe command button, the globe/mailbox image, the code behind the button’s Click event, and the form’s timer event code into your main application form or main menu. Set the timer interval on that form to 1500 (1.5 secs).
Also remember to set the Conditional Compilation Argument OutlookEnabled to a value of 0 in the Access Options panel (on the Advanced tab) if Outlook isn’t loaded on your system. Doing this prevents the Outlook code from producing a compile error. If you’re using Outlook, be sure to establish the reference for it in your database.
I hope you enjoy Access e-mail. It will work, and it just might be the most talked about enhancement in your database! Let me know; I’m always either looking for cars or waiting for mail!

By Daniel Sanders June 18, 2020 - 10:03 am
I am very interested in a copy of your email aplica6ion. De Download is not with the full email code.
Danlel Sanders
Amsterdam