Good database design ensures that there’s only one place to store any piece of data. But in many companies, data is stored in many places on many different computers. Outlook data is one example–important customer data ends up being stored on many different desktops. Rick Dobson shows two ways to pull that data together.
This is the third in a three-part series on Access/Outlook interoperability. In this article, I’ll show you how to consolidate into a single Access database Outlook contact data from multiple computers. This is often a critical task: Businesses regularly permit mission-critical data to reside on multiple computers. As one example, sales representatives can each have their own Contacts folder in Outlook on their computer.
While some business functions work well with dispersed data pools, other business functions require a single, consolidated data pool–such as an Access database. For instance, by consolidating all of the Contacts folders from different computers into a single table within an Access database, a small business owner can easily publish newsletters via e-mail to all prospects and clients.
Consolidation strategies
There are numerous ways to consolidate Outlook data across multiple computers. One way is to rely heavily on built-in graphical Access tools. These tools include the ISAM (indexed sequential access method) driver for Outlook data and the Query Designer’s capability to create action queries.
The Outlook ISAM driver can easily expose several types of Outlook data in virtual linked tables. You can use a make-table action query to build a real Access table rapidly, based on the virtual linked table exposed by the Outlook ISAM driver. With a linked table pointing at a table on another computer and an append action query, you can transfer rows of data in a table on another computer to the rows of a table on the current computer.
The graphical approach is a great way to quickly sketch out a prototype solution. This approach makes it fast to construct a solution. However, the constraints of graphical tools limit the strategy. The ISAM driver fails to expose at least one important type of Outlook data: Categories data for Outlook contact items. Also, the Outlook ISAM driver only displays what looks like a table within an Access database: It’s actually a virtual table. One advantage of this virtual linked table is that the table automatically reflects changes to the original contact data in Outlook. Unfortunately, you can’t append rows from a virtual linked table on one computer to an Access table on another computer.
Action queries created with the Query Designer can easily enable an application to make a table or append rows to a table. Unfortunately, action queries created with the Query Designer display message boxes that you can’t suppress. These prompts are potentially confusing or distracting to an application’s users. In addition, append action queries don’t offer any flexibility in how they append rows. The originating data source rows always append to the destination source, even when some column values in an originating source row duplicate column values in a destination row.
A second technique for transferring contact data between computers draws on automating Outlook from within Access. The second article in this series explored the basic techniques for this approach. When automating Outlook from Access, you can tap any type of Outlook data, including Categories data in the Outlook Contacts folder.
You can transfer data from the Contacts folder on one computer via ADO to a table in an Access database on a second computer. Because you programmatically implement the consolidation of contact data between computers, you have precise control over how contact data with one or more identical field values is merged. In addition, there are no automatic pop-up prompts associated with transferring data between computers when using ADO. This means your custom solutions execute without distracting prompts.
I’ll look at both solutions in this article.
The graphical solution
To consolidate Outlook contact data across two or more computers in a single Access database, you need two things. First, you need a way for each computer to expose its Outlook contact data. Second, you need a way of combining the exposed data by multiple computers in a single table on one computer. Each computer requires a means to expose its Outlook contact data, but only the computer with consolidated data needs a means of appending data from one or more other computers.
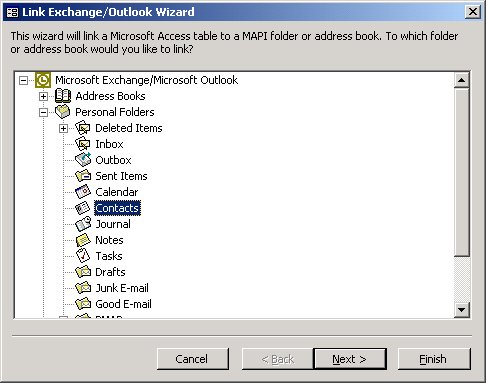
You can use a two-step process to expose Outlook contact data via Access. First, create a virtual linked table to the Contacts folder in Outlook by selecting File | Get External Data | Link Tables. In the Link dialog box that appears, select Exchange(). This opens the Link Exchange/Outlook Wizard. Use the wizard to point at a virtual linked table in the Contacts folder on the local computer. Expand Personal Folders and select the Contacts folder within it. Figure 1 shows the selection. Click Next and then Finish to complete the creation of the virtual linked table. The default name for the virtual linked table is the same as the selected folder. Therefore, the default name for the virtual linked table is Contacts for the Contacts folder.
Figure 1
The second step is to create a make-table action query to build an Access table, based on the virtual linked table. The virtual linked table and the Access table created with the make-table query work together to expose the Outlook contact data. The virtual linked table points at the Outlook Contacts folder. The make-table query generates an updatable snapshot of the virtual linked table. Users can run the make-table query whenever they need a fresh update (for example, after several additions, updates, or deletes in a Contacts folder in Outlook).
A make-table action query creates an Access table based on another table (such as a linked table), copies over any data in that table, and replaces any already existing table with the same name. Therefore, running a make-table query based on a virtual linked table pointing at the Contacts folder generates a new table with the most recent Outlook Contacts data.
You can create a make-table query for the virtual linked table that points at the Contacts folder with the following steps. Open a new query in Design view. Then, add the virtual linked table that points at the Contacts folder. Select any subset of columns that your application requires. Then, select Query | Make-Table Query and specify a name for the table that the query will generate. Figure 2 shows the query design and the Make Table dialog box with a name of ContactsCcs1 for the table generated by the query.

Figure 2
Now it’s just a matter of repeating the process for each computer you want to consolidate data from. You can simplify the application for your users by creating an Access form that contains a button to invoke the make-table query. In the Download file, Form1 in SA0704.mdb and Form1 in SA0704Cab2200.mdb both illustrate this strategy. SA0704.mdb resides on the Ccs1 computer, and SA0704Cab2200 is on the Cab2200 computer.
My test of this solution strategy involved contact data from two computers (the Ccs1 and Cab2200 mentioned earlier), but the architecture of the solution easily adapts for more than two computers. The make-table query on the Cab2200 computer generated a table named ContactsCab2200. This table was based on the virtual linked table for the Outlook Contacts folder on Cab2200. The Ccs1 computer assigned the name ContactsCcs1 to the table resulting from its make-table query (see Figure 2). The sample application uses the same name, MakeContactsLocal, for the make-table query on both computers. Each time a user invokes the query, it writes over any previous version of either ContactsCab2200 or ContactsCcs1, depending on the computer running the query.
Sample contact data for each computer helped to verify and demonstrate the operation of the sample application. Table 1 shows the sample contact data in three columns. The first column has the Display name (first name followed by last name). The second column contains e-mail addresses in the Contacts folder on the Ccs1 computer. The third column contains e-mail addresses in the Contacts folder on the Cab2200 computer. The middle four names (from Ellen Doe5 through Harriet Doe8) appear in the Contacts folders of both computers. The e-mail domains for these addresses are slightly different between these two computers. The domain for Ellen Doe5 through Harriet Doe8 on the Ccs1 computer is doe.com, but the domain for these contacts is does.com on the Cab2200 computer.
Table 1. Sample contact data.
| Display name | Ccs1 e-mail address | Cab2200 e-mail address |
| Abe Doe1 | abe@doe.com | |
| Bill Doe2 | bill@doe.com | |
| Cybil Doe3 | cybil@doe.com | |
| Dan Doe4 | dan@doe.com | |
| Ellen Doe5 | ellen@doe.com | ellen@does.com |
| Frank Doe6 | frank@doe.com | frank@does.com |
| Gail Doe7 | gail@doe.com | gail@does.com |
| Harriet Doe8 | harriet@doe.com | harriet@does.com |
| Ivy Doe9 | ivy@doe.com | |
| Jan Doe10 | jan@doe.com | |
| Karen Doe11 | karen@doe.com | |
| Laura Doe12 | laura@doe.com |
If you want to follow along with the demonstration, enter the sample contact data into Outlook on two computers. Copy the sample files to the two computers with the sample data and use the Linked Table Manager to update the link from SA0704 to SA0704Cab2200.
The Ccs1 computer consolidates sample data from the Outlook folder from the Cab2200 computer with sample data from its own Outlook folder. Therefore, I modified the MakeContactsLocal query slightly from a query that returns all the data in Outlook’s Contacts folder on a computer. The Jet SQL for the make-table query on the Ccs1 computer filters for a domain name of doe.com, while the Jet SQL for the Cab2200 computer filters for a domain of either doe.com or does.com. The Jet SQL for the Cab2200 computer, which is a superset of the Jet SQL for the Ccs1 computer, appears in the following code block. The Link Exchange/Outlook Wizard assigned the names of First, Last, and Email Address to the first name, last name, and e-mail address of each contact item:
SELECT Contacts.First, Contacts.Last,

Contacts.[Email Address] INTO ContactsCab2200

FROM Contacts

WHERE (((InStr([Email Address],"doe.com")>0 Or

InStr([Email Address],"does.com")>0)=True));
An append action query adds rows from the ContactsCab2200 table in the Cab2200 computer to the ContactsCcs1 table in the Ccs1 computer. Therefore, the consolidated data resides in the ContactsCcs1 table on the Ccs1 computer. The application uses a linked table in the SA0704.mdb file to reference the contents of the ContactsCab2200 table in SA0704Cab2200.mdb. If you run this application in your office setting, it’s likely that you’ll at least need to change the file name at which the ContactsCab2200 linked table points. You can build an append query with the Query Designer. The sample application created its append query with this approach and named its query AppendLocalFromRemote. Here’s the Jet SQL for the AppendLocalFromRemote query:
INSERT INTO ContactsCcs1 ( [First], [Last],

[Email Address] )

SELECT ContactsCab2200.First,

ContactsCab2200.Last,

ContactsCab2200.[Email Address]

FROM ContactsCab2200;
To perform a consolidation, initialize the ContactsCcs1 table by running the MakeContactsLocal query on the Ccs1 computer. This operation populates the ContactsCcs1 table with the most recent data from the Contacts folder on the Ccs1 computer. Next, invoke the MakeContactsLocal query on the Cab2200 computer to make sure the ContactsCab2200 table has the most recent Outlook data. Finally, invoke the AppendLocalFromRemote query on the Ccs1 computer to append contact data from the Cab2200 computer into the ContactsCcs1 table on the Ccs1 computer.
Figure 3 shows the ContactsCcs1 table after running the MakeContactsLocal query on the Ccs1 computer. Notice that it contains eight rows. Rows 5-8 have an e-mail domain of doe.com in their Email Address column values. Figure 4 shows the ContactsCcs1 table after running the MakeContactsLocal query on the Cab2200 computer followed by the AppendLocalFromRemote query on the Ccs1 computer. Now the ContactsCcs1 table has 16 rows. The basic append operation doesn’t recognize Ellen Doe5 in the ContactsCcs1 table as the same as Ellen Doe5 in the ContactsCab2200 table. Therefore, the table with consolidated data includes two rows for Ellen Doe5–one from the ContactsCcs1 table and the other from the ContactsCab2200 table. Data for three other contacts, Frank Doe6, Gail Doe7, and Harriet Doe8, appears on two rows for the same reason.

Figure 3
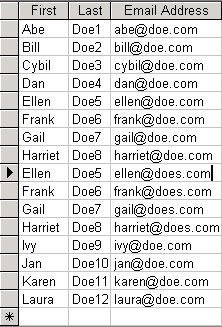
Figure 4
The custom code solution
One way to build a more flexible consolidation solution is to use custom programming. For example, you can automate Outlook on each of the remote computers, such as Cab2200, and find contact data to pass to another computer, such as Ccs1, that stores the consolidated data. In this custom programming approach, each remote computer pushes its contact data to the computer holding the consolidated data. Because remote computers push their data via an ADO Recordset, there’s no need for a linked table as in the graphical solution. The ADO Recordset points at a table with consolidated contact data in a database on another computer. By adding new rows to the Recordset, remote computers can pass their contact data to the computer holding the consolidated data.
This custom programming approach illustrates a simple use of Categories data (see the second article in this series for more about Categories data). In order to handle Categories data, you’ll need to modify the design of the ContactsCcs1 table on the Ccs1 computer. You can do this by pressing two buttons on Form1 in SA0704.mdb (see Figure 5). Initially, click the Create/Update Local button to obtain a fresh version of the ContactsCcs1 table with three columns. Then, click the Add a Categories Column button to modify the ContactsCcs1 table by adding a new column named Categories. Command2’s Click event procedure uses the ADD COLUMN statement within the ALTER TABLE statement to add a Categories column to the ContactsCcs1 table.
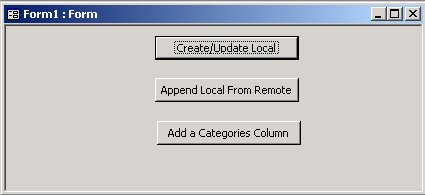
Figure 5
Form1 in SA0704Cab2200.mdb contains four buttons. Its top button, with a caption of Create/Update Local, performs the same function as the top button on Form1 in SA0704.mdb. The Click event procedures for the remaining three buttons in Form1 within SA0704Cab2200.mdb illustrate different approaches to pushing data from a remote computer (Cab2200) to a computer holding consolidated contact data (Ccs1)–see Figure 6.
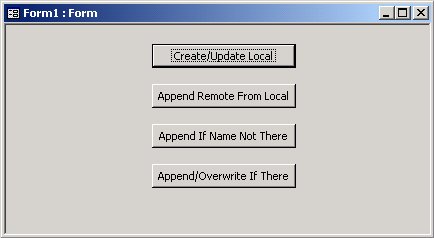
Figure 6
The Click event procedure for the Append Remote from Local button (Command1) adds selected contact items from the Outlook Contacts folder on the Cab2200 computer as rows to the ContactsCcs1 table on the Ccs1 computer. There are two major code blocks to the event procedure. First, the procedure creates a Recordset pointing at the ContactsCcs1 table in the SA0704 Access database file on the Ccs1 computer. When you run this program, you’ll need to modify the connection string for the Recordset to point at a computer in your environment. Two string variables simplify this task: Assign the path and file names for the consolidated contact data to strConsolDBPathFile, and then assign the table name for the consolidated contact data to strConsolDBTable.
Set rst1 = New ADODB.Recordset

strConsolDBPathFile = "\\Ccs1\C\Articles\SA0704.mdb"

strConsolDBTable = "ContactsCcs1"

With rst1

  .ActiveConnection = _

    "Provider=Microsoft.Jet.OLEDB.4.0;" & _

    "Data Source=" & strConsolDBPathFile & ";"

  .Open strConsolDBTable, , _

    adOpenKeyset, adLockOptimistic

End With
After opening the Recordset, the procedure iterates through the items in the Contacts folder and adds items with a Categories data value of FromCab2200 as new rows to the rst1 Recordset. A feature like this enables remote computers to keep some contact items, such as those for family members, outside of the consolidated contact data for a company. The code for adding an item as a new row populates the first name field (Field(0)) through the Categories field (Field(3)). Because rst1 has a keyset cursor type, populating a new row in the Recordset also updates its corresponding table, namely ContactsCcs1 in SA0704.mdb on the Ccs1 computer:
For Each myItem In myContacts

  With rst1

    If InStr(myItem.Categories, _

        "FromCab2200") Then

      .AddNew

        .Fields(0) = myItem.FirstName

        .Fields(1) = myItem.LastName

        .Fields(2) = myItem.Email1Address

        .Fields(3) = myItem.Categories

      .Update

    End If

  End With

Next
There’s no major difference in the outcome between the Click event procedures for the second button on Form1 in SA0704.mdb (see Figure 5) and the second button on Form1 in SA0704Cab2200.mdb (see Figure 6). The ContactsCcs1 table resulting from both procedures has 16 rows, eight from Ccs1 and eight more from Cab2200. The four rows with the same Display names on both computers each appear twice in the table with consolidated contact data. One minor difference in the outcome between the two procedures is that the Click event procedure for the second button on Form1 in the SA0704Cab2200 Access database file populates a Categories column with FromCab2200. This is the value of the Categories data for the selected contact items from the Outlook Contacts folder on the Cab2200 computer. Figure 7 shows the table generated by the Click event procedure for the second button on Form1 in SA0704Cab2200.mdb after the Contacts table is initialized with clicks to Command0 and Command1 on Form1 in SA0704.mdb.
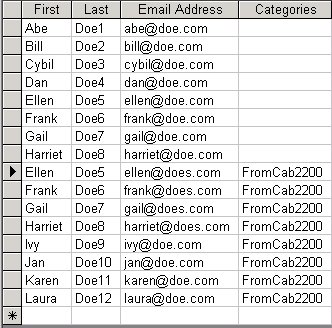
Figure 7
The third and fourth buttons (Command2 and Command3) on Form1 in SA0704Cab2200.mdb enable users to add contact items to the table of consolidated contact data without creating duplicate first and last name pairs. All consolidations shown so far do create duplicates because they add new rows without regard to any existing contacts in the table of consolidated contact data. The Click event procedure for Command2 adds a contact item only if there’s no row in the consolidated table with the first name and last name of the contact item. The Click event procedure for Command3 either appends a contact item as a new row in the consolidated contact table or overwrites an existing row with the same first and last names as a contact item.
The code for the Command2 Click event procedure is a subset of that for the Command3 Click event procedure. That being the case, I’ll just describe the code for the Command3 Click event procedure. The trick to making either Click event procedure work is to search for an existing row in the consolidated contact table with the first name and last name of a contact item from an Outlook Contacts folder. The Command3 Click event procedure calls the FirstLastThere function procedure to perform this task and then branches on the return value of the function procedure to update the consolidated table.
The FirstLastThere function procedure returns a Boolean value of True if a first name and last name already exist in the ContactsCcs1 table. Otherwise, the function procedure returns a value of False. The function procedure takes First, Last, and strConsolDBPathFile as string arguments for first name, last name, and the path and file name for an Access database file with the ContactsCcs1 table. An ADO Recordset object points at the database whose name is passed to the function procedure. The rst1 Source property specifies a Jet SQL statement for selecting a row from the ContactsCcs1 table in the database whose first name and last name match the arguments passed to the procedure. The procedure returns a Boolean value based on the RecordCount property for rst1 after opening the recordset. A RecordCount property of 0 indicates no match in the ContactsCcs1 table for first name and last name. In this case, the procedure returns a value of False. Otherwise, the procedure returns a value of True:
Function FirstLastThere(FirstName As String, _

    LastName As String, _

    strConsolDBPathFile As String) As Boolean

Dim rst1 As ADODB.Recordset

Set rst1 = New ADODB.Recordset

With rst1

    .ActiveConnection = _

        "Provider=Microsoft.Jet.OLEDB.4.0;" & _

        "Data Source=" & strConsolDBPathFile & ";"

     .Source = "SELECT * FROM ContactsCcs1 " & _

        "WHERE First='" & FirstName & _

        "' and Last='" & LastName & "'"

    .Open , , adOpenKeyset, adLockOptimistic

End With

If rst1.RecordCount > 0 Then

    FirstLastThere = True

Else

    FirstLastThere = False

End If

rst1.Close

Set rst1 = Nothing

End Function
The following excerpt from the Click event procedure for Command3 shows the code for either overwriting an existing row in the ContactsCcs1 table or just adding a new row. The code branches to either of two paths based on the return value of the FirstLastThere function. When the return value is True, the code deletes the matching row with first name and last name for the current contact item and then adds the contact item as a new row. When the FirstLastThere function returns a value of False, the code segment merely adds a new row based on the current contact item:
For Each myItem In myContacts

  With rst1

    If InStr(myItem.Categories, _

          "FromCab2200") Then

       If FirstLastThere(myItem.FirstName, _

          myItem.LastName, strConsolDBPathFile) _

          = True Then

          rst1.MoveFirst

          Do Until rst1.EOF

            If rst1("First") = myItem.FirstName _

              And rst1("Last") = _

              myItem.LastName Then

              rst1.Delete

              Exit Do

            End If

            rst1.MoveNext

          Loop

          .AddNew

             .Fields(0) = myItem.FirstName

             .Fields(1) = myItem.LastName

             .Fields(2) = myItem.Email1Address

             .Fields(3) = myItem.Categories

           .Update

       Else

         .AddNew

            .Fields(0) = myItem.FirstName

            .Fields(1) = myItem.LastName

            .Fields(2) = myItem.Email1Address

            .Fields(3) = myItem.Categories

         .Update

       End If

     End If

  End With

Next
Because the ContactsCcs1 table serves multiple sample applications with different requirements, you must reinitialize the ContactsCcs1 table every time you want to demonstrate the operation of the Click event procedures for Command1, Command2, or Command3 on Form1 in SA0704Cab2200.mdb. You can readily redesign the application so that there’s no need to reinitialize ContactsCcs1 when working with a single consolidating strategy. You can reinitialize ContactsCcs1 by clicking Command0 followed by Command2 on Form1 in SA0704.mdb. Clicking Command3 on Form1 in SA0704Cab2200.mdb results in a ContactsCcs1 table like the one in Figure 8. This time the table contains just 12, instead of 16, rows. In addition, the rows for Ellen Doe5 through Harriet Doe8 appear just once, and their column values come from the Cab2200 computer.
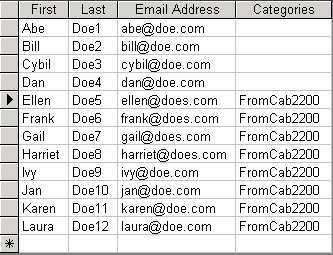
Figure 8
Conclusion
Consolidating Outlook contact items from multiple computers in a single Access database can simplify many functions, including the distribution of newsletters via e-mail to a business’s clients and prospects. This article demonstrated two routes to consolidating Outlook contact items from multiple computers. One path relies heavily on graphical techniques that are relatively easy to apply. The other path demonstrates custom programming techniques that offer more flexibility. The choice of which technique to use is yours to make.
Why Not Try
Migrating Access (and Outlook Data) to SQL Server
