Since the release of Office XP, it’s been possible to create spreadsheets by using ExcelML. Peter Vogel shows you how to use this technology to create spreadsheets that can be sent anywhere.
Last month I showed you how the next version of Microsoft Word lets you create Word documents without having to load Microsoft Word into memory. This is interesting technology, and it will become more valuable as Office 2003 becomes more prevalent. However, Excel has had the ability to work with XML since Office XP—which makes using XML and Excel a lot more valuable.
In this article, I’ll show you how you can create a spreadsheet without learning the Excel object model or having to load Excel into memory. You can assemble an Excel spreadsheet in your Access code with nothing more than standard string-handling functions. The resulting document can be sent anywhere that a text document can—so you don’t have to worry about your document being removed by a firewall or virus checker.
The simplest spreadsheet
First, some Excel terminology. In Excel, the file that’s created is referred to as a Workbook, which can hold one or more Worksheets. Worksheets are what you and I would typically refer to as a spreadsheet.
The simplest possible Workbook that can be successfully opened by Excel looks like this in XML:
<?xml version="1.0"?>

<?mso-application progid="Excel.Sheet"?>

<Workbook

    xmlns="urn:schemas-microsoft-com:office:spreadsheet"

    xmlns:ss="urn:schemas-microsoft-com:office:spreadsheet">

<Worksheet ss:Name="Sheet1">

</Worksheet>

</Workbook>
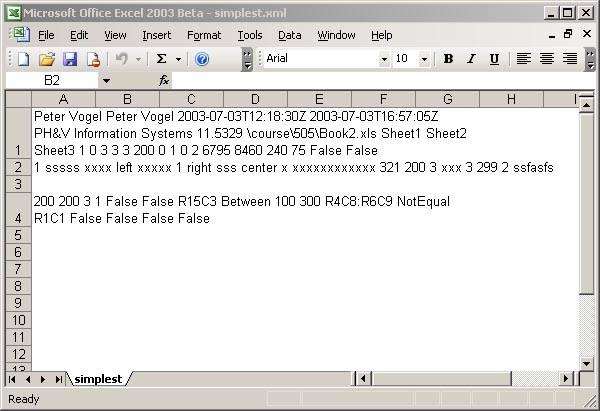
The XML declaration that begins this example is normally optional in an XML document. However, if you omit it, Excel won’t display the spreadsheets in the Workbook correctly (see Figure 1).
Figure 1
The mso-application processing instruction ties this file to Excel. If you put this XML document in a file and save it to your hard disk, the presence of the mso-application instruction causes Windows to use Excel to open the file when the user double-clicks on it—even if you save the file with the XML extension (“MySpreadsheet.XML”).
You can also save this file with the standard Excel file extension, XLS. If you do save your XML file with the Excel extension of XLS, you can omit the mso-application processing instruction because the normal Windows file associations will cause Windows to associate Excel with the file. Excel will continue to save the file in XML format even though it has the XLS extension.
In the sample document, the Workbook element is the root element for the XML spreadsheet document. Each Worksheet element within the Workbook element defines a Worksheet when displayed by Excel.
A Workbook element doesn’t have to include any Worksheet elements—Excel will still successfully open the file, though there won’t be anything in the Workbook. This sample might be better referred to as the simplest useful XML Workbook—as it would, at least, allow the user to enter data.
You may also be wondering about the “xmlns” attributes on the Workbook element and the “ss:” prefix used with the some of the elements. If you’re new to XML, the sidebar “XML Namespaces” may be helpful to you.
Creating a spreadsheet
The heart of an Excel document is the spreadsheet itself. A spreadsheet is defined by the Table element inside a Worksheet element. Within the Table element, a Row element is used for every row that holds data. Within the Row element, a Cell element is used to define every cell that holds data.
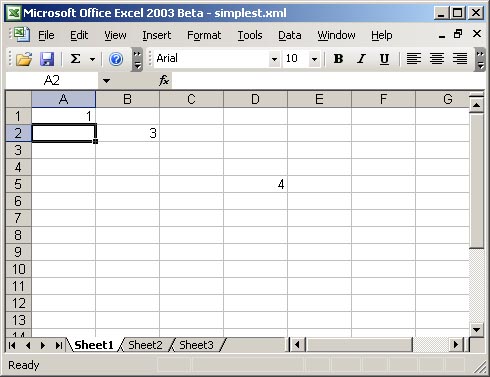
Figure 2
This example puts numbers in cells A1 and B2, and a formula that adds the two of them together in cell D5 (the spreadsheet can be seen in Figure 2):
<ww:Worksheet>

 <ss:Table>

   <ss:Row>

       <ss:Cell>

           <ss:Data ss:Type="Number">1</ss:Data>

       </ss:Cell>

   </ss:Row>

   <ss:Row>

       <ss:Cell ss:Index="2">

           <ss:Data ss:Type="Number">3</ss:Data>

       </ss:Cell>

   </ss:Row>

   <ss:Row ss:Index="5">

       <ss:Cell ss:Index="4" ss:Formula="=R1C1+R2C2">

           <ss:Data ss:Type="Number">4</ss:Data>

       </ss:Cell>

   </ss:Row>

 </ss:Table>
As you can see, only the cells with something in them get defined in the XML spreadsheet. Since there’s only data in rows 1, 2, and 5, there are only three row elements in the document. As long as the rows are side by side, all you need to specify is the Row tag. This would define the first two rows in a spreadsheet:
<ww:Worksheet>

 <ss:Table>

   <ss:Row>

     ...row information...

   </ss:Row>

   <ss:Row>

     ...row information...

   </ss:Row>
However, because my example doesn’t have anything in rows 3 or 4, the Row tag for the fifth row has an attribute called Index that specifies that this Row element is defining row 5 (ss:index=”5″) in the spreadsheet.
This XML fragment uses the Index attribute to define rows 2, 4, and 6, for instance:
<ss:Table>

   <ss:Row ss:index="2">

        ...row information...

   </ss:Row>

   <ss:Row ss:index="4">

        ...row information...

   </ss:Row>

   <ss:Row ss:index="6">

        ...row information...

   </ss:Row>
Within a Row element, the Cell tag defines the row’s cells in a way very similar to the way that rows are defined: Only the cells that have something in them appear in the document. As with the Row element, the Index attribute on the Cell tag specifies the column that the cell appears in. And like a Row, only the first Cell following an empty column for the row needs an Index attribute.
Adding data and formulas
Now that you can create a spreadsheet, you’ll want to put something in it. Within the Cell element, the Data element holds the value for the cell (even if the cell has a formula that calculates the cell’s value dynamically). The Data element has a Type attribute that holds the data type of the data in the cell. Valid values for the Type attribute are Number, DateTime, Boolean, String, and Error. This cell holds the string value “Monday”:
<ss:Cell>

   <ss:Data ss:Type="String">Monday</ss:Data>

</ss:Cell>
The Cell tag also has a Formula attribute that holds the formula for a cell (if the cell has a formula). Formulas are written in “R1C1” format rather than the format that Excel uses in its user interface (for example, “A1”). In R1C1 notation, cell B2 is written as “R2C2” (Row 2, Column 2).
Formatting with style
It’s not enough to have data in your spreadsheet—you’ll also want to format it. In the Excel user interface, there appear to be two strategies for formatting: You can apply formatting to an individual cell or you can define a style and apply the style to one or more cells. In an Excel XML spreadsheet, there’s only one strategy: Define a style and then apply it to the cell.
A style is defined using a Style element inside the Styles element that appears in the XML document just before the Worksheet element and after the ExcelWorkbook element. This example defines two styles: The first style has an ID of “Default” and a name of “Normal”; the second style has just an ID of “s22”:
...

</x:ExcelWorkbook>

<ss:Styles>

  <ss:Style ss:ID="Default" ss:Name="Normal">

     <ss:Alignment ss:Vertical="Bottom"/>

     <ss:Borders/>

     <ss:Font/>

     <ss:Interior/>

     <ss:NumberFormat/>

     <ss:Protection/>

  </ss:Style>

  <ss:Style ss:ID="s22">

     <Font x:Family="Swiss" ss:Size="12" ss:Bold="1"/>

     <ss:NumberFormat ss:Format="0.00;[Red]0.00"/>

  </ss:Style>

</ss:Styles>

<ss:Worksheet ss:Name="Sheet1">

...
A style that has a Name attribute will be displayed in the list of styles in the Format | Style dialog in Excel. The first style in my example is the one called “Normal” in the Excel style dialog, for instance. Since the second style in my example doesn’t have a name, it won’t appear in the Style dialog.
The second style uses the Font tag to specify a font style (Swiss), a font size in points (12), and turns on bolding. The second style also includes a NumberFormat that specifies that the data is to appear with two decimals when positive, and two decimals in red when negative.
Now it’s just a matter of applying the defined style to the cell where you want to use it. That’s done with the StyleID attribute on the Cell tag. This example applies the second style (s22) to the cell in my example that has the formula:
<Row ss:Index="5">

  <ss:Cell ss:Index="4" ss:StyleID="s22" ss:formula=...
You can apply formats to both whole rows and columns. For a row, you just need to use the StyleID attribute on the Row element. For columns, you must use a Column element (all Column elements appear after the Table element and before the first Row element). The Column element has an Index attribute to specify the column to be formatted and a StyleID attribute to hold the style reference. This example applies the s22 style to the first row and the third column:
...

<ss:Table>

   <ss:Column ss:Index="3" ss:StyleID="s22"/>

   <ss:Row ss:StyleID="s22">

       <ss:Cell>
This has just been an introduction to XML spreadsheets, but it’s enough to get you started: You can define rows and cells, put data or formulas in them, and format your results. The easiest way to find out more is to create a spreadsheet that does something that you’re interested in, save it as an XML spreadsheet, and then open the document in Notepad. In this month’s Download file you’ll find a sample database that generates a spreadsheet holding all the order details from the Northwind database. The spreadsheet extends each order line (in other words, it multiplies price times quantity) and totals the value of all of the order lines.
Sidebar: XML Namespaces
In order to understand the format of an XML spreadsheet, you must understand the namespaces used by the XML spreadsheet. The elements that make up Excel XML are divided into three groups:
- Tags that define a spreadsheet.
- Tags that define everything else in Excel XP.
- New tags added to support the new functionality in Excel 2003 (primarily mapping XML documents).
In addition, Excel spreadsheets can include HTML tags, SOAP tags, and tags from other XML dialects. To keep tags from different dialects separate, XML uses namespaces.
A namespace is an arbitrary string of characters that’s associated with a set of tags. When processing an XML Workbook, Excel can check to see what namespace is associated with each tag to determine what kind of tag it’s working with. This allows the Excel XML designers to have an Excel tag called “Table” and be able to distinguish it from the “Table” tag in HTML: The Excel tag will be in one of the Excel namespaces and the HTML tag will be in the HTML namespace.
In the sample document (available in the Download file), you can see two of the namespaces defined on the Workbook element (one is defined twice):
<Workbook

  xmlns:x="urn:schemas-microsoft-com:office:excel"

  xmlns="urn:schemas-microsoft-com:office:spreadsheet"

  xmlns:ss="urn:schemas-microsoft-com:office:spreadsheet">
The last two lines define a namespace ending in :spreadsheet, which is the ExcelML namespace that holds tags associated with defining spreadsheet functionality (which I’ll call the “spreadsheet namespace” in this article). The last line associates the spreadsheet namespace with the prefix “ss.” The second to last line doesn’t associate the spreadsheet namespace with any prefix. Because the second line doesn’t use a prefix, the spreadsheet namespace becomes the default namespace for the document (in other words, any tag that has no prefix will also be associated with the spreadsheet namespace).
For example, in the sample Excel document, the Workbook’s Name attribute has the ss prefix (“ss:Name”) so the Name attribute will be considered part of the spreadsheet namespace. However, the Workbook and Worksheet elements have no prefix at all. They’re tied to the spreadsheet namespace in the namespace’s role as the default namespace.
The following example uses the ExcelWorkbook element. In this example, I’ve included the elements used to control the size and position of the Workbook window within Excel:
<x:ExcelWorkbook

 xmlns:x="urn:schemas-microsoft-com:office:excel"

  <x:WindowHeight>9120</x:WindowHeight>

  <x:WindowWidth>10005</x:WindowWidth>

  <x:WindowTopX>120</x:WindowTopX>

  <x:WindowTopY>135</x:WindowTopY>

</x:ExcelWorkbook>
As you can see, the ExcelWorkbook element and its children have a prefix of “x:”. This prefix ties the elements back to the namespace that ends with “:excel”.
Getting the right elements into the right namespace is critical to creating a valid Excel XML spreadsheet. Excel won’t properly process an ExcelML tag unless it’s tied to the correct namespace.
Other Pages that you may wish to read
