Dynamically changing your form’s properties at runtime can often provide a better experience for your users. Rick Dobson shows you some secrets for dynamically changing your form’s background as it gains and loses focus, keeping subforms in view, and providing colorful feedback for data.
In last month’s issue of Smart Access, I took a look at manual and programmatic means of applying Conditional Formats on Access Forms. As easy and powerful as conditional formats can be to use, they expose just a very small subset of the full range of Access formatting features. One of the great strengths of Access is that you can implement nearly all formatting features at design time from a form’s Properties window. In recent versions of Access, Microsoft even resorted to exposing a form’s Properties window at runtime, but this window is potentially confusing for the typical user of many Access applications. Beyond that, the availability of the Properties window at runtime still doesn’t enable the form and form control properties to be changed dynamically at runtime.
Tapping the full power of Access to format forms at runtime requires a grasp of Access form events. Programming form event procedures to manage form and form control properties is definitely more complex than creating conditional formats or using a Properties window at design time. However, the payoff for a professional Access developer is the ability to dynamically set any form formatting property at runtime.
In this article I’ll show you how to make sure that your user knows which form is the currently active form, how to keep a subform in view as the user resizes the master form, and how to use shaded backgrounds to let your user read form data “at a glance.”
You might want to review Access form events as described in the sidebar “Overview of Form Events.”
Formatting with GotFocus and LostFocus events
One of the most visually dramatic changes that you can make to a form involves changing the image that tiles across the background of a form. You can use a form’s Picture property to specify a bitmap or other file type containing an image that a form shows on its background. The PictureTiling property determines whether a form shows a single copy of the image or whether the image is tiled across a form’s background.
Form1 and Form2 in the SA1104 project (SA1104.mdb) are Access forms without any controls. What’s special about these forms is a single line of VBA code in their GotFocus and LostFocus event procedures that changes the Picture property for each form. Additional code in the Load event procedures for both forms refines the setting to tile the picture specified by the Picture property as well as perform other formatting.
Figure 1 shows Form1 selected so that it has the focus (the form has a background image with the text Got Focus). In the figure, Form2 appears unselected. When you open a form, such as Form2, it initially has focus. Selecting Form1 after opening Form2 causes Form2 to lose focus (in the figure, the text in Form2’s background image says Lost Focus). Figure 1 also shows the Database window for the SA1104 project. If a user selects the Database window, the image for Form1 will change to show Lost Focus. With the Database window selected, clicking either Form1 or Form2 will cause the picture in the background for the form to change so that Got Focus appears for the most recently selected form.

Figure 1
The following excerpt from the code in the module behind Form1 shows the simple code that manages the re-formatting of Form1 and Form2 as it gains and loses focus. The Load event procedure begins by setting the form’s PictureTiling property to True. This assignment causes the image specified by a form’s Picture property to tile across the background of a form. Other assignment statements turn off navigation buttons, record selectors, and dividing lines. The last assignment in the Load event procedure suppresses the automatic appearance of scroll bars when all of a form’s content doesn’t show in a form’s window.
The magic for this simple re-formatting occurs in the GotFocus and LostFocus event procedures. The GotFocus event procedure assigns gotfocus.bmp to the Picture property of a form. Therefore, whenever the GotFocus event fires, the image in the gotfocus.bmp file tiles across the form’s background. The image file resides in the articles folder of the c:\ path. You’ll probably need to update the path for the image files on your computer.
The LostFocus event assigns the lostfocus.bmp file to the Picture property of the form. As a consequence, the image in the background of the form updates depending on whether the GotFocus or LostFocus event fired last:
Private Sub Form_Load()
    Const acScrollBarsNeither = 0
    Me.PictureTiling = True
    Me.NavigationButtons = False
    Me.RecordSelectors = False
    Me.DividingLines = False
    Me.ScrollBars = acScrollBarsNeither
End Sub
Private Sub Form_LostFocus()
    Me.Picture = "c:\articles\lostfocus.bmp"
End Sub
Private Sub Form_GotFocus()
    Me.Picture = "c:\articles\gotfocus.bmp"
End Sub
Formatting with the Resize event
Since the inception of Access, form designers have been plagued by the ability of users to change the size and shape of a form. This is because controls on a form maintain their size and anchor their position to the form’s top and left borders even while a form changes its size, shape, or both. As a result, controls can appear inappropriately placed or even cropped after the resizing of a form. Controls can sometimes appear cropped after a resizing even when there’s adequate space to show the controls on the form (provided that the controls were moved to the space that’s available on the form).
Whenever a user changes the size or shape of a form, the form’s Resize event fires. You can place code in a form’s Resize event procedure to compensate for the new form dimensions after resizing. The code to achieve this isn’t very difficult for simple forms for the range of typical resizing operations, but the end result can really improve how a form appears after a user resizes it. For complicated forms and to handle all ranges that a user might resize a form, see Stuart Kinnear’s two articles on resizing tools (“Resize With Class” in the May 2000 issue and “Everything About Resizing Controls” in the November 2000 issue).
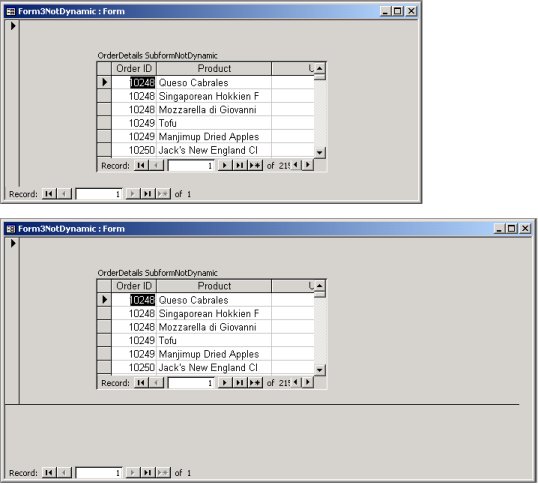
Form3 and Form3NotDynamic in the SA1104 project each include a single subform control based on the Orders Details table. The Form3NotDynamic is an Access form with no code in the module behind it to adjust for changes in the form’s size or shape made by a user. Form3 contains code behind its Load and Resize event procedures to center the subform control both horizontally and vertically within the form.
Figure 2 and Figure 3 contrast Form3NotDynamic and Form3 to demonstrate the effect of the code behind Form3. The top window in Figure 2 shows Form3NotDynamic after it initially opens with the subform control centered within the top window. The bottom window in Figure 2 shows the form after dragging the bottom right corner of Form3NotDynamic to the right and down. In this window, the subform control is no longer centered. In addition, the locations of the record selector, dividing line, and navigation buttons further accentuate the upper, leftward displacement of the subform control.
Figure 2
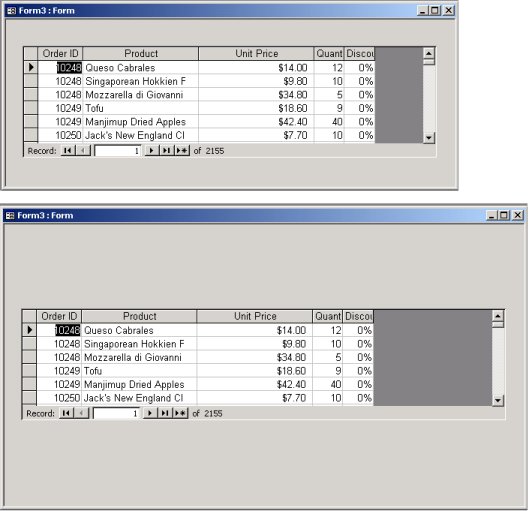
Figure 3
Figure 3 shows Form3 immediately after it opens in its top window and after manual resizing to about the same dimensions as the bottom window in Figure 2. However, you can see that the subform control in Form3 remains horizontally and vertically centered in both the top and bottom windows, thanks to some resizing code. The code behind Form3 also widens the subform control so that the control maintains the same displacement from the left and right edges of its parent container in the top and bottom windows. Form3 also suppresses the visibility of the record selector, dividing line, and navigation buttons.
The following code shows the two lines of code in the Resize event procedure for Form3. These lines merely call two separate sub procedures. The code for centering the subform control is in sub procedures to facilitate the code’s reuse from two other procedures–namely, the Resize event procedure and the Load event procedure. The Load event procedure controls the formatting of Form3 similarly to that for Form1 and Form2, with the exception of the calls to CenterHorizontally and CenterVertically.
Private Sub Form_Resize()
    CenterHorizontally
    CenterVertically
End Sub
The next code is the CenterHorizontally procedure and is just three lines of code. The first line defines a constant of one-half inch or 1440 twips divided by two. I included the constant declaration in the CenterHorizontally procedure for clarity, but the best position for the constant declaration is at the top of the module so that it executes just once each time Form3 opens–not once each time the CenterHorizontally procedure is called. The second line of code re-specifies the width of the subform control to the width of the window for Form3 less one-half inch. The InsideWidth property designates the width of a form’s window. The last line centers the subform control within the width of the form’s window by assigning a displacement for the left edge of the subform within Form3:
Const int1 = 1440 / 2
    Me.OrderDetailsSubform.Width = _
        Me.InsideWidth - int1
    Me.OrderDetailsSubform.Left = _
        (Me.InsideWidth - _
        Me.OrderDetailsSubform.Width) / 2
The code for the CenterVertically procedure has to account for two special issues when it centers the subform control within Form3. One special issue follows from the case where the Form3 height is less than the subform control’s height. The other special issue follows from a distinction between a form’s height and the height of the window for a form. Access allows users to resize the window for a form so that the window has more height than the underlying form’s height. This behavior normally causes no problems. However, in the context of this application, relocating the subform control can raise an error by attempting to move to a position outside the bounds of the underlying form in the form window. The code in the CenterVertically procedure traps the resulting error and makes a compensating setting to the form’s height.
The On Error GoTo statement at the top of the CenterVertically procedure prepares to trap any error resulting from an attempt to move the subform control outside the vertical extent of Form3. The code normally assigns to the intDown variable the number of twips necessary to center the subform control within Form3. If intDown is 0, then no vertical adjustment needs to be made to the subform control. When intDown is negative, the form window has less height than the subform control. In this case, the procedure moves the subform control to the top of the form’s window.
The assignment of the Top property in the Then clause within the code block starting with the TryAgain label can raise an error. This error can result from an attempt to displace the subform control so that it extends beyond the bottom edge of the form. The number for this error is 2100. The error trap code responds by lengthening the height of the form (Me.Detail.Height) at runtime so that the form’s height is 20 percent larger than the height of the form’s window (Me.InsideHeight). Because the form has a Detail section without either Header or Footer sections, the height of the form is the height of its Detail section. After making the adjustment to the form’s height, the error trap transfers control to the code block starting with the TryAgain label.
On Error GoTo Vtrap
Dim intDown
TryAgain:
    intDown = _
        CInt((Me.InsideHeight - _
        Me.OrderDetailsSubform.Height) / 2)
    If intDown > 0 Then
        Me.OrderDetailsSubform.Top = intDown
    Else
        Me.OrderDetailsSubform.Top = 0
    End If
NormalExit:
    Exit Sub
Vtrap:
    If Err.Number = 2100 Then
        Me.Detail.Height = _
        Me.InsideHeight * 1.2
        GoTo TryAgain:
    Else
        Debug.Print Err.Number & _
        vbCr & Err.Description
    End If
Formatting data
It’s typical for designers to need to dynamically alter formatting to reflect the value in a textbox or other controls. Here’s an example of why it’s important to understand how the Access events work. With the Current event:
- You can change the formatting whenever the user moves to a new record in the record source for a form.
- You can change formatting when a form initially loads data for display.
- However, the Current event doesn’t fire when a user changes a value on the current row, so you can’t use this event to respond to user input.
To respond to user-entered data, you can use the AfterUpdate event for a control to change the formatting for the value in a control after updating. While the Current event applies to a form overall, you can create an AfterUpdate event procedure for a whole form or a specific control on a form.
The frmOrderDetails form in the SA1104 project was created with the New Object | AutoForm menu command. The form’s default view is a Single Form. When you’re applying dynamic formatting to controls with event procedures, you should generally use this default view because Access formatting assigned this way applies only to the current row. Figure 4 shows the form for three different records, namely records 2, 1, and 16. The color for the Quantity textbox progresses from a pale shade of blue to a deep shade of blue as the values change. With a single glance, readers can use the color coding to determine the range of the quantity without having to see the actual number. Code behind the form updates the formatting for the textbox based on its current value.
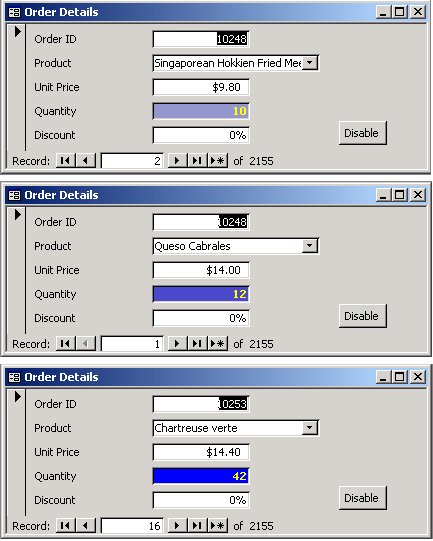
Figure 4
The frmOrderDetails form in Figure 5 can also modify the color of the Quantity textbox in response to an update of an existing value or an insertion of a new value. The form detects both kinds of changes for the Quantity textbox with the AfterUpdate event procedure for that textbox. When the value in the Quantity textbox exceeds 160, the color changes from a shade of blue to deep red. Figure 5 shows the Quantity textbox for record 1 with a red background color (not discernible in the gray scale print image) because its value is updated to a number greater than 160–namely, 1200.
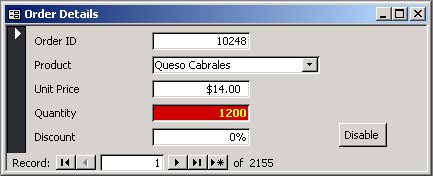
Figure 5
Figure 6 demonstrates yet another formatting feature illustrated by the frmOrderDetails form. You can see that the Discount textbox is disabled. The toggle button on the form enables a user to turn the Enabled property for the Discount textbox on or off with successive clicks to the button.

Figure 6
The following listing presents the Load and Current event procedures for frmOrderDetails as well as the AfterUpdate event procedure for the Quantity textbox. The Load event procedure contains just three lines of code. Its first line assigns a string value to the Caption property for the Toggle1 control. By default, all controls are enabled. The code therefore assigns an initial value of Disable to the Caption property of the toggle button. This signals to the user that clicking the control can disable the Discount textbox. The second and third lines of code in the Load event procedure set the ForeColor property in the Quantity textbox to yellow and the FontWeight property to the largest of nine possible values. FontWeight values begin at 100 and extend through 900.
The Current event procedure for frmOrderDetails and the AfterUpdate event procedure for the Quantity textbox both call the same ColorQuantity sub procedure, which assigns the BackColor property for the Quantity textbox. Using ColorQuantity in both cases simplifies code maintenance because you can make a single change to the ColorQuantity sub procedure and affect the color assignment for both event procedures.
When a user opens the form, the Open and Load events fire one after the other. Then, the Current event fires after the Load event. If a user modifies the quantity for an existing row or inserts a new row, the AfterUpdate event fires for the Quantity textbox:
Private Sub Form_Load()
    Me.Toggle11.Caption = "Disable"
    Me.Quantity.ForeColor = RGB(255, 255, 0)
    Me.Quantity.FontWeight = 900
End Sub
Private Sub Form_Current()
    ColorQuantity
End Sub
Private Sub Quantity_AfterUpdate()
    ColorQuantity
End Sub
The code inside ColorQuantity, which is shown in the following block, includes a single Select Case statement with four Case clauses. The first three Case clauses assign successively deeper shades of blue to the BackColor property for the Quantity textbox. The shades are set by varying the mix of values in an RGB function. Quantity values in the range of 0 through 10 have the least deep shade of blue, and quantities in the range of 41 through 160 have the deepest blue shade possible with a RGB function. Quantity values greater than 160 are captured by the Else case, which assigns a deep red to the BackColor property for the Quantity textbox. The Else case has the capability to handle negative Quantity values, but an Order Details table constraint catches negative values before the change is committed to the table.
Select Case CInt(Me.Quantity)
        Case 0 To 10
            Me.Quantity.BackColor = _
                RGB(150, 150, 200)
        Case 11 To 40
            Me.Quantity.BackColor = _
                RGB(75, 75, 200)
        Case 41 To 160
            Me.Quantity.BackColor = _
                RGB(0, 0, 255)
        Case Else
            Me.Quantity.BackColor = _
                RGB(200, 0, 0)
    End Select
The toggle button control, Toggle1, can have either of two views: elevated or recessed. The Load event associates the initial view with the Enabled property for the Discount textbox. The toggle button appears elevated in this view (see Figure 4 and Figure 5). Clicking the toggle button once causes the toggle button to enter its second view, which appears recessed (see Figure 6). Successive clicks to the toggle button move the button back and forth between its two views.
The Toggle1_Click event procedure switches the caption for Toggle1 and updates the Enabled property of the Discount textbox. Recall that the Discount textbox is Enabled by default and that the Load event procedure for frmOrderDetails initializes the Caption property of Toggle1 to Disable. An If…Then…Else statement in Toggle1_Click, which appears as the last code sample in this article, switches the value of the Caption property for Toggle1 and the Enabled property for the Discount textbox.
 If Me.Discount.Enabled = True Then
        Me.Discount.Enabled = False
        Me.Toggle11.Caption = "Enable"
    Else
        Me.Discount.Enabled = True
        Me.Toggle11.Caption = "Disable"
    End If
By combining form event procedures and simple assignment statements for form and form control properties within decision structure statements, you can readily build forms with dynamic formatting. In this article I illustrated approaches for changing a form’s background image, relocating a control’s position on a form in response to the Resize event, and modifying control properties in response to moving to a new record or changing a value within the current record. The article also highlights a distinction between the height of a form’s window and the height of an underlying form in a form window. This distinction generally doesn’t matter. However, it can be significant when you programmatically relocate controls on a form. If you take the time to learn the techniques covered in this article and reinforce the knowledge you gain with some experimenting on your own, you’ll be well prepared to enable any kind of dynamic form formatting that a client may require.
Sidebar: Overview of Form Events
As an Access developer, you use events so often that it’s easy to take them for granted. Yet it’s critical to understand what causes an individual event to fire as well as the order in which events fire. There are several major groups of Access events–most of which apply to forms. A handful of individual events reside within each of the event groups. The MSDN site offers a succinct taxonomy of classic Access events (http://msdn.microsoft.com/library/default.asp?url=/library/en-us/off2000/html/acproEventsRef.asp) with links for gaining more information about specific event types. The MSDN summary relates individual events to groups and indicates the order of firing for the events within a group. In this article, I concentrated on selected events from the Window, Focus, and Data event groups as part of managing form control properties at runtime.
An Access form appears in a window that users can open to expose the content associated with a form. The content is most often data, but it can be as simple as a background color or an image on a form. When users finish working with a form’s content, they can close the form directly or close either its application or Access. In any of these cases, the window displaying form content closes. The Window events identify selected moments in a form’s lifecycle. The Open event fires when a form is opened, but before it displays any data. The Load event, which occurs after the Open event, fires when a form first shows its data. While a form is open, users can optionally resize it–for example, by dragging its edge or corner. The Resize event fires each time the user finishes resizing a form. The Unload and Close events fire one after the other as a user closes a form.
While a form is open, a user can switch the focus to another control on the same form or to another form so long as the current window isn’t modal–namely, a dialog box. The events involved with the transfer of focus belong to the Focus group. If a form doesn’t have any controls or all of its controls are disabled, the GotFocus event indicates the transfer of focus to a form. After a form gains control, the GotFocus event applies to the individual controls on a form. Similarly, the LostFocus event indicates focus transfers from a form or control. Other events in the Focus group include Activate, Deactivate, Enter, and Exit. The Enter and Exit events apply exclusively to individual controls, while the Activate and Deactivate events reference either Access forms or reports.
The collection of Data events is among the richest Access event groups. This article demonstrates the application of just two particularly robust event types in the Data group. The Current event fires whenever a new record becomes current for a form. For example, the Current event fires after the Load event as a form opens. After a form loads its data, the Current event fires whenever a user navigates between rows, such as for a user browsing data. The Current event additionally fires after the sorting or the requerying of a form’s data. The AfterUpdate event fires for a form or an individual control on a form after a change occurs to data, such as an update to a value in a form control. A large variety of more narrowly configured events catch specific kinds of data changes, such as the AfterDelConfirm and AfterInsert events. Other events in this group signal actions that are about to occur, such as the BeforeUpdate event.
