Mike Toole describes an alternative to the Zoom box that not only looks and works better but avoids the Zoom box’s spurious updates. His design can be used for creating any sophisticated custom dialog.
You never have enough screen space. As a result, you often are forced to set TextBoxes to their minimum size–only the amount of space required for a “typical” entry. However, when an unusually large entry does appear, your TextBox doesn’t display all of the data and users find it difficult to see their information. On the other hand, making a TextBox big enough to display its largest entry doesn’t seem like a reasonable solution because most of the time that extra space will never be used.One solution is to use the built-in Access Zoom box. The Zoom box, opened using Shift+F2, provides a larger viewing space for text data from a control and doesn’t take up any extra space on your form. The Zoom box has been with Access, unchanged, since at least version 2 and is showing its age. Among other issues, when the user closes the Zoom box, the box automatically updates the value in the control whose text it was displaying, even if the user didn’t make a change.
Recently, when I needed a Zoom box for an application, I decided to build a new, improved model. What I had in mind was something that:
- Looks a whole lot better.
- Locates itself on the control being zoomed.
- Can be customized.
- Doesn’t update the original control when the user chooses Save unless data has been changed.
I had one other criterion: Using this new tool had to be a zero-cost solution for the developer. Maybe it’s just me, but I often find that when I create a home-grown utility, by the next time I use it, I’ve forgotten how it works. Since my home-grown solutions aren’t described in the Access Help, I often have to puzzle out how to use it again. So my new Zoom box must also be really easy to use–no more than one line of code to hook my Zoom box to a TextBox.
Designing the Zoom box
Each time a user requests to zoom a control, there are at least four actions to be performed:
- Detect the zoom request.
- Open and position the zoom dialog form.
- Copy the control’s existing value to the Zoom box.
- Reassign the edited value back to the control.
To achieve my one-line target, the code for these actions had to go somewhere other than in the calling form. My solution was to create a class that wraps the zoom dialog form and implements all the required logic “under the covers.” The resulting class can be found accompanying download. To use the class in your own project, just copy the form frmZoom, the class mtZoomText, and the module mtZoomAPIs from the download into your project.
With that setup done, there are only two things you have to do to use the class. First, create an instance of the class in the Open event of your form:
Private mclsZoomText As mtZoomText

Private Sub Form_Open(Cancel As Integer)

  Set mclsZoomText = New mtZoomText

End Sub
Then add this single line of code to the Enter event of any TextBox for which you want Zoom enabled. The single line of code enables the class to monitor the user’s keystrokes when the TextBox has focus:
Private Sub DeliveryNotes_Enter()

' Assign the TextBox to the zoom class

Set mclsZoomText.TextBox = ActiveControl

End Sub
And that’s it! Open the form, set the focus to any TextBox that’s hooked up, press Shift+F2, and voilà–the zoom form is displayed, positioned on the current control (see Figure 1). Any changes to the data are assigned back to the original control when the user chooses Save.
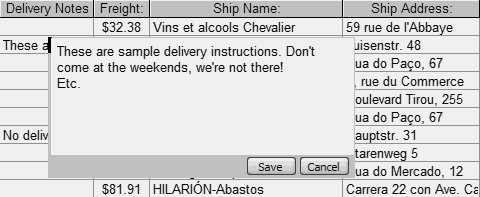
Figure 1
In the download for this article I’ve also enabled the key combination Alt+Z to request a zoom, which I find easier both to type and to remember. You can tailor the code in the class to use any key combinations you want. In the download, you can see the code in action in the frmOrders form. I’ve already hooked up the zoom to the Delivery Notes and Ship Name columns.
By default, the zoom form is positioned over the middle of the requesting TextBox. Also by default the top left corner is used as the anchor, as shown in Figure 1. But if there’s not enough room on the screen to do this, I anchor one of the other corners. I put a vertical red bar in the anchored corner of the Zoom box to make it easier to see where the zoom originated.
How it works
The glue that links your form’s control to the class, and the class to the zoom form, is provided by three module level variables in the class. Two of them use the WithEvents keyword to enable the class to sink their events–that is, to allow the inclusion of event procedures in the class that react to the events of the objects being declared:
Private mfrmPopUp  As Access.Form

Private WithEvents mTextBox As Access.TextBox

Private WithEvents mCmdSave As Access.CommandButton
The mTextBox variable is set via the TextBox property, which you use in the OnEnter event of a TextBox on your form to enable the zoom function for that TextBox. The assignment of “[Event Procedure]” to the onKeyDown property tells Access to raise events for the keystrokes received by the TextBox:
Public Property Set TextBox(Value As TextBox)

  Set mTextBox = Value

  mTextBox.OnKeyDown = "[Event Procedure]"

End Property
Once the control is hooked to the event, the class’s mTextBox_KeyDown event procedure monitors the user’s keystrokes for the key combination requesting the zoom. When a request is detected, Keycode is set to zero to block the built-in Access Zoom box, which would otherwise load as well:
Private Sub mTextBox_KeyDown(KeyCode As Integer, _

         Shift As Integer)

If not ((Shift And acShiftMask) And _

(KeyCode = vbKeyF2)) Then

  Exit sub

End If

KeyCode = 0
So that I can later position the zoom form relative to the original TextBox control, I use two Windows API calls to retrieve the control’s coordinates while the control still has the focus. Once that’s done, the zoom form can be opened (hidden, initially, to prevent screen flashes when the form is later repositioned over the zoomed control). I then hook the OnClick event of the zoom form’s Save button, assign the current value of the original TextBox, set the form’s position, and then, finally, make the form visible:
' Open the zoom form

DoCmd.OpenForm cPopUpFormName, WindowMode:=acHidden

Set mfrmPopUp = Forms(cPopUpFormName)

With mfrmPopUp

  Set mCmdSave = .Controls!cmdSave

  mCmdSave.OnClick = "[Event Procedure]"

  .txtZoom.value = mTextBox.Text

  ...

  ...

  MoveSizeZoom ctlRect

  mfrmPopUp.Visible = True

End With
The zoom form has its Modal property set to Yes so that the form retains the focus until the user clicks the Save or Cancel button after editing is complete. Cancel simply causes the zoom form to close itself, after which focus returns to the original form. The Save button’s Click event is handled in the zoom class, which passes the update back to the original TextBox before closing the zoom form:
Private Sub mCmdSave_Click()

 If Nz(mTextBox) <> Nz(mfrmPopUp.txtZoom) Then

    mTextBox.value = mfrmPopUp.txtZoom

    DoCmd.Close acForm, cPopUpFormName

End Sub
Zoom form design
The zoom form itself is very simple, consisting of only four controls (see Figure 2):
- txtZoom, where the data is edited
- cmdSave
- cmdCancel
- shpAnchor, a rectangle control for display in the corner of the zoom form that’s anchored on the original TextBox
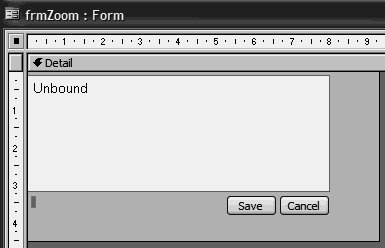
Figure 2
The form’s layout isn’t absolutely critical because the zoom class repositions controls and resizes the Detail section when the form is loaded. Only the left position of the command buttons remains unaltered. The Detail section will be sized just larger than the TextBox so that its back color forms the border of the form. The only logic needed in the form is to handle the Cancel button and to block the built-in Access zoom function:
Private Sub cmdCancel_Click()

    DoCmd.Close acForm, Me.Name

End Sub

Private Sub txtZoom_KeyDown(KeyCode As Integer, _

                              Shift As Integer)

  If (Shift And acShiftMask) And _

     (KeyCode = vbKeyF2) Then

       KeyCode = 0

  End If

End Sub
If you want, you can handle these two events in the class instead of the zoom form. However, if you do, you can’t remove the zoom form’s code module to make it a lightweight form. The module is always required if you want to process events.
Positioning the zoom form
One of the most difficult parts of this project was devising a method for positioning the control. My first attempts were not only complicated but, just when I thought I was getting somewhere, I found scenarios where it just plain didn’t work (for example, forms in a datasheet). This led me to experiment with other methods and, finally, to hit upon a much simpler solution that required only one change to my zoom form: The form’s PopUp property must be set to Yes.
The solution works because an Access control becomes a “real” window when it receives focus and its properties can therefore be accessed using standard Windows API calls. I take advantage of these in the mTextBox KeyDown event to get the originating TextBox’s coordinates so that I can position the Zoom box relative to the TextBox. I call the GetFocus routine, which returns the windows handle of the control that currently has focus (the originating TextBox) and pass that handle to GetWindowRect, which returns the control’s top, bottom, left, and right coordinates in the ctlRect structure (the user defined type, RECT_Type, and the API declarations can all be found module mtZoomAPIs):
Dim ctlRect As RECT_Type

apiGetWindowRect GetFocus(), ctlRect
After the form is opened, I call the procedure MoveSizeZoom to format the form and resize its window. Constants are used to fix the width of the border (in reality, the amount of Detail section background that’s left showing after the controls are positioned), and the width of shpAnchor (the red rectangle that indicates which corner of the form is over the TextBox):
Const cBorderPixels As Long = 1

Const cAnchorWidthPixels As Long = 4
I use a couple of Windows APIs in the class’s initialization procedure to get the twips per pixel values from the screen’s current settings so that pixels can be converted to twips and vice versa:
mfrmPopUp.shpAnchor.Width = _

     cAnchorWidthPixels * mTwipsPerPixelX

After setting the width of shpAnchor, I set the form width as the sum of the anchor marker, the zoom TextBox, and the border widths:

mfrmPopUp.Width = mfrmPopUp.shpAnchor.Width + _

       mfrmPopUp.txtZoom.Width + _

       lngBorderTwipsX
At this stage I encountered a problem. The resulting form width was sometimes a pixel too narrow. This came about because the width of the controls (set in the designer and stored as a number of twips) doesn’t always represent an exact number of pixels. My fix was to include code to round the width and height values of the form’s controls to an exact pixel count before calculating the height and width:
.txtZoom.Height = (.txtZoom.Height\mTwipsPerPixelY) _

                    * mTwipsPerPixelY

.txtZoom.Width = (.txtZoom.Width\mTwipsPerPixelX) _

                    * mTwipsPerPixelX
I found another case of odd behavior when setting the top of the zoom TextBox to form an artificial top border on the form. I had to add in another pixel’s worth of space to the border width to get this to work:
.txtZoom.Top = lngBorderTwipsY + mTwipsPerPixelY

I then position my command buttons relative to the TextBox and set the Detail section's height:

.cmdSave.Top = .txtZoom.Top + .txtZoom.Height + 3 * mTwipsPerPixelY

.cmdCancel.Top = .cmdSave.Top

.Section(acDetail).Height = .txtZoom.Height + lngBorderTwipsY + _

       .cmdCancel.Height + (6 * mTwipsPerPixelY)

Now I can calculate the actual width and height required for the form's window:

lngPopWidth = .Width / mTwipsPerPixelX

lngPopHeight = _

     (.Section(acDetail).Height / mTwipsPerPixelY)
Orienting the form
My last step is to decide where to put the form on the screen. I retrieved the screen’s height/width via API calls in the class’s Initialize procedure, so it’s easy to check whether there’s enough room to display the Zoom as a drop-down. Similar logic decides the left/right orientation. I then set the Top and Left for shpAnchor to place it over the originating TextBox. Finally, I call the MoveWindow API to set the form’s size and position:
If ctlRect.Top + lngPopHeight <= mScreenheight Then

    lngPopY = ctlRect.Top

    mfrmPopUp.shpAnchor.Top = 0

Else

    lngPopY = ctlRect.Bottom - lngPopHeight

    mfrmPopUp.shpAnchor.Top = .Section(acDetail).Height _

                              - .shpAnchor.Height

End If

If ctlRect.Left + lngOffsetX + lngPopWidth _

                          <= mScreenWidth Then

    lngPopX = ctlRect.Left + lngOffsetX

    .shpAnchor.Left = 0

    .txtZoom.Left = .shpAnchor.Width '+ mTwipsPerPixelX

Else

    lngPopX = ctlRect.Left - lngPopWidth + lngOffsetX

    mfrmPopUp.shpAnchor.Left = mfrmPopUp.Width - _

           mfrmPopUp.shpAnchor.Width + mTwipsPerPixelX

    .txtZoom.Left = lngBorderTwipsX + mTwipsPerPixelX

End If

apiMoveWindow mfrmPopUp.hwnd, lngPopX, lngPopY, _

              lngPopWidth, lngPopHeight, True
The class advantage
Using a class as an intermediary to wrap the zoom dialog made it easy to achieve my aim of making the Zoom box’s replacement customizable. For instance, I can change the colors, command names, and TextBox size just by redesigning the form. Which suggests the next enhancement for this control: exposing these as properties of the class that could be set in your form’s Open event when you create an instance of the class.
In later development, I applied this general approach of using classes to manage dialogs when creating a zoom form specifically for working with date fields (that form displayed a dialog containing the standard ActiveX date picker control). In that project I added extra properties in the Date Zoom class to allow the setting of min/max values to control the date selection.
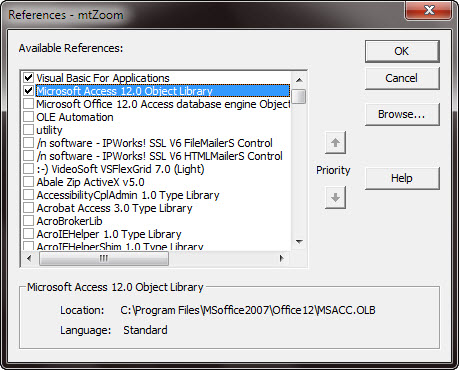
If you import the objects into your database then
Open VBA container, choose Tools menu, choose References
