Excel is an excellent tool for analyzing and graphing data writes Sanjay Singh. Here’s a “generic” utility to transfer data from Access to Excel. It’s so generic that it can be used to create a complete graphing solution without one additional line of code.
I recently carried out a number of projects that combined the strengths of Microsoft Access and Excel: Access for storing and presenting relational information, Excel for analysis and graphing. In this article, I’ll present a function that I developed as part of that project to transfer data from any Access table or query to Excel. This function can be used in your applications without any additonal modifications. To prove that, I’ll also show you how I used the function myself in an application to graph Access data in Excel. This article will also show you a number of useful Excel techniques (including a way of generating graphs without any code at all).
Transferring data to Excel
There are four main ways to move data from Access to Excel:
- Use MS Query from Excel to pull the data from Jet databases.
- Use DAO and VBA from Excel to copy data from Jet databases.
- Use Access to open Excel and write the data in a worksheet using Automation.
- Use the Export macro action to create an Excel worksheet, and then open Excel to view it.
The first two methods can be considered “pull technology,” where Excel pulls the data from Access. The last two methods can be thought of as a form of “push technology.” While using the Export macro action is the simplest way, it’s also the method that offers you the least control, and I’m going to ignore it for this article. Instead, I’m going to concentrate on the third method: pushing the data into Excel from Access. The reasons for choosing push over pull were:
- Historical: In all my projects so far, my users have wanted to push a button in an Access application and generate a graph in Excel.
- Centralized control: The push method gave me much “cleaner” code because all the code (and query definitions) are contained within my Access application. If I’d used either of the first two methods, I would have had to define the query in Excel and shift control between the two applications.
The code to carry out this data transfer is contained in the module basExcel in the database in the accompanying Download file. To use the function, just copy it into your application and call to the function ExcelDataTransfer like this (after checking off Excel in your project’s References list):
| Dim objExcel As Excel.Application
ingReturnCode = ExcelDataTransfer(rsRecordset, _ intStartRow, intStartCol, objExcel) As Boolean |
The function takes the recordset passed in to it and writes all the data in the recordset to a new Excel workbook. The function accepts an optional name of an Excel template, in which case the new workbook will be based on that Excel template. Data can be written to a particular worksheet (and starting at a particular cell) on the new workbook.
During development, I’d considered passing the name of a query to the function and then opening the query within ExcelDataTransfer. I decided to pass in a recordset because it would let me apply filters and sorts to the recordset before passing it to ExcelDataTransfer. The parameters that the ExcelDataTransfer function required are listed in Table 1.
Table 1. The parameters of the ExcelDataTransfer function.
| Parameter | Description |
| rs | This is the recordset to be transferred to Excel. |
| intStartRow and intStartCol |
These are integers representing the starting row and column in the Excel spreadsheet where you wish to copy the data. This lets you choose exactly where you want the data to go in the spreadsheet. |
| objExcel | This object variable is passed back by the function so that you can further manipulate the data in the calling function. This is much better practice than declaring a global variable that can be accessed from anywhere. |
| strTemplate | This is an optional parameter. If you provide a value for this parameter, the new workbook created will be based on this template. Otherwise, a normal blank Excel template will be used. |
| strDataPage | This is an optional parameter. It’s the name of the worksheet in the workbook where you wish to write the data. This is useful if you need to write to a particular worksheet in a multipage workbook. If you don’t pass in a name, the current sheet will be used. |
Under the hood
The complete code for ExcelDataTransfer is in the sample database, so I’ll just go through some of the more interesting parts here. The variables used in the routine are:
| Dim intRow As Integer
Dim strQuery As String Dim varSysCmd As Variant Dim lngRecCount As Long Dim xlsSheet As Excel.Worksheet Dim i As Integer |
Plus, there’s one module-level variable:
| Dim xls As Excel.Application |
The first line in the function checks the RecordCount property of the recordset passed to it in order to see if there’s actually any data to graph:
| If rs.RecordCount = 0 Then
Call MsgBox(prompt:=”There’s no data to graph.” _ Buttons:=vbInformation + vbOKOnly + _ vbDefaultButton1, Title:=”No Data To Graph!”) Else If ExcelOpen() Then ‘code here is explained below End If End If |
Once the function has confirmed that there’s some data to graph, the module-level object variable xls is set using the function ExcelOpen (see the Foundation Concepts sidebar). If ExcelOpen() returns True, the actual data transfer can take place. The rest of the code outlined in this section is inside the If ExcelOpen()EndIf block in the preceding code.
Once I know that I have data and Excel is open, I create a new workbook using the following code. If the name of an Excel template was passed into the function, then I create the workbook using the template. Since the template is an optional argument, I check to see whether it’s present by using the IsMissing function:
| If Not IsMissing(strTemplate) Then
xls.Workbooks.Add strTemplate Else xls.Workbooks.Add End If |
Once the workbook is open, the code sets the object xlsSheet to point to the Excel worksheet to which data will be written. If the name of a data page was passed in to the function in the optional strDataPage argument, then xlsSheet will be set to point to that particular worksheet. Otherwise, xlsSheet will point to the currently active sheet in the new workbook (usually the first sheet):
| If Not IsMissing(strDataPage) Then
Set xlsSheet = xls.Worksheets(strDataPage) Else Set xlsSheet = xls.ActiveSheet End If |
Moving data
I now have a recordset with all the data that I want to transfer, and I have an Excel worksheet to which I want to copy it. I’m ready to take the data across with the following code:
| intRow = intStartRow
Do Until rs.EOF varSysCmd = SysCmd(acSysCmdUpdateMeter, _ intRow – intStartRow) For i = intStartCol To (intStartCol + _ rs.Fields.Count – 1) xlsSheet.Cells(intRow, i).Value = _ rs.Fields(i – intStartCol) Next i rs.MoveNext intRow = intRow + 1 Loop |
As you can see from the code, recordset fields are moved to Excel cells one cell at a time. The outer Do loop moves through each record in the recordset. The inner loop ForNext loops, moves through all the fields in the record, and moves the contents of each field to Excel. The intStartCol and intStartRow are used to control where on the worksheet the first cell will be written.
Finally, I set the object variable objExcel to point to Excel and make Excel visible so that the user can see the transferred data:
| xls.Visible = True
Set objExcel = xls |
I’ve set up the function so that objExcel is one of the parameters of ExcelDataTransfer. As a result, a reference to the active Excel applications is passed back to the procedure that called ExcelDataTransfer. The calling function can then further manipulate Excel to do anything else required by the application.
In the sample database, you’ll find a table called tblMaterials. Here’s some code from the sample database that demonstrates using ExcelDataTransfer:
| Public Function Test() As Boolean
On Error GoTo Test_Error
Dim rs As Recordset Set rs = CurrentDb.OpenRecordset(“tblMaterials”) Debug.Print ExcelDataTransfer(rs, 1, 1, xls) Set xls = Nothing
Test_Exit: Exit Function
Test_Error: MsgBox “Error number ” & Err.Number & “: ” & _ Err.Description, vbOKOnly + vbInformation, “Test” Resume Test_Exit
End Function |
An excellent problem
This is all very interesting, but how would you use ExcelDataTransfer in a real application? I created ExcelDataTransfer to answer a specific request from one of my clients. The company was using an Access database to store its laboratory data. Once or twice a week, this data was copied to an Excel spreadsheet and then graphed to spot trends, and so forth. My client couldn’t use MS Graph from within Access because:
- The data had regression analysis applied to it. This is a function built into Excel and can therefore be applied without any coding.
- A second graph was sometimes needed to support further analysis based on the results of graphing the Access data. Creating a second graph in Excel is very easy to do.
My task was to automate the process of creating the graphs. The senior lab analyst who would be using the application was capable of making queries in Access. He also knew more about Excel than I did. My job was to give him the ability to graph any query he could create in Access and to add new graphs to the system on an ad hoc basis.
In the Access application that I developed, the results of the daily lab tests were recorded in a table called tblData. Another table, tblMaterials, listed the materials that were being tested. Table 2 shows the tblData with some typical data in it.
Table 2. tblData with some data in it.
| ID | Material | Date | intSurface | intTestA1 | intTestA2 | intTestA3 | intTestA4 |
| 98 | Material 1 | 11-Jul-98 | 83.00 | 9.91 | 2.36 | 2.13 | 7.53 |
| 99 | Material 1 | 12-Jul-98 | 89.00 | 8.22 | 0.88 | 1.89 | 7.29 |
| 100 | Material 1 | 13-Jul-98 | 83.00 | 8.03 | 2.82 | 1.02 | 6.95 |
| 101 | Material 1 | 14-Jul-98 | 81.00 | 8.41 | 2.05 | 2.03 | 6.46 |
Creating a graph
The user interface for the application was the form frmGraphPrinter and is shown in Figure 1. The form allows the user to enter criteria to select the data to be graphed, pick a graph, and click either Preview or Print. The data is passed to Excel, which creates the graph and prints it, if required.

Figure 1
The graphs list on the form is drawn from the table tblGraphCbo. The table tblGraphCbo lists all the Excel template files that can be used with this application (see Table 3). The table also lists which query or filter is to be used with this Excel template to create the recordsource that’s passed to ExcelDataTransfer.
Table 3. Fields in the tblGraphCbo table.
| Field name | Description |
| strName | This is the name by which the user will know the graph. This name is displayed in the graphs list on frmGraphPrinter. |
| strFilter | This is the query that defines the data to transfer to Excel. |
| strTempLate | This is the template that a new document is based on (in Excel) when creating the graph. |
The function that’s called to tie the user’s entries on the screen to the form is called GraphMake. It uses the data from tblGraphCbo to run a query, set a filter, and pass some parameters to the ExcelDataTransfer function. After calling ExcelDataTransfer, the code uses the objExcel variable returned from the application to change the title of the graph and then print it out. If you look at the routine in the sample data, you’ll notice that there’s no code to create a Excel graph.
In this application, the Access data is transferred from Access to a new Excel workbook based on an existing template. These templates each contain two worksheets on them, one of which is called “Data.” It’s to this worksheet that the Access data is written.
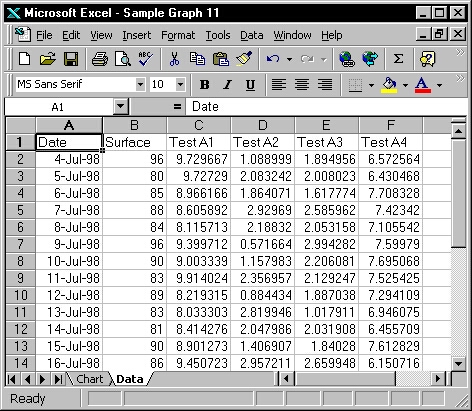
Each of these templates also contains a second sheet, titled “Chart,” which contains the graph to be displayed. The graph is set up in the template to pull the information that it should graph from the Data sheet. As a result, changing the “Data” sheet automatically changes as the graph. All this is achieved without a line of real code — all you need are Excel templates and some Excel magic. Figure 2 shows a typical Data page after having data exported to it, and Figure 3 show the resulting Chart Page of the sample template with data for the sample graphed.
Figure 2
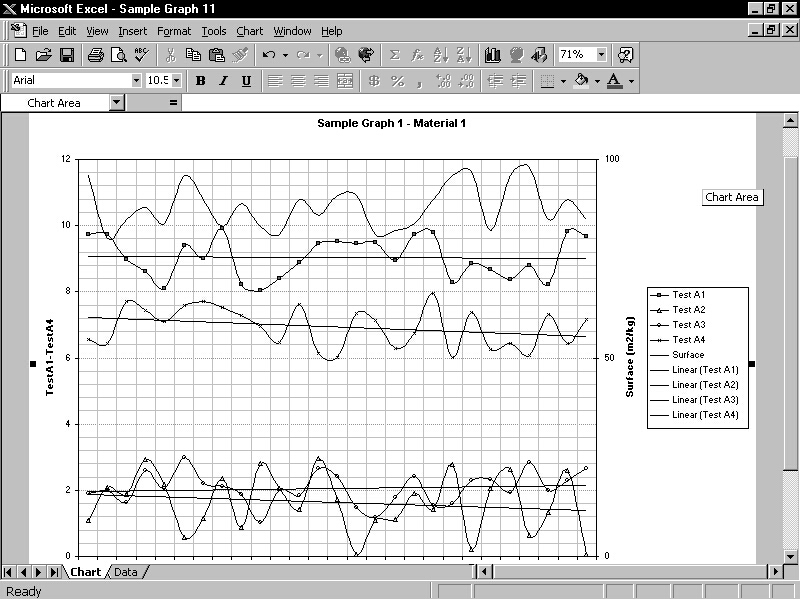
Figure 3 – Charting in Excel
Creating new graphs
Creating a new graph in the application begins with the creation of a new query that extracts data to be graphed. The process to create a template from this query is:
1. Open the query in datasheet to view it in Access. From the Edit menu, select Copy to copy all the records in the query result.
2. Open a blank workbook in Excel.
3. Go to cell A1 and paste the data. All the Access data should be pasted with the field names in row 1.
4. Rename the sheet the data is on to “Data.”
5. Use Excel’s ChartWizard to create the chart that you want. Make sure that, when asked, you save the chart on a new sheet named Chart.
Your workbook should now have one sheet called Data (with the data on it) and another sheet called Chart (with the graph on it). Now comes the tricky part. The Excel ChartWizard will have saved all data ranges as absolute ranges — that is, each data range has an exact start and end cell address. This isn’t suitable to this application because you can never be sure how many rows of data will be returned by the Access query. The problem is solved by changing the data ranges to formulae that cover whatever area is actually occupied by your data. See the sidebar “Charting Variable Ranges in Excel” for instructions on how to do this.
6. Once you’ve changed the data ranges to variable ranges, delete all the data from the Data page except the column titles. You’ll get an error message when you delete the data, but you can ignore it.
7. Save the workbook as a template in the directory of your choice. (For the purpose of this example, save it in C:\My Documents. When you save a workbook as a template, Excel will try to save it to the default Office templates directory. Remember to change this to the directory you want.)
The final step is adding the new template to the user interface by making the appropriate entries in tblGraphCbo. Table 4 shows the entries for a report called Test that uses the query qrySampleGraph1 and the template C:\my documents\Test.xlt.
Table 4. The graph from the data.
| Field | Value |
| strName | Test |
| strFilter | qrySampleGraph1 |
| strTempLate | C:\my documents\Test.xlt |
If you’ve carried out all the steps in creating the template correctly, you should be able to open frmGraphPrinter, choose the new graph, enter criteria, and print your graph out. And this new graph required no new code at all.
Benefiting from Excel
There are a number of benefits in using Excel from Access:
- Financial and scientific functions in Excel: The example graph in the sample database used linear regression lines, but there are a variety of other functions in Excel that Access doesn’t support.
- Formatting without coding: When working with Excel, your new graph can be easily formatted in front of your users (or even by your users) until they’re happy with the results. When the formatting is right, the only additional “development” that’s required is to save the worksheet as a template.
- New graphs can be developed quickly with no code: Once you’re familiar with the creation of templates, new graphs can be added quickly. Because no code is required for a graph, testing time is minimized. In fact, it’s now possible to sit down with the user and carry out the requirements analysis and the development of new graphs simultaneously.
- Excel has a much larger “expert” user base than Access: More people know how to control Excel by entering formulae, creating graphs, and so forth than can create new forms, reports, and so on with Access. This is especially true of business users. If data requires further analysis, then give it to your users in a tool that they can use (without having to call you!). If you’re lucky enough to have a “power user,” as I did, then he or she should be able to carry out formatting functions and add new graphs without assistance.
The last benefit is the most important one to me. With this solution, I’ve put power in the hands of users. I believe that as computer professionals, our true job description should be to work ourselves out of our current jobs. Where possible, we should constantly strive to shift as much of our work to our clients as possible. (Giving work to competitors is normally not recommended.) Shifting control and power to (competent) users gives us the opportunity to develop using newer and more exciting technologies. What more can a software developer ask for?
Your download file is called Singh_XLGraph.accdb and you can download it on this page Office and Office 365 >>
Sidebar: Foundation Concepts
Like all the applications that make up Microsoft Office, Excel is a component. That is, it’s a single application that contains one or more objects that can be exposed to other applications. Access controls Excel by using the methods and properties of those objects through a process called Automation.
The process of using a component varies from Access 2.0 to Access 95/97. Before using a component from Access 95/97, you must set a reference to it. To do this, open a new module in Access and, from the Tools menu, select References. This provides you with a list of all the components on your computer (or, at least, all the ones that have made the necessary entries in the Windows Registry). Select the Excel entry on this list, and you’re ready to use Excel’s objects in your application just like you use the DAO Recordset object. In Access 2.0, you must use the CreateObject function to set your object variable to the main object in Excel:
| Set xls = CreateObject(“Excel.Application”) |
In the sample application, the ExcelOpen() function demonstrates another way to return a reference to the top-level Excel Application object. In ExcelOpen, a call is made to the GetObject() function. This returns a reference to a running instance of Excel:
| Function ExcelOpen()
Dim flgRunning As Boolean Dim varSysCmd As Variant
On Error Resume Next flgRunning = True
varSysCmd = SysCmd(acSysCmdSetStatus, _ “Opening Excel”)
Set xls = GetObject(, “Excel.Application”) If xls Is Nothing Then ‘If Excel wasn’t running, then open it. Set xls = New Excel.Application flgRunning = False End If
If xls Is Nothing Then MsgBox “Can’t Create Excel Object” ExcelOpen = False Else ExcelOpen = True End If
DoEvents
varSysCmd = SysCmd(acSysCmdClearStatus) End Function |
If there are no running instances of Excel, a runtime error will occur and the object xls will be set to nothing. The “On Error Resume Next” line in the beginning of this function will move the function to the next line, where a new instance of Excel will be opened, if necessary.
