In this action-packed episode, Chris Weber shows you how to use AutoKeys, how to create a sorting form, and how to use AutoKeys to enable you to generate this sorting form with a single keystroke.
One of the things that amazes me about Microsoft Access is its tenacity. Access debuted back in the early 1990s and has been going strong ever since. Meanwhile, other products and entire languages have come and gone, are on their way out, or have had to take a completely different course to survive. You could claim that Delphi, an excellent tool and the first of the truly radical RAD tools, is quickly being supplanted by Java and .NET technologies; C++ has been superseded by C#; Visual Basic has been completely transformed to keep up with Microsoft’s .NET initiative. But Access just hangs in there, because it was well thought-out from the outset and there are times when it’s just the right tool for the job.
Compared to other development platforms, the Access IDE is extremely flexible, supporting a level of customization that allows you to create tools without having to work outside your project. When I need a timesaving solution to a particular problem, like changing all the caption properties on a series of 40 reports, I often write a snippet of fix-up code in VBA and just run it. When these snippets look reusable, I’ll insert them into my add-in database of favorite code. When I find myself using a coded technique repeatedly, I’ll either customize my Access toolbars to enable me to call the code from a menu or, when it’s really handy, I’ll create an AutoKeys macro. In case you’ve never used AutoKeys, I’ll show you how in this article, and give you a great tool as your first AutoKeys macro.
Introducing AutoKeys
AutoKeys is the name of a very special macro object that Access looks for in your database. The lines in an AutoKeys macro can be tied to specific keystrokes. When Access finds a macro called AutoKeys in your application, Access allows the keystroke combinations to be executed from anywhere within your application. An example is in order.
Figure 1 shows a pair of my favorite AutoKeys macros: a design view shortcut and a kill-hourglass/screen recovery trick. With these AutoKeys macros in my database, when I press Ctrl+Shift+D together, Access puts the current object into design view. Ctrl+Shift+H kills the hourglass and turns on the screen echo. The first macro is especially handy when you’ve removed design view from your menus, custom toolbars, or shortcut menus; the second when your code has triggered the hourglass or turned off the screen echo and crashed.
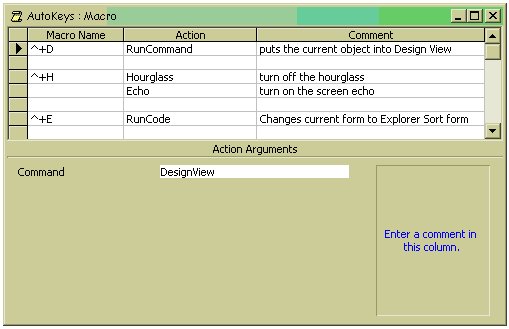
Figure 1
A quick trip to Access Help will show you what the available keystroke combinations for AutoKeys are. They include the Ctrl and Shift keys in combination with letters, numbers, and even keyboard control keys like Insert and Delete (see Table 1). What Help doesn’t tell you is that you can’t use the Alt key (it’s reserved for menus). You can combine the Ctrl and Shift keys to help shield your users from inadvertently pressing your combinations, as I did in my previous two examples. And, of course, I never reveal my key combinations to my users (they shouldn’t need them).
Table 1. Acceptable shortcut key combinations.
| SendKeys syntax | Key combination |
| ^A or ^4 | Ctrl+Any letter or number key |
| {F1} | Any function key |
| ^{F1} | Ctrl+Any function key |
| +{F1} | Shift+Any function key |
| {INSERT} | Ins |
| ^{INSERT} | Ctrl+Ins |
| +{INSERT} | Shift+Ins |
| {DELETE} or {DEL} | Del |
| ^{DELETE} or ^{DEL} | Ctrl+Del |
| +{DELETE} or +{DEL} | Shift+Del |
A shortcut to RunCode
Now that you’re familiar with AutoKeys, I’d like to show you another of my favorite AutoKeys implementations: an AutoKeys macro that uses a RunCode action to turn tabular forms into Explorer Sort forms.
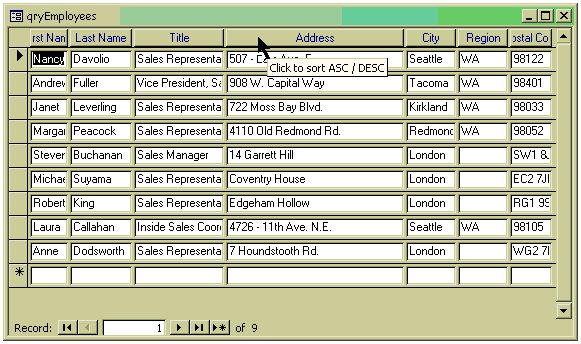
Way back when Windows 95 came out, many developers began to create tabular forms that had Windows Explorer-like column headings that allowed users to sort on a column’s data when the user clicked the column label. There were various versions of these forms and the code that gave them their sorting capabilities. There seemed to be only two designs for the column headers: raised column labels or command buttons. I’ve always stuck with the raised column labels because my users seem to quickly realize that raised controls can be clicked (of course, I always provide suitable Control Tip Text). Also, by using raised column headers, I don’t have to make new command button labels for my tabular forms (see Figure 2).
Figure 2
The code that people generated to provide sorting functionality quickly evolved and was distilled by the Access community into a set of standard routines that everyone seemed to use. Following is my favorite version without error handling. The routine must be passed a reference to the calling form object and the field to sort by. If the field passed in is already being used as the OrderBy property of the form, the code makes the sort a descending sort. The routine will work when called by both main and subforms:
Function ExplorerSort(frm As Form, strFld As String)

If frm.OrderBy = strFld Then

frm.OrderBy = strFld & " DESC"

Else

frm.OrderBy = strFld

End If

frm.OrderByOn = True

End Function
The steps for creating Explorer Sort forms are simple:
- Use the tabular form Wizard to create the basic layout from a table or saved query.
- Switch to design view.
- Delete any columns you don’t need to see.
- Multi-select the column labels and make them raised, centered text, and a bit wider.
- Add Control Tip Text to the selected labels that reads “Click to sort ASC / DESC”.
- Assign the ExplorerSort() function to the Click event of each label, passing in a reference to the calling form and name of the field used for the Control Source of the textbox directly below it.
Here’s an example of the code you should use for the label’s Click event:
=ExplorerSort([Form], "LastName")
With a bit of cleanup, your form is up and running. Lately, I’ve found myself creating a lot of these Explorer Sort forms, and running through the same identical steps to create them began to get rather boring.
AutoKeys to automate
So, it seemed to me, the smart thing to do was to create an AutoKeys macro that would perform those steps with a single keystroke. Automating these steps appears relatively simple:
- Use the tabular form Wizard to create the basic layout from a table or saved query.
- When the Wizard completes its work, press Ctrl+Shift+E to run my MakeExplorerForm() function.
The bulk of the work is now performed by my MakeExplorerForm() function. It switches the Wizard’s form to design view and sets a form variable to point to it. It then loops through all the controls in the tabular form’s header. If the control is a label, it searches for a corresponding control with the same Left position in the detail section. If found, it sets the header control’s OnClick event to my ExplorerSort() function passing in the ControlSource of the corresponding detail control. It then sets several of the header control’s formatting properties:
- SpecialEffect to raised
- TextAlign to centered
- Top to just a hair below the header’s top
- ForeColor to dark blue
- Height to just tall enough to show the label’s text in my default font
- ControlTipText to “Click to sort ASC / DESC”
Once the routine is finished with the header label, the code sets the Height and Top properties for the detail control. Finally, after all the controls have been changed, two lines of code set the form’s Header and Detail height for optimum display. The after results can be seen in Figure 2. Now, when my user clicks on the column label, the data is sorted by the underlying field. Obviously, my form still needs a bit of cleanup, but basically just adjusting the width of the controls is all I need to do.
Public Function MakeExplorerForm()

Dim frm As Form, ctlHeader As Control, ctl As Control

Const QT = """"

DoCmd.RunCommand acCmdDesignView

Set frm = Screen.ActiveForm

For Each ctlHeader In frm.Section(1).Controls

If ctlHeader.ControlType = acLabel Then

For Each ctl In frm.Section(0).Controls

If ctl.Left = ctlHeader.Left Then

With ctlHeader

.OnClick = "=ExplorerSort([Form], _

" & QT & ctl.ControlSource & QT & ")"

.SpecialEffect = 1

.TextAlign = 2

.Top = 0.0313 * 1440

.ForeColor = 8388608

.Height = 0.1667 * 1440

.ControlTipText = "Click to sort ASC / DESC"

End With

Exit For

End If

With ctl

.Height = 0.1771 * 1440

.Top = 0.0417 * 1440

End With

Next ctl

End If

Next ctlHeader

frm.Section(0).Height = 0.25 * 1440

frm.Section(1).Height = 0.2083 * 1440

End Function
Everything you need to implement this technique is in the accompanying download, including my sample AutoKeys macro group and the module basExplorerSort. There’s one caveat to this technique that you need to be aware of: If combo boxes are used for lookups, you’ll have to include the combo’s display field from the parent tables in your form’s record source for sorting. For example, if a combo is used to select a CustomerID but displays the customer name, you’ll want to include the customer name in the record source of the form, so that the sorting takes place by the data visible in the combo box. Start exploring!
Other Pages On This Site You Might Like To Read
