Normalizing your data design is an essential part of creating a database that can be easily updated. However Garry Robinson found it necessary to denormalize his data to provide the users with a user interface that met their needs.
Every now and again you will get a casual enquiry from one of your important clients that makes you dread that you have set up the all-important data model the wrong way. Well, I had one of those moments lately when a client asked if I could set up a data entry form in a different way and I realized that my data model just didn’t suit the request. My first tactic was to look for a diversion and pretend to have a lot of work on my plate and just hope that the request would go away. Well, it didn’t and in a month’s time it was turned into a formal request and I really didn’t have a good answer. Then I was browsing through Helen Feddema’s Access Watch newsletter and presto, she published an article that suggested a solution to that problem. This article describes how I adapted her approach to my problem, which in technical terms could be described as the denormalization of a fully normalized table. This article also describes my adaptation of Helen’s original solution, which turns a normal flat table with lots of fields into a normalized table suitable for grouping by queries.
Garry’s Problem – How To Denormalize A Table For Data Entry
The database that I was working on was for a metallurgical plant that extracted zinc, lead and silver from high grade ore for a mine near the center of Australia. The main purpose of the database was to store and report on about 200 different measurements that are taken twice every day at many different places around the plant. When I was designing the solution, I eventually decided that I need to avoid adding new fields to the tables every time a new measurement was required. So I decided on using a normalized table that was managed by a lookup for each entity as shown in Figure 1.
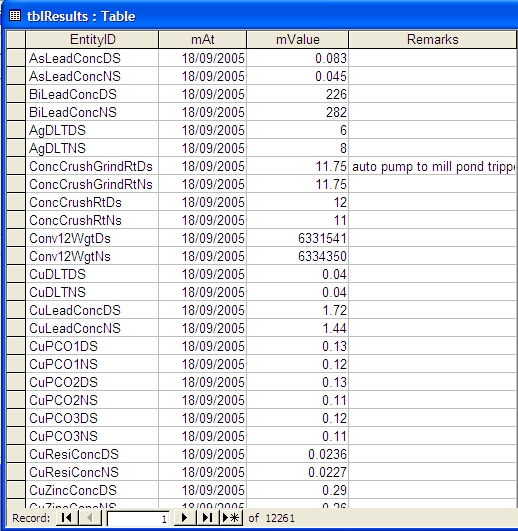
Figure 1 – The Normalized table used in Garry’s database
As you can probably guess, the way the data entry normally was undertaken was for the user to enter a value against each of the entities for each shift/date. This design meant that the data entry would always be top down as shown (in figure 2). This picture is taken from the actual solution that we run at the mine.
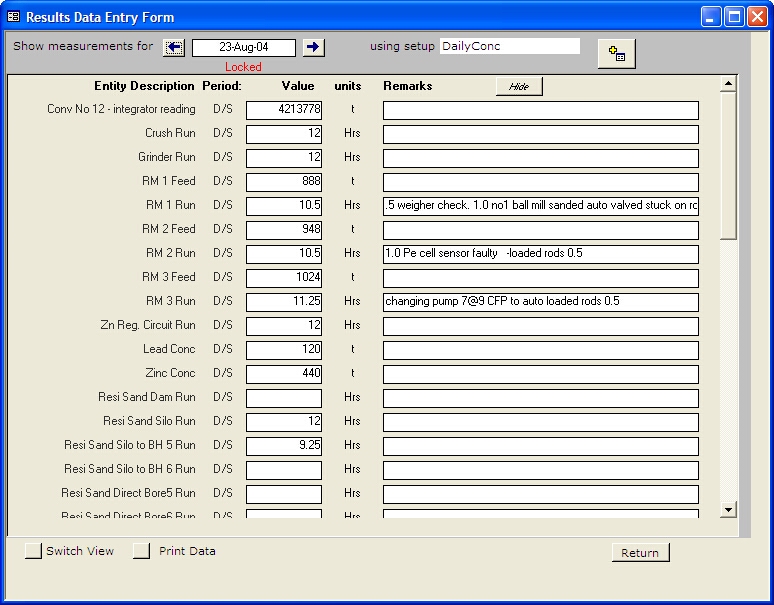
Figure 2 – The data entry from the live system shows the top down data entry for the normalized table.
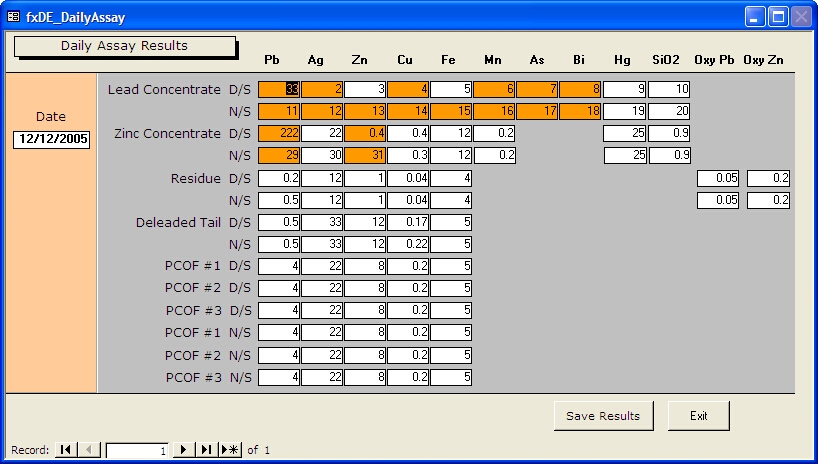
The request that the client was after was to see about 50 fields from the one day on screen all at the one time. This actually meant displaying 50 records from the normalized table at once. To make it even more challenging, the client wanted the fields arranged in a specially configured grid. To understand what the client wanted, have a look at the form in the final solution shown in figure 3.
Figure 3 – The form arranged in a grid. The highlighted fields are those values that are outside the allowed range.
Setting Up The Data Entry Form
After reading Helen’s article, I concluded that the first thing that we need to do is to first create a single record where all the entities in the normalized table are turned into fields. Importantly we need to make sure that the form isn’t already opened because we need to delete the record behind the table before opening the form. In the Garry.mdb database, you will find a form that does this using the following code.
Private Sub cmdGridForm_Click()

Const DATAFORM  As String = "fxDE_DailyAssay"

If CurrentProject.AllForms(DATAFORM).IsLoaded Then

MsgBox "The results data entry form is currently “ & _

“loaded and will be opened in its existing state", & _

vbInformation

DoCmd.OpenForm DATAFORM

Else


DoCmd.OpenForm DATAFORM, , , , , acHidden

Form_fxDE_DailyAssay.loadResults #12/12/2005#


End If

End Sub
Note: Helen prefers to use argument names for clarity, so the DoCmd.OpenForm line would be:
DoCmd.OpenForm formname:=DATAFORM, windowmode:=acHidden
It’s longer that way, but clearer (especially when there are lots of arguments), and you don’t have to count the commas.
If you look at the code above, you will see the statement Form_fxDE_DailyAssay.loadResults which runs a public subroutine of the data entry form called LoadResults. Let’s now look at this important public subroutine (called a method because the code behind a form is a class module). Note: Garry is not fussed and the 55 character limit extends the code to infinitum
Option Compare Database

Option Explicit


' Note: this form must be loaded on local PC and not on a client server

Const DATEFIELD = "mAt"


Public Sub loadResults(dateToload As Date)


' Load the results from the results table for one day

On Error Resume Next


Dim dbs As DAO.Database, fld As DAO.Field

Dim flds As DAO.Fields, rstSource As DAO.Recordset

Dim rstTarget As DAO.Recordset, strPrompt As String

Dim strResultsTable As String, strSourceTable As String

Dim strTitle As String, varValue As Variant

Dim strResultsDate As String


If Me.Visible = False Then


'This procedure should only run if the form

‘is hidden, If it is visible then the user is

‘probably entering data and has not saved it.


'Fill results table

strSourceTable = Me.RecordSource


DoCmd.SetWarnings False

DoCmd.RunSQL "delete from " & strSourceTable

DoCmd.SetWarnings True
Now we are going to populate the “one” record table that is the record source of the data entry table. To start with we will create a new data entry record by adding the date as the primary key. We will add any other data that exists for this record as well, but if this is a new date, we only need to add the date and the user will add the other results into the blank fields on the data entry form.
strResultsTable = "tblResults"


On Error GoTo ErrorHandler


Set dbs = CurrentDb

Set rstSource = dbs.OpenRecordset(strSourceTable, _

dbOpenDynaset)

Set rstTarget = dbs.OpenRecordset(strResultsTable)


'Load todays date

strResultsDate = Format(dateToload, "dd-mmm-yyyy")

rstSource.AddNew

rstSource(DATEFIELD) = CDate(strResultsDate)

rstSource.Update
Now we are going to populate all the fields behind the data entry form and the way that we do this is to match up the records in the normalized table with the fields behind the data entry form. To better understand this concept, look at figure 4 to see how the mapping of a number of the records in the normalized table for a single day translates into data that can be displayed and edited in the data entry form.
'There should only be one record and we will now

‘return to it

rstSource.MoveFirst

rstSource.Edit

Set flds = rstSource.Fields

For Each fld In flds


'Skip first field, and get names and values from

‘the other fields

If fld.Name = DATEFIELD Then

'This field has already been updated

Else

Dim strFieldName As String

strFieldName = fld.Name

‘Retrieve the value in the normalized table

varValue = DLookup("mvalue", strResultsTable, _

DATEFIELD & " = #" & strResultsDate &

"# and entityID = '" & strFieldName & "'")

If Len(varValue) > 0 Then


rstSource(strFieldName).Value = varValue


End If


End If

Next fld

rstSource.Update

rstSource.Close


'Make the form visible

'Display the current record

Me.RecordSource = strSourceTable

Me.Visible = True


End If


Sub_Exit:

On Error Resume Next

DoCmd.SetWarnings True


rstSource.Close


Set dbs = Nothing

Set rstSource = Nothing

Set rstTarget = Nothing

Set flds = Nothing

Exit Sub


ErrorHandler:

MsgBox "Error No: " & Err.Number & _

"; Description: " & Err.Description

Resume Sub_Exit


End Sub
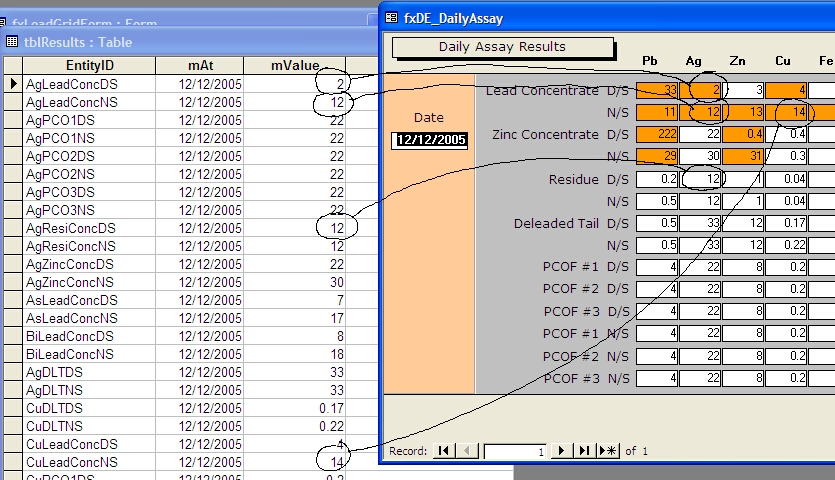
Figure 4 – Mapping of some daily data records to the fields in the data entry form
The Required Form Properties For The Data Entry Form
There are a number of subtle things that you need to change with your form to make it work. Most importantly, you need to set the following properties as listed below.
RecordSelectors = No

NavigationButtons = No

CloseButton = No

Cycle = Current Record
Exiting The Form Without Saving
Now we have the important part of saving the data once it is complete — but before I head down that path, let’s first look at how we will handle the user deciding that they want to quit or exit the form. For this I use the Dirty property of the form to first test if the user has made some changes. This will stop the user from losing 5 minutes of work down the plughole. You will find this code under the Exit button in Garry.mdb
If Me.Dirty Then

okToExit = MsgBox("You have changed information,” & _

“are you sure that you want to exit?", vbOKCancel,   _

"Information Has Been Modified")

Else

okToExit = vbOK

End If

If okToExit = vbOK Then

DoCmd.Close

End If
Exiting The Form And Saving The Results
To save the data entry, I handle all the modifications through the Save Results button which in turn calls a function called TransferToResults as follows.
Private Sub cmdPost_Click()

‘Transfer the results back to the normalized table

On Error GoTo Error_handler

RunCommand acCmdSaveRecord

TransferToResults

exit_cmdPost:

Exit Sub

Error_handler:

MsgBox "Error No: " & Err.Number & _

"; Description: " & Err.Description

GoTo exit_cmdPost

End Sub
Now we will look at how the TransferToResults function transfers all the results back to the normalized results table. To do this, the code will loop through all the fields in the table and create a record for each field. In this sample, I take the easier route of deleting the record if it exists and then posting a new record to replace it. I have also used the Transaction processing option available with DAO to ensure that all the deleting and insert queries are handled in one batch in case of systems failure. If you are interested in transaction processing parts of the code, look for the Execute, BeginTrans, CommitTrans and Rollback statements.
Function TransferToResults()


On Error Resume Next

Dim myWrk As DAO.Workspace

Dim dbs As DAO.Database

Dim fld As DAO.Field

Dim flds As DAO.Fields

Dim rstSource As DAO.Recordset

Dim rstTarget As DAO.Recordset

Dim strPrompt As String

Dim strResultsTable As String

Dim strSourceTable As String

Dim strTableTemplate As String

Dim strTitle As String

Dim strResultsDate As String


strTableTemplate = "tblResults"

strResultsTable = "tblResults"


On Error GoTo ErrorHandler


'Fill results table

strSourceTable = Me.RecordSource


Set myWrk = DBEngine.Workspaces(0)

Set dbs = CurrentDb


'Only commit the records at the end of all the transactions

myWrk.BeginTrans


Set rstSource = dbs.OpenRecordset(strSourceTable)

Set rstTarget = dbs.OpenRecordset(strResultsTable)

Do While Not rstSource.EOF

Set flds = rstSource.Fields

For Each fld In flds


'Create a set of records in the target table

‘corresponding to one record in the source table

rstTarget.AddNew

'Skip first field, and get names and values

‘from the other fields

If fld.Name <> DATEFIELD Then

strResultsDate = "#" & _

Format(rstSource(DATEFIELD), "dd-mmm-yyyy") & "#"

rstTarget(DATEFIELD) = rstSource(DATEFIELD)

rstTarget![EntityID] = fld.Name

rstTarget![mvalue] = fld.Value


'Remove any existing record if it exists

On Error Resume Next

dbs.Execute _

"delete from [" & strResultsTable & "] where “ & _

EntityID = '" & rstTarget![EntityID] & "' and " & _

DATEFIELD & " = " & strResultsDate, dbFailOnError


Select Case Err.Number

Case 0

'Existing record was deleted

Case Else


MsgBox "Problem with deletions"


End Select


rstTarget.Update   'Add new value

End If

Next fld

rstSource.MoveNext

Loop

rstSource.Close

myWrk.CommitTrans


strPrompt = "Results saved for " & _

Format(mAt, "dd-mmm-yyyy")

lblResultsSaved.Caption = strPrompt

lblResultsSaved.Visible = True


Sub_Exit:

On Error Resume Next

DoCmd.SetWarnings True


rstSource.Close

myWrk.Close


Set rstSource = Nothing

Set rstTarget = Nothing

Set flds = Nothing

Set dbs = Nothing

Set myWrk = Nothing


Exit Function


ErrorHandler:


' Something happened, no insert or delete

‘ queries will be committed

myWrk.Rollback


MsgBox "Error No: " & Err.Number,  vbInformation, _

"Transaction was not completed successfully"

Resume Sub_Exit


End Function
Using The Same Technique For A Questionnaire Table
Now I will hand over to Helen Feddema who wrote the original article for the WAW article. Please bear in mind that the code in the CreateResultsTable function in Helen.mdb is very similar to the TransferToResults function that I illustrated in the last section.
A reader asked me how he could convert a table with over 100 questionnaire fields to a more manageable format, with the fields converted to records in a table and to make it easier to tabulate the data. It is indeed difficult and unwieldy (if not impossible) to create a crosstab query with so many fields, so I decided to tell my readers about a technique that I use to switch fields to records.
To see how to achieve this, you would be best to open the download database (called Helen.mdb) that comes with this article. In that database you will find the tblSurvey table (part of which is shown in Figure 5) has the raw data from the questionnaires. It has 44 fields (cut down from the original table, which had over 100 fields). There is a Text field, ID, which is the key field, and the other fields are either Boolean or Text, with the Text fields taking a numeric value from 1 to 5.
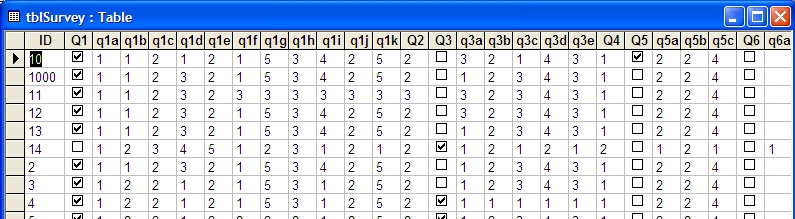
Figure 5. The table with raw survey data in numerous fields
To switch the fields to records, I first created a table (with the prefix zstbl to indicate that it is a system table) with just three fields: SurveyID, a Long Integer field indexed Yes (Duplicates OK), Question and Answer (both text fields). This table is copied to create a results table that is filled from code.
The CreateResultsTable function (which you will find in download database called Helen.mdb) fills a results table with records containing field names and values from the original tblSurvey and creates a totals query based on it (qtotAnswers) that totals the number of Yes, No, and 1 through 5 answers for each question. For convenience, the function can be run from the macro mcrCreateResultsTable, or (for consistency with Garry’s database), the frmCreateResultsTable form. This query is the record source for a simple report, which is shown in Figure 6.
Public Function CreateResultsTable()


On Error Resume Next


Dim fld As DAO.Field

Dim flds As DAO.Fields

Dim rstSource As DAO.Recordset

Dim rstTarget As DAO.Recordset

Dim strPrompt As String

Dim strResultsTable As String

Dim strSourceTable As String

Dim strTableTemplate As String

Dim strTitle As String

Dim strReport As String

Dim strQuery As String

Dim strSQL As String

Dim lngCount As Long

Dim strCurrentDate As String

Dim intResult As Integer

Dim rpt As Access.Report


'If there is already a results table for today, delete it

strTableTemplate = "zstblSurveyResults"

strCurrentDate = Format(Date, "dd-mmm-yyyy")

strResultsTable = "tblSurveyResults_" & _

strCurrentDate

Debug.Print "New table name: " & strResultsTable

DoCmd.DeleteObject objecttype:=acTable, _

objectname:=strResultsTable


'Delete old totals query

strQuery = "qtotAnswers"

DoCmd.DeleteObject objecttype:=acQuery, _

objectname:=strQuery


On Error GoTo ErrorHandler


'Make copy of table template

DoCmd.CopyObject newname:=strResultsTable, _

sourceobjecttype:=acTable, _

sourceobjectname:=strTableTemplate


'Fill results table

strSourceTable = "tblSurvey"

Set dbs = CurrentDb

Set rstSource = dbs.OpenRecordset(strSourceTable)

Set rstTarget = dbs.OpenRecordset(strResultsTable)

Do While Not rstSource.EOF

Set flds = rstSource.Fields

For Each fld In flds

'Create a set of records in the target table

‘corresponding to one record in source table

Debug.Print "Field name: " & fld.Name

rstTarget.AddNew

'Skip first field, and get names and values

‘from the other fields

If fld.Name <> "ID" Then

rstTarget![SurveyID] = rstSource![ID]

rstTarget![Question] = fld.Name

If fld.Type = dbBoolean Then

'Change Boolean to "Yes" or "No" text

rstTarget![Answer] = _

IIf(fld.Value = True, "Yes", "No")

Else

rstTarget![Answer] = fld.Value

End If

rstTarget.Update

End If

Next fld

rstSource.MoveNext

Loop

rstSource.Close


'Create totals query based on new results table

Set dbs = CurrentDb

strSQL = "SELECT [" & strResultsTable _

& "].[Question], " _

& "Sum(IIf([Answer]='Yes',1,0)) AS YesAnswer, " _

& "Sum(IIf([Answer]='No',1,0)) AS NoAnswer, " _

& "Sum(IIf([Answer]='1',1,0)) AS 1Answer, " _

& "Sum(IIf([Answer]='2',1,0)) AS 2Answer, " _

& "Sum(IIf([Answer]='3',1,0)) AS 3Answer, " _

& "Sum(IIf([Answer]='4',1,0)) AS 4Answer, " _

& "Sum(IIf([Answer]='5',1,0)) AS 5Answer " _

& "FROM  [" & strResultsTable & _

"] GROUP BY [" & strResultsTable & "].[Question];"

Debug.Print "SQL for " & strQuery & ": " & strSQL

lngCount = CreateAndTestQuery(strQuery, strSQL)

Debug.Print "No. of records: " & lngCount

If lngCount = 0 Then

strPrompt = "No records found; canceling"

strTitle = "Canceling"

MsgBox strPrompt, vbOKOnly, strTitle

GoTo ErrorHandlerExit

End If


strReport = "rptAnswers"

DoCmd.OpenReport reportname:=strReport, _

view:=acViewDesign, windowmode:=acHidden

Set rpt = Reports(strReport)

rpt.Tag = strCurrentDate


strTitle = "Finished"

strPrompt = strResultsTable & _

" results table created; open report?"

intResult = MsgBox(strPrompt, vbYesNo, strTitle)

If intResult = vbYes Then

DoCmd.OpenReport reportname:=strReport, _

view:=acViewPreview

Else

DoCmd.Close objecttype:=acReport, objectname:=strReport

End If


ErrorHandlerExit:

Exit Function


ErrorHandler:

MsgBox "Error No: " & Err.Number & "; Description: " & Err.Description

Resume ErrorHandlerExit


End Function
The CreateAndTestQuery function listed below is handy for creating (and recreating, as needed) a query in code. It is used to recreate the totals query qtotAnswers, based on the newly created results table.
Public Function CreateAndTestQuery( _

strTestQuery As String, strTestSQL As String)

As Long


On Error Resume Next


'Delete old query

Set dbs = CurrentDb

dbs.QueryDefs.Delete strTestQuery


On Error GoTo ErrorHandler


'Create new query

Set qdf = dbs.CreateQueryDef(strTestQuery, _

strTestSQL)


'Test whether there are any records

Set rst = dbs.OpenRecordset(strTestQuery)

With rst

.MoveFirst

.MoveLast

CreateAndTestQuery = .RecordCount

End With


ErrorHandlerExit:

Exit Function


ErrorHandler:

If Err.Number = 3021 Then

CreateAndTestQuery = 0

Resume ErrorHandlerExit

Else

MsgBox "Error No: " & Err.Number & "; Description: " & Err.Description

Resume ErrorHandlerExit

End If


End Function
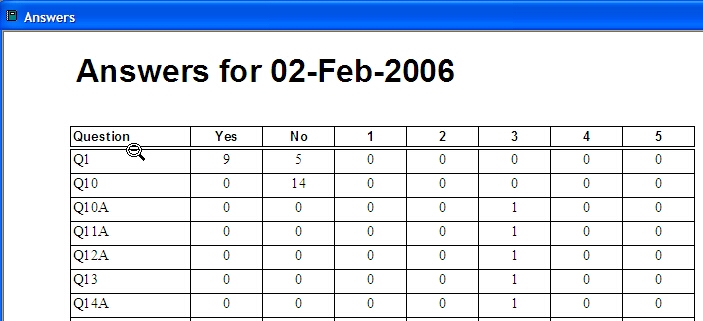
Figure 6. A report based on a totals query giving the number of each answer for each question
Summary
In addition to learning how to redesign your database or configure a denormalized data entry form, one of the things that you can take from this article is the need to continue to keep reading and reviewing good quality publications on topics that suit your profession. In this case I probably would have spent 2-3 days programming if I wasn’t diligent enough to actually read the magazines that I had signed up for. Alas a solution did turn up in my inbox and now I have easily made up the time I have spent quickly browsing the news that passes my way.
Other Pages On This Site You Might Like To Read
Tame the Crosstab Missing Column Beast
